 Using
JavaBeans to Add Dynamic Elements to Web Pages
Using
JavaBeans to Add Dynamic Elements to Web PagesRobert Will
Senior Technical Staff Member
IBM
Carol Jones
Senior Technical Staff Member
IBM
May 1999
Introduction
WebSphere Application Server and WebSphere Studio provide support for building dynamic web applications. Using Java Server Pages, you can create web pages that include data and logic, instead of just static HTML. For example, suppose you want to create a page that includes an option list like this one:
It contains three items (Susie, Rob and John) along with the values to submit when each is selected. Of course this is trivial if you know all the values ahead of time. But if you were building a site to allow people to access the information about people in a department, the information you need to display would be constantly changing, and you'd have to change the page each time you add or delete a person from the department. You can solve this problem by writing a Java Server Pages (JSP) "scriptlet" to create the list dynamically, instead of using static, hard-coded values.
WebSphere Page Designer has built-in support for many different kinds of dynamic elements, so that you don't have to write the JSP code yourself. Many of these are like the HTML tags that you are already familiar with, except that Page Designer generates JSP scriptlets that fill them with dynamic data. Some dynamic elements are simple, displaying just a single data value. Others are more complex, because they can loop through data or even contain other dynamic elements.
In the next few sections, we walk through several examples, so you can understand each how dynamic elements work. You'll build several examples, step-by-step, using WebSphere Studio and WebSphere Page Designer. The remainder of this paper has the following sections:
- Writing JSP Scriptlets
First, we'll explain how to write the JSP code by hand, so you can understand the details of what is happening when your pages runs. - Getting Started with Studio
Then, we'll show you how WebSphere Page Designer makes this much easier. We start by setting up a Studio project and loading the sample beans. - Displaying Bean Properties
In this section, we'll try out some simple dynamic elements. They are a quick way to display a single data value taken from a bean's property. The simple dynamic include Dynamic Property, Dynamic Image, Push Button, Radio Button, Check Box, Text Field, Text Area, and Form. - Dynamic Tables
We'll move on to a really fancy example: a table which has rows that repeat, using dynamic data. We'll do two examples, to show both simple and complex tables. - Dynamic Loops
Sometimes, you don't need a table, but you just want to repeat a section of your page. Dynamic Loops are perfect for solving that problem. - Dynamic Lists
We wrap up by going back to the option list problem, which brought us here in the first place. You'll see how to submit the form, and then use the selected list value on another web page.
If you know how to create Java Beans and JSP pages, you can write the code for the option list yourself. Let's say that you have created two beans. The first has an indexed property that lists all the people and the second bean contains properties that describe each person. The two beans might look like this:
   public class Department {
    public Person[] PersonList;
    public Department() {
    // default constructor
       super();
       // some processing to populate the list of people from the database or file system
    }

    public Person getPerson(int i) throws IndexOutOfBoundsException {
      return PersonList[i];
    }
   } // end of Department

   public class Person {
    public String name;
    public String photo;

    public String getName() {
      return name;
    }

    public String getPhoto() {
     return photo;
    }
   }// end of Person
Then you could add a BEAN tag to your JSP file such as
<BEAN NAME="myDept" TYPE="Department" INTROSPECT=NO CREATE=YES SCOPE=REQUEST></BEAN>
and finally create a JSP scriptlet something like this:
<%
 try {
   Person p = myDept.getPerson(0); // throws an exception if empty.
%>
   <SELECT name="selectedImage">
<%
   for (int i = 0; ; ) { %>
   <OPTION selected value="<%= p.getName()%>"><%= p.getPhoto() %></OPTION><%
     i++;
     try {
       p = myDept.getPerson(i);
     }
     catch (java.lang.ArrayIndexOutOfBoundsException e) {
       break;
     }
   } %>
   </SELECT><%
 }
catch (java.lang.ArrayIndexOutOfBoundsException e) {
} %>
When your page is loaded in a browser, the option menu listing all of the people in the department would be created, much like the one at the top of this page.
But really, this is the hard way. An easier way is to use WebSphere Page Designer to visually create this dynamic option menu, instead of writing the JSP code yourself. Not only is this a lot simpler, it is far less error prone than manually creating and typing in the scriptlet source.
The examples that follow make use of three Java Beans. They are:
- Person: this bean contains a property for first name, last name, address, town, city, zip code, and photo of the person.
- Department: this bean contains a property for department name, department number and an indexed property that contains the set of Person objects in the department
- Organization: this bean contains an indexed property that contains the set of Department objects in the organization.
The constructors of these beans create some sample data for all the properties so that these beans do not require any actual data source. In a real application, the beans would read the data out of a database some other source.
Just to keep things simple, in the following examples, we will specify CREATE=YES on the Bean tag. This will cause the bean to be created when the page is loaded. Alternatively, these beans could also be created within a servlet and passed to the page in the request object or session object.
Setting up the project
First create a new project in Studio. Unzip the Sample Beans and Photos; you'll be adding the files from this zip file into your Studio project. To do this, follow these steps:
- Create a folder named PageBeans under the servlet folder of the project. Using the Insert=>File menu choice, add all the .java and .class files to this folder.
-
Create a folder named Photos under the root of the project, and all the .gif files to that folder.
Example 1: Displaying Bean Properties
Simple dynamic elements are a quick and easy way to display a single data value from a bean. We'll start with something easy. We want to create a page that looks like this:
Hi Rob! Nice photo!
where both the name (Rob) and the photo are dynamically generated from the values of the Person bean. Of course, since we are using sample data, you will see the same value each time you run this example. But if you used fields from the user profile object or some other bean that really used dynamic data, the values would be different.
Start by inserting a new JSP file into your project. You can just use the Sample.jsp template, and rename it to Page1.jsp. Double click on Page1.jsp to edit it in WebSphere Page Designer.
The easiest way to use a bean on the page is by dragging the Person.class file onto the page. The Bean tag dialog will come up. Fill in the fields to match this picture:
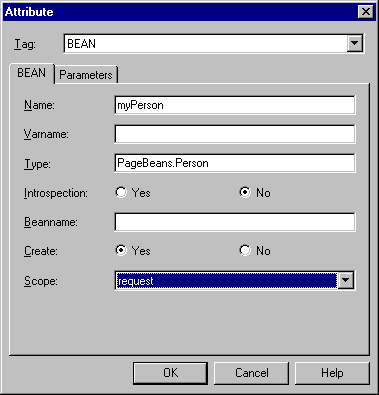
To create the rest of the page, do the following steps:
- Type Hi and then select Insert=>Dynamic Elements=>Dynamic Property.
-
The following dialog appears:
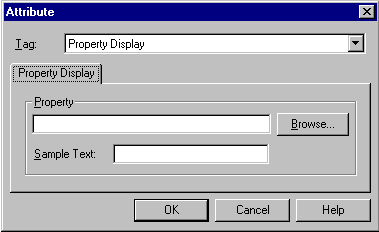
The Property field indicates which property of the bean to display, and the Sample Text field lets you specify some placeholder text that is shown while you are designing the page. This lets you to get a pretty good idea of how the page will look.
-
Fill in the placeholder text. If the property is going to return a short string (like in this case), then you can enter something short (type in Rob for now). If you expect the property to return an entire paragraph, then you can enter an entire paragraph as the placeholder.
-
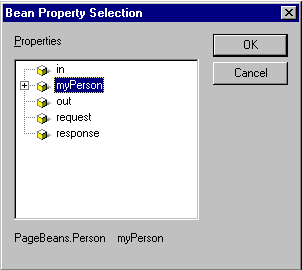
Fill in the property name. You can type it into the field, or better yet, use the Browse button which will bring up the following dialog:
-
Expand the + on the myPerson bean, then select firstName.
-
Back in the page layout window, type ! Nice photo! and then select Insert=>Dynamic Elements=>Dynamic Image. Another property selection dialog appears.
-
Select the myPerson.photo property, like you did with the firstName property before. You can select a placeholder image as well, using any of the images in the Studio project.
-
Save the page and close the file. (Hint: if you plan on editing additional files, just close the page window in Page Designer, but don't close Page Designer itself. This will improve the performance the next time you need to edit an HTML or JSP file.
If you have autopublish turned on, you are ready to try it out. Otherwise, publish the site first. Once the site is published, select Page1.jsp and press F8 to preview the page. You should see
Hi Lois! Nice photo!
Now you should have a pretty good idea of what you can do with simple dynamic elements. They are a quick way to display a single data value taken from a bean's property. Push Buttons, Radio Buttons, Check Boxes, Text Fields, TextAreas and Forms can all be used in a similar manner.
More complex repeating elements, such as dynamic tables, loop over the values of a bean's indexed property. (An indexed property means that the bean has an array of data values for the property.) Inside the repeating element, you can have more dynamic elements. In the case of the table, the rows of the table display data values for each instance of a bean, and the table cells can display other property values. To try out a dynamic table, follow along with these steps:
-
First create Page2.jsp in the same way you created Page1.jsp,
but this time drag Department.class onto the page.
-
Fill in the fields as before except set the name to myDept and the
type should be PageBeans.Department.
-
Create a table with 2 rows and 3 columns.
In the first row, type headings in each of the three columns:
- type Name into the first column
- type Town in the second column and
- type Photo in the third column.
-
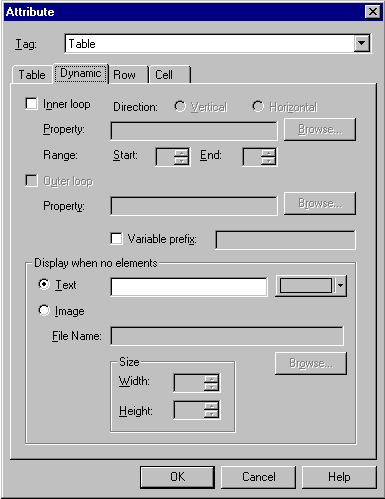
Next bring up the table attribute dialog (alt+enter).
Choose the Dynamic tab which will look like this:
-
Select the Inner loop check box, and choose the myDept.person() indexed property using
the Browse button.
-
You can repeat rows either vertically or horizontally.
Leave it set for vertical since we already entered the headings across the top.
-
Set the Range Start to 2 and End to 2.
This will cause just the second row to be repeated.
After you close the Attribute dialog, note that there are dotted lines around the second row of the table. This is a visual cue that shows you what repeats.
Now, you're ready to insert the data values that you want to display when the rows are repeated. Select the first column, second row and then select Insert=>Dynamic Elements=>Dynamic Property. This should look familiar; this time, expand myDept, expand Person, and then select firstName. Repeat these steps for the town and photo columns. (Be sure to use a dynamic image element for the photo column instead of a Dynamic Property).
If there were other beans on the page, you could select them instead of the ones that we just listed. Of course, the table will be looping through the department bean and so if you choose an indexed property that don't correspond in any way to myDept, the results aren't likely to make much sense. Non-indexed properties can also be used within the looping area, but of course they won't change within the loop. This might be useful if you want to display columns headings.
Save the file and check the result into the project as before. Publish the file if necessary and press F8 to preview Page2.jsp.
Advanced Dynamic Tables
You can try a more advanced dynamic table on your own. Follow the same steps you just learned about, except use the Organization bean. This time, try creating a dynamic table that uses both inner and outer loops.
-
For the inner loop, use choose the organization bean's department.person property. Don't forget to adjust the start and end values so only the third row repeats.
-
For the outer loop, use the organization bean's Department property.
-
To finish up, insert the dynamic text and images along the third row in the same way you've done in the other examples.
Another complex repeating element is the dynamic loop. With this element, you can select a portion of your page, and have that area of the page repeat.
Create a new page, Page4.jsp, and drag the Department.class bean onto the page. Fill in the dialog just as you did in Page2.jsp. Create the same text and dynamic image as you did before, this time by expanding the myDept bean until you navigate down to the firstName and photo properties. Use anything you want for the sample text and image. You should have something like this on your page:
Hi Rob! Nice photo! 
Next, select highlight everything from the H in "Hi" through the image as shown below:

While this area is selected, choose Insert=>Dynamic Elements=>Dynamic Loop. Use Browse to choose the person indexed property as the property to loop on. There will be dotted lines around the area that will be repeated. This is a visual cue that this area is a loop.
Save the file, check it in and preview the page as before. You will see that same sentence repeated for each member of the department. Each line will have a different name and photo. Dynamic ordered and unordered lists can be created in the same way, as well as dynamic text.
Dynamic lists repeat a set of dynamic elements like the tables do. But they are "self contained" because you specify the elements to repeat within the same dialog that you specify the repeating information (unlike for a table, where you specify the contained objects independently of the containing element dialog). We will just show the Dynamic Option Menu. The Dynamic List Box is very similar.
Create Page5 and add the Department bean, exactly as you did in the last example. After defining the bean, place a form on the page (choose Insert=>Form and Input Fields=>Form). Set the form's submit action to Page6.jsp. Also go ahead and put a Submit button in the form, using the form toolbar.
- Then, choose Insert=>Form and Input Fields=>Option Menu to add the drop-down list. Specify a name (we'll use "selectedImage") just like for an ordinary option menu.
-
Instead of defining any items or values for the option menu, choose the Dynamic tab. Use the person indexed property as the property to loop on as before.
-
Check the checkbox next to Item Property that says Specify by Property and then Browse for the firstName property.
-
Repeat these steps for the for the Value setting, this time using photo as the property. (Note: the photo property returns the name of the photo, such as "rob.gif", not the actual photo. Since you aren't inserting a dynamic image, this value will not be combined with an image tag, but instead will be treated as the string value to send to the server when the corresponding name is selected.)
When you created the form, you set the action to Page6.jsp, which means that whenever an item is selected from the option menu, the form will submit the value to the server, and then display Page6.jsp.
Creating Page6 is quite easy. There is no need to add any bean to the page. Simply create a new JSP page named Page6. Choose Insert=>Dynamic Element=>Dynamic Image. This time, however, the browse button won't help much. The attributes passed into the page in the request object are not properties so they cannot be selected that way. Instead type request.getParameter("selectedPhoto"). This will use the value (such as "rob.gif") that is passed from your Page5 input form as the value of the image property.
Save the file, check it in and preview Page5 (not Page6). Select a name on the option menu, click Submit and this will submit the image name to Page6 which will show the correct image.