Chapter 1
*Essentials of Microsoft Visual Basic
*Certification Objectives
*Understanding Microsoft Visual Basic–Based Development
*From the Classroom
*Jump on the Bandwagon
*Creating an Application
*Creating the User Interface
*Writing the Code for the Kilo Program
*Debugging and Error Handling
*Debugging
*Error Handling
*Compiling an EXE File
*Certification Summary
*Two-Minute Drill
*Self Test
*
This chapter will familiarize you with the essentials of Microsoft Visual Basic 6.0 (VB). You will be introduced to the VB environment and all the tools available to assist you in developing applications. You will also create two sample applications, one of which you will be guided through, the other will involve minimal help from the book. You will then be introduced to the debugging and error-handling processes used in VB. Finally, you will compile your sample application so that it creates an EXE file, allowing it to run on other computers.
VB contains many tools to assist in the development of your applications. These tools allow you to see exactly how your program will look when it is completed. This provides the VB user a tremendous advantage over nongraphic programming languages that do not allow you to see how your program will look until you are finished.
VB is rapidly becoming the center of the application programming universe. While competitors like PowerBuilder try desperately to maintain a grip on the rapidly eroding developer base that has plateaued in recent years, VB has become the king of the development build. No other language can boast the vast number of developers currently using one form of the language or another. Between Visual Basic for Applications, VBscript, and the full-blown VB language, programmers are storming to the forefront of the development frontier.
With each new revision of Microsoft’s language for the masses, the capabilities of V allow developments to create ever more versatile applications. VB version 5 was the detonator that generated an explosion in the commercial ActiveX control market. VB version 6 is poised to bring DTML and COM-based application development to the general public. Finally, Enterprise application development is finally a reality to the millions of developers who call VB their language of choice.
Creating an application in VB now provides users with some additional unique choices with the latest release of VB. IIS Applications help VB developers create applications that live on a Web server, responding to users with HTML pages. Made up of a Webclass object and Webitems, VB provides the integrated design environment that makes the transition from client/server to Web-based application development a snap while providing cross-platform capatibility. DHTML applications within VB provide the extensive flexibility and ease of the VB IDE, while leveraging the advanced capabilities of the DHTML object model for thin-client HTML page applications almost indistinguishable from traditional, fatter binary applications.
With the massive number of enhancements and capabilities that Microsoft has loaded into the latest version of VB, take care to avoid using the whiz-bang features just for the sake of exploration. When it comes to exam time, remember: Microsoft is interested in promoting and generating momentum for the advanced features of its newest version of VB. As you work your way through preparations for the desktop exam, don’t forget . . . Microsoft VB is about bringing application development to the Web.
—by Michael Lane Thomas, MCSE+I, MCSD, MCT, A+
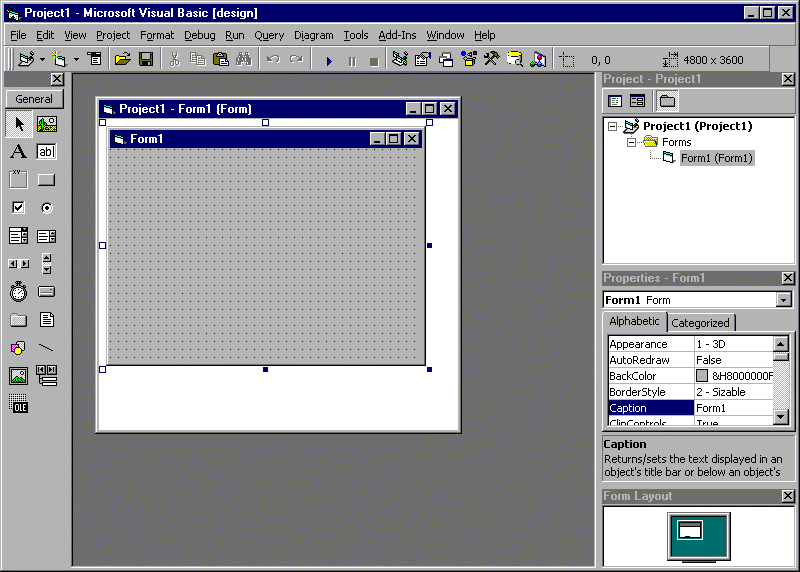
First of all, let’s take a look at what the VB interface looks like by examining Figure 1-1. Though at first it may look somewhat intimidating, it’s really not that complicated.

Figure 1: The VB interface
We will examine these tools and how they can help you create applications.
The menu bar provides the user with most of the commands that control the VB environment. This menu bar operates according to Windows-based standards, and the commands can be accessed by using either the mouse or keyboard.
The toolbar is located directly below the menu bar and is a collection of buttons that provide shortcuts for executing commands and for controlling the VB programming environment.
The toolbox, as shown in Figure 1-2, contains various controls that will be used to construct your application. Some of these are command buttons, text boxes, labels, combo boxes, and so on. To place one of these objects on your form, the basic building block of a VB application, you only need to click on that particular control, then highlight an area on the form where you would like the control to be placed. These controls become known as objects once they have been added to a form. The toolbox is also user-friendly in that when you place the mouse cursor over any particular control, the name of that control will be displayed (known as a ToolTip).
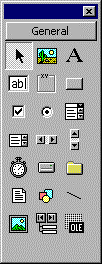
Figure 2: The toolbox
The project container window contains the Form window. The Form window is used during the design process. It is the area on which objects are placed during design time.
Figure 1-3 shows the Form Layout window, which allows you to see where the form will physically appear on the screen during runtime. When you change the location of the form, it will be reflected in the Form Layout window.
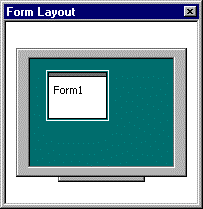
Figure 3: The Form Layout window
The Properties window, as seen in Figure 1-4, allows you to change the property settings of the objects on your form. For example, by utilizing the Properties window, you may change the font size, background color, name, and so on of the form, as well as changing the properties of the objects on your form. The Properties window also contains a drop-down box that will allow you to see all the objects on your form. Additionally, VB only displays those properties that you have the ability to change.
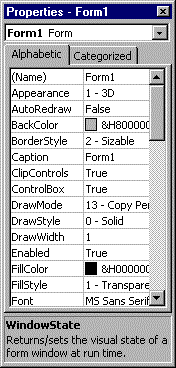
Figure 4: The Properties window
The Project window, shown in Figure 1-5, allows you to see the various files that are contained in your VB project. The Project window will also tell you the name of the project, in this case an unnamed project with the default title of Project1 in parentheses, and any forms with the same naming convention. The Project window also displays any modules, user controls, and property pages that may be associated with the project.
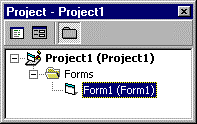
Figure 5: The Project window
The Project window contains three buttons. The first button allows you to view the code in the project. The second button allows you to view the objects in the project. The third button toggles the folders in the Project window. When the toggle folder button is highlighted the folders are expanded, showing the contents of each folder.
Now that you’ve been introduced to the VB environment, it’s time to see how to use the visual environment to create an application. Of course, any project demands some sort of planning and VB is no different. Once you have decided what you wish to develop, you will need to plan how you would like it to appear. When you have passed the planning stage, it’s time to start working. For this example, we will create an application that converts values in kilograms to values in pounds. Basically, there are three steps to creating an application. The first step is to create the user interface, which includes placing the objects and setting their properties. The second step is to write the code for the program. The third step, if necessary, is to do the debugging. Let’s get started!
When you launch VB the New Project dialog box, shown in Figure 1-6, appears.
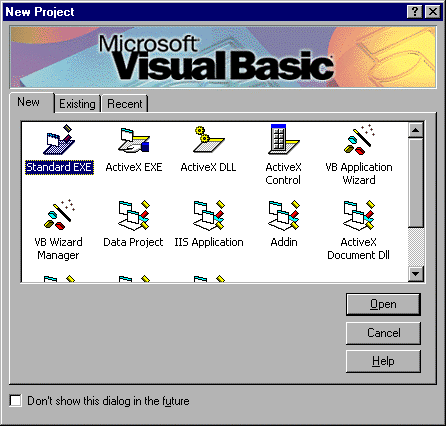
Figure 6: The New Project dialog box
This screen gives you many different options as to what you want to create. For our purposes, choose the Standard EXE icon.
Though not necessary, it is a good idea to save the project as soon as you begin. For our purposes, we will call the program kilo. When you click on the Save icon on the toolbar or access it through the menu bar, you will be prompted with two screens. Figure 1-7 shows the first of the dialog boxes that will ask what you want to save the file as.
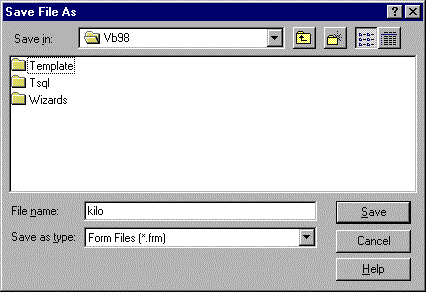
Figure 7: Save File As dialog box
Notice that the dialog box is titled Save File As and the Save as Type is listed as Form Files (*.frm). The first dialog box is asking what you wish to save the form as. Save the form under the name kilo. This will save your form along with its objects and code in a file.
The second dialog box, shown in Figure 1-8, then asks you what you want to save the project as. This will save your project components (these are listed in the Project window) in a separate file from your form .
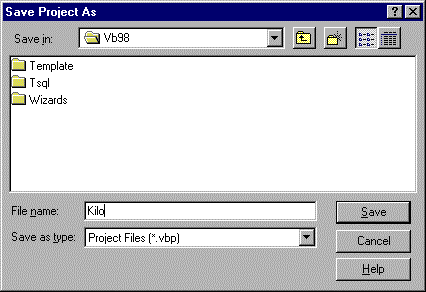
Figure 8: Save Project As dialog box
Notice that now the title of the dialog box is Save Project As and the type of file is Project Files (*.vbp). Save the project as Kilo.
Next, we will give the project a name by highlighting Project1 in the Project window and changing the name property to Kilo (see Figure 1-9).
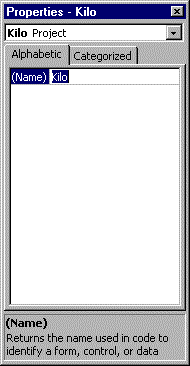
Figure 9: Naming the project
The Project window should now resemble Figure 1-10.
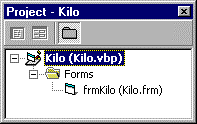
Figure 10: The Project window with the new project and form names
First, a word about naming your objects. It is a good idea to devise a consistent method of naming your objects. For example, if it’s a form, begin the name with the three letters frm; if it’s a label, begin the name with lbl, a text box, begin with the three letters txt, if a command button, cmd, and so on. The current standard for naming objects is called the Hungarian naming convention. For more information on this convention, see Appendix D. It is a good idea to become familiar with this naming convention because the exam uses this method for naming all its objects. Ultimately this may save you some confusion, especially when you begin to develop more sophisticated applications.
Now we will set the properties on the kilo form. Click on the Properties window or use the drop-down list (at this time, frmKilo will be the only item listed in the drop-down list) and change the properties of the form as follows (see Table 1-1):
Property |
Input |
| (Name): | frmKilo |
| Caption: | The Kilo Program |
| Font: | System, Bold, 10 |
| Height: | 4800 |
| Left: | 1995 |
| Top | 1500 |
| Width | 6000 |
Table 1: Properties of the frmKilo form
When you go to change the font, there are ellipses to the far right of the font property box. Clicking on those ellipses will bring up the following window (Figure 1-11).
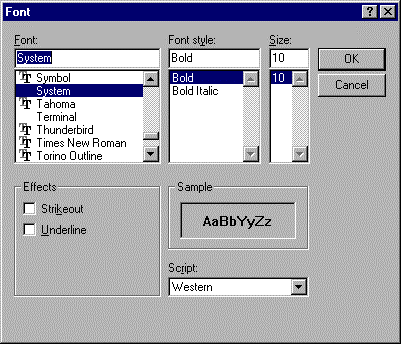
Figure 11: Changing the font, font style, and font size in the Font dialog box
The screen should look like Figure 1-12. The form name should already be called frmKilo because we changed this above.
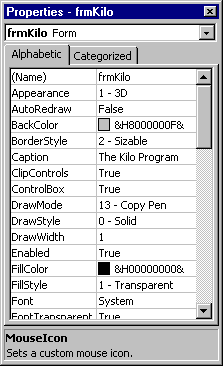
Figure 12: Properties of the Kilo form
Next we will create the objects on the kilo form. The interface will consist of two labels, two text boxes, and two buttons. To create these, click on the corresponding controls on the toolbox, move the mouse over the form, and draw boxes for the controls.
Let’s create the first label now. Click on the label control and place it on the form. The next step is to set the properties of the label you just created. Change the properties of label to the following (see Table 1-2). The results appear in Figure 1-13.
Property |
Input |
| (Name): | lblKilos |
| Alignment: | 1-Right Justify |
| Caption: | Weight in Kilos: |
| Font: | System, Bold, 10 |
| Height: | 255 |
| Left: | 720 |
| Top: | 600 |
| Width: | 1935 |
Table 2: Properties of the lblKilos label
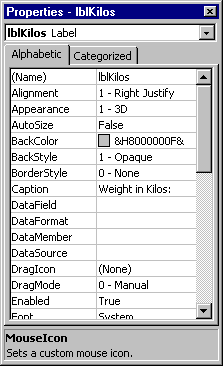
Figure 13: Properties of the Kilos label
Now let’s create the other label. Notice again how I named the label. You want to name each object something that will easily distinguish it from any other object in your project. Change the properties according to the following (Table 1-3).
Property |
Input |
| (Name): | lblPounds |
| Alignment: | 1-Right Justify |
| Caption: | Weight in Pounds: |
| Font: | System, Bold, 10 |
| Height: | 255 |
| Left: | 720 |
| Top: | 1200 |
| Width: | 1935 |
Table 3: Properties of the lblPounds label
Now let’s create the text box for the kilos text box. Change the properties to the following (Table 1-4).
Property |
Input |
| (Name): | txtKilos |
| Font: | System, Bold, 10 |
| Height: | 360 |
| Left: | 3360 |
| Text: | (blank) |
| Top: | 600 |
| Width: | 600 |
Table 4: Properties of the txtKilos text box
The properties windows should look like the one shown in Figure 1-14.
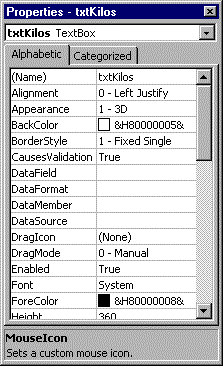
Figure 14: Properties of the Kilos text box
Next up is to create the text box for the pounds text box. Change the properties of this box to match the following (Table 1-5).
Property |
Input |
| (Name): | txtPounds |
| Font: | System, Bold, 10 |
| Height: | 360 |
| Left: | 3360 |
| Text: | (blank) |
| Top: | 1080 |
| Width: | 600 |
Table 5: Properties of the txtPounds text box
The last step in designing the interface is to create the two command buttons. The first button we’ll call Calculate because this is the button that will be pressed to perform the conversion from kilograms to pounds. Set the properties according to Table 1-6. The result should look like Figure 1-15.
Property |
Input |
| (Name): | cmdCalculate |
| Caption: | &Calculate |
| Font: | System, Bold, 10 |
| Height: | 600 |
| Left: | 2280 |
| Top: | 1920 |
| Width: | 1335 |
Table 6: Properties of the cmdCalculate command button
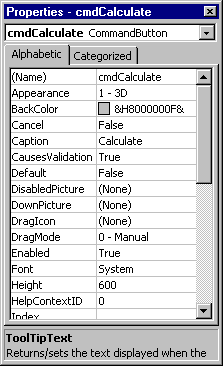
Figure 15: Properties of the Calculate button
Notice that the caption is Calculate. The face of the button should look like Figure 1-16.
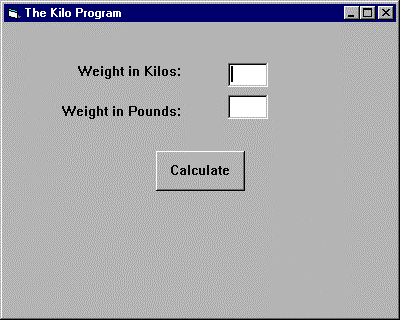
Figure 16: The Calculate button
Now change the caption to be &Calculate. The Properties will look like Figure 1-17.
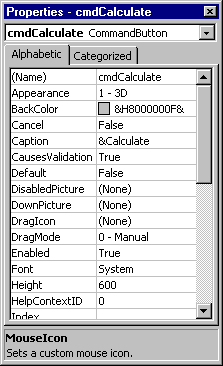
Figure 17: Properties of the Calculate button using the ampersand character
Notice the change in the button as illustrated in Figure 1-18.
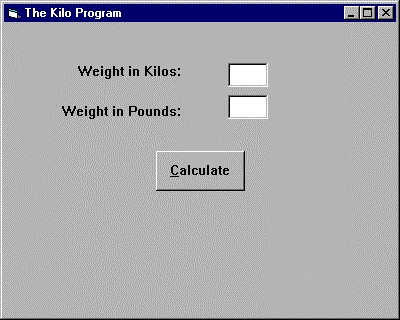
Figure 18: Caption of the Calculate button with the "C" underlined
This is called an access key and allows the button to be activated by pressing the Alt-C keystroke combination. This can be a helpful tool to utilize while creating applications .
Now create the Exit button and set its properties to the following (see Table 1-7).
Property |
Input |
| (Name): | cmdExit |
| Caption: | E&xit |
| Font: | System, Bold, 10 |
| Height: | 600 |
| Left: | 2280 |
| Top: | 2600 |
| Width: | 1335 |
Table 7: Properties of the cmdExit command button
You are now finished creating the user interface and the form should resemble Figure 1-19.
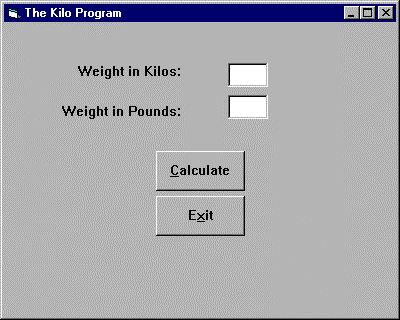
Figure 19: The finished form
Now that you have some experience in working with an object’s properties, here are some more properties you can use to enhance your applications.
Start Q&A
| What are the TabStop and TabIndex properties for? | TabStop and TabIndex allow you to change the order in which the tab key will proceed through the objects on your form. When the object is highlighted, this is known as having the focus. When the TabStop is set to True and the TabIndex is set to 0 (zero), that object will have the focus when the application begins. If you change a TabIndex for a particular object, VB will automatically renumber the tab stops of the other objects . There will likely be a question about this on the test. |
| What if I want to use some code from another form that I want to remain hidden from the user during runtime? | The form has a property called Visible which when set to False, makes the form invisible to users during runtime (runtime itself will be explained later). This can be useful when you have a form that contains some code which is referenced in another form. When code is referenced in a form, that form is loaded. However, by having the visible property set to False, the code may be used without the form being seen . |
| Can the user resize the form during runtime? | Your form has two different properties, called MaxButton and MinButton, which allow you to determine whether you wish for the users to minimize or maximize the form during runtime. By changing the settings of these two properties to False (see Figure 1-20), you can remove the maximize and minimize buttons from the form. However, the user will still be able to resize the form. |
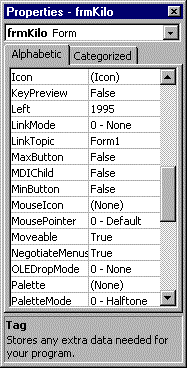
Figure 20: Minimize and Maximize buttons set to False
The form will then look like this (Figure 1-21):
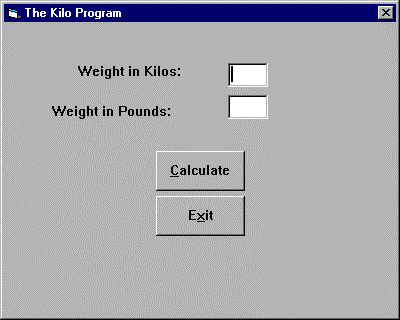
Figure 21: Finished form without the Minimize and Maximize buttons
Now that you have created the user interface, the next step to developing your application is to write the code. In this case, the only code that is necessary will be for the two command buttons. Double-click on the Calculate button. The Code window should appear (Figure 1-22).
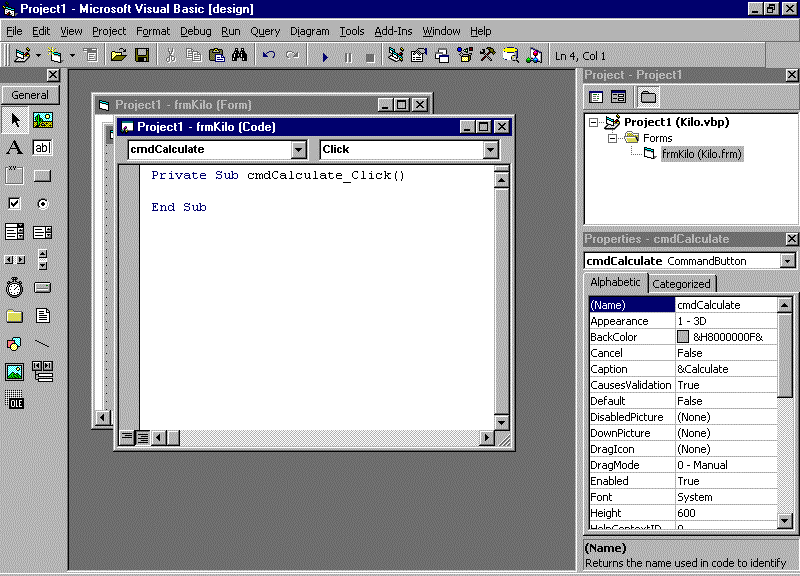
Figure 22: The Code window for the command buttons
Now it is time to enter the code for the Calculate button (Figure 1-23).
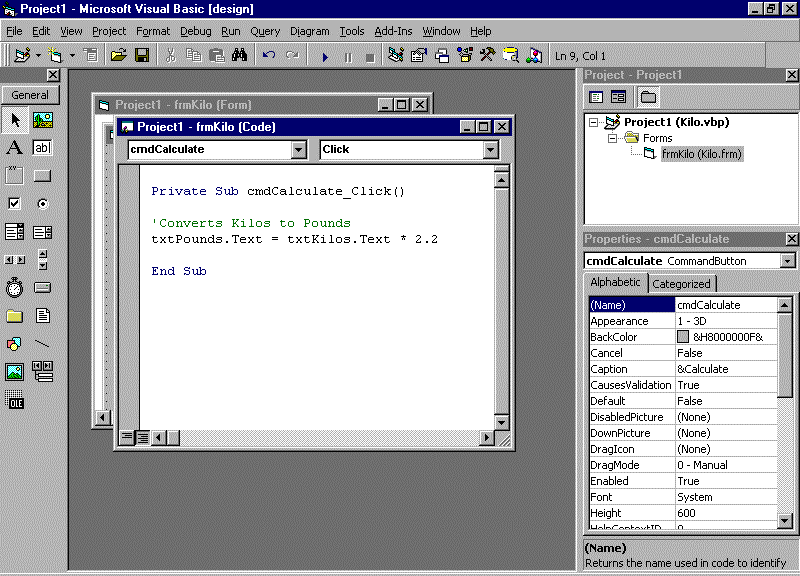
Figure 23: Entering the code for the Calculate button
Notice that there is a line in green that begins with an apostrophe. VB ignores anything that follows an apostrophe. These are known as comments. Though not necessary, it is a good idea to insert comments into your code. This may assist you down the road in the debugging process and also make it easier for others who may need to work with your code. Since everyone writes code a little differently, this will help to bridge this gap of individual differences.
Now, about the code for the Calculate command button. We’ve basically told VB to get a value for the txtPounds text box by retrieving the value entered in the txtKilos text box and multiplying this value by 2.2.
For the Exit command button, simply enter End. This will allow the user to terminate the program by clicking on this button (Figure 1-24).
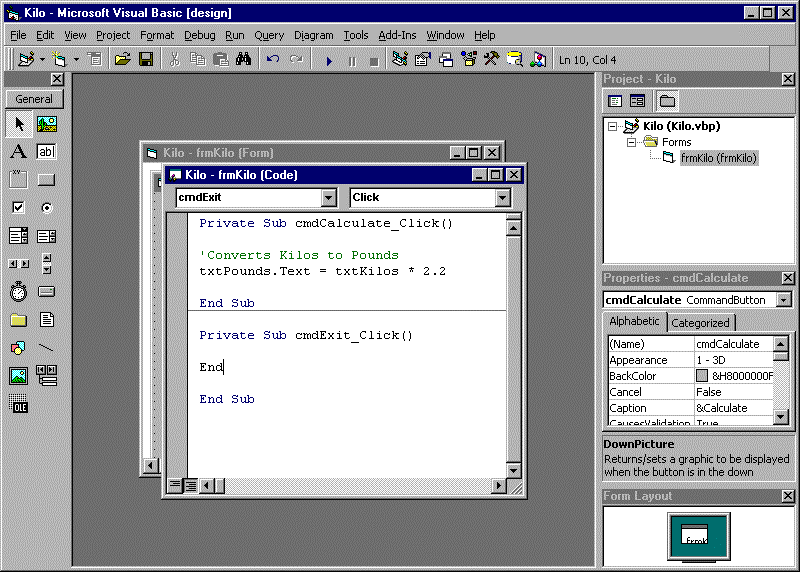
Figure 24: Entering the code for the Exit button
We have finished the second step in the development process, so it’s time to see if the program actually works. Click on the Run icon in the toolbar or by selecting Run from the menu bar. Now enter a numerical value of 5 in the Kilos text box and click on the Calculate button. If the program returns a value of 11, then congratulations, it works! You have created your first VB application (Figure 1-25).
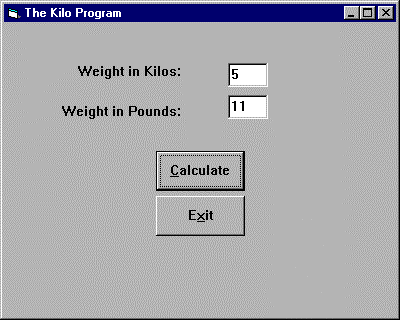
Figure 25: The Kilo program in action
Now that we have created an application together, it’s time for you to try one on your own.
Exercise 1-1: Creating a simple application
Suppose your application did not work for some reason. What would you do then? This is where the troubleshooting or debugging process begins. VB contains many tools to help you determine what is causing your program to work improperly. Some of the tools used to aid in the debugging are breaks, watches, the Err object, and the debug object.
A break stops the execution of a program while it’s running and places the program in Break mode. The statement being executed while Break mode is entered will be displayed with a bullet to the left of that line. Break mode allows you to examine, debug, reset, step through, or continue execution of the application. You may enter Break mode by encountering a breakpoint during program execution, pressing Ctrl-Break during program execution, by clicking on the Break button on the debug toolbar (it looks like the "pause" button on a cassette recorder), when you encounter a Stop statement during program execution, by pressing the F9 key on a line of code, by adding a Break When True watch expression (which will stop execution when the watch is True), or by adding a Break When Changed watch expression (which stops the execution of the program when the value of the watch changes) .
A watch allows you to monitor the values of variables, properties, and expressions at runtime. These watch expressions appear in the Watch window, which lets you observe their values. As mentioned above, you may also use watch expressions to switch the application into Break mode whenever the expression’s value changes or equals a specified value. For example, you may use a watch expression to put the application in Break mode when a loop counter reaches a specific value, or you may want the application to enter Break mode whenever a flag in a procedure changes value. Watch variables allow you to change the display format of variables in the Watch window or the Quick Watch dialog box using formatting symbols. Watches can only be added during design time or while the program is in Break mode . You may add a watch by clicking on the Debug window and selecting Add Watch, by clicking on the View menu, choosing Watch Window, then right-clicking in the Watch Window, or by right-clicking on a line of code and selecting Add Watch . Watches, watch expressions, and watch variables are sure to be found on the certification exam.
VB also utilizes something called the Err object. It contains data that your application needs to know in order to respond properly to errors. The Err object has six properties (Number, Description, Source, HelpFile, HelpContext, and LastDLLError) and two methods associated with it (Clear and Raise). Number returns the error number of common VB errors and Description returns a description for that error number . Source contains information as to where the error occurred. HelpFile contains a fully qualified path to a help file (if no help file is specified, no help will be displayed ) . HelpContext is a string containing a HelpContext ID associated with the error that occurred. LastDLLError contains the result code of the last external call made to the Windows API or another DLL. Clear is used to clear the contents of the Err object. Raise is used to deliberately cause a runtime error .
The Debug object is only available during the development process, not at runtime. It has two methods, Print and Assert. Debug.Print is used to send output to the Immediate window without breaking the execution of the application . Any references to the Debug object are stripped from the code when an EXE file is created.
Finally, the Debugging toolbar is a great help in isolating problems. It allows you to start the program, enter Break mode, end the program, toggle breakpoints, step into, step over, step out, view the locals, Immediate and Watch windows, use quick watch, and call stack.
We have already discussed Break mode. The break button appears on the toolbar in the form of a button that looks like the "pause" button on a cassette recorder.
The Call Stack dialog box is available only in Break mode (Figure 1-26).
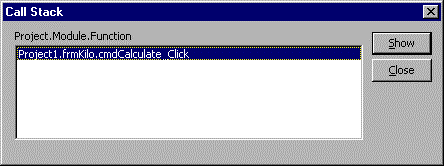
Figure 26: The Call Stack dialog box
Basically, there are three types of errors that you may encounter. The first error is a syntax error. This could be a misspelled word or simply an error in the format of the code. An example of a syntax error is illustrated in Figure 1-27.
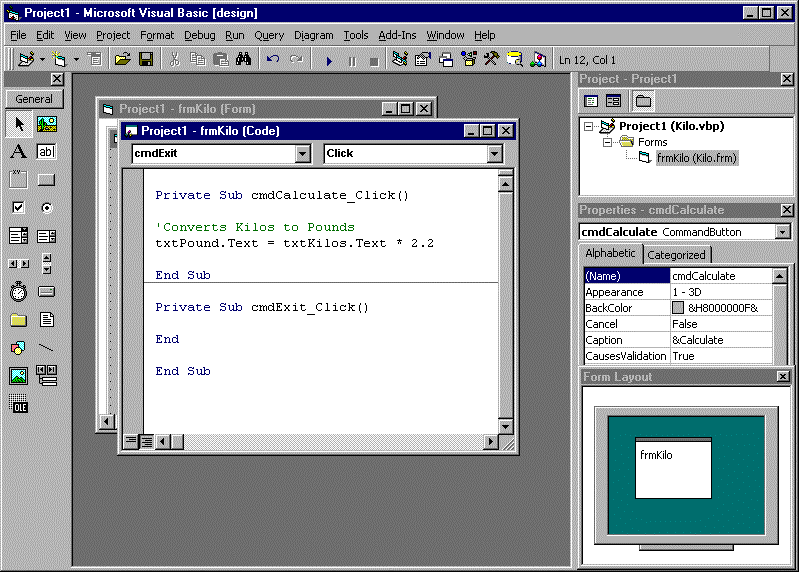
Figure 27: The Call Stack dialog box
Notice that the code for the Calculate button contains a reference to txtPound where it should be txtPounds.Text. Now when the program is run, there is no output to the txtPounds text box.
The next error you may encounter is a runtime error. This is an error that occurs during the execution of the program and causes the program to halt. Now if we change the code for the Calculate button to read txtKilo.Text instead of txtKilos.Text and run the program, we will encounter a runtime error. You will notice there is very little difference between the runtime error and the syntax error. Basically what distinguishes the two is that a runtime error is an error in syntax that causes the program to stop unexpectedly (see Figure 1-28).
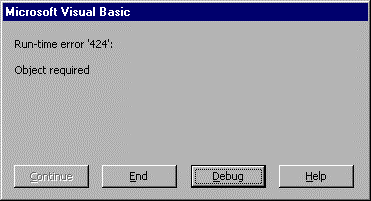
Figure 28: An example of a runtime error
If you click the Debug button, the following screen will appear (Figure 1-29):
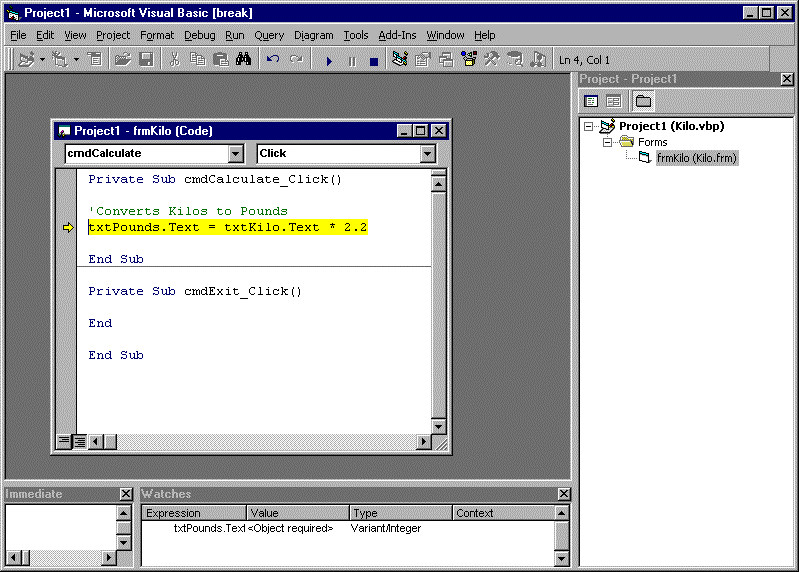
Figure 29: Pinpointing errors
Notice that the offending line is highlighted and there is an arrow next to that line. That arrow is called a watch. A watch allows you to examine what is happening in your code. Notice also the Watch window at the bottom of the screen. This will be more fully discussed later in the chapter. This gives you some clue as to what is causing the error.
The final error that will be discussed is a logic error. This is where the code is fine and the program runs correctly but the desired outcome does not occur. An example of this would be if we divided by 2.2 rather than multiplied. The output would be consistent with what was coded, though not a correct conversion factor, so the actual response would be wrong.
Begin Q&A
| How does a watch statement help in the debugging process? | A watch allows you to view the code as it is executed, and by viewing the Watch window you can get some input on what is creating the error. |
| How do I add a watch statement? | You can add a watch by performing a right click at the beginning of the line in which you wish to add the watch. You may also add a watch by clicking on the Debug item on the menu bar and selecting Add Watch, which will launch the window seen in Figure 1-30. You then choose the procedure (in this case cmdCalculate_Click), the module (frmKilo) and the Project . |
| How do I add a breakpoint to my code? | You may add a breakpoint by clicking on the gray area to the left of the line you wish to contain a breakpoint and clicking on the left mouse button or by clicking on the Toggle Breakpoint button on the debugging toolbar. |
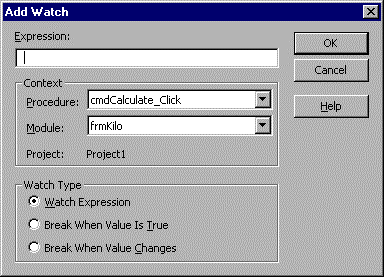
Figure 30: Adding a watch to your application
Error handling is where you anticipate certain problems with your code and build in safeguards to keep your application from crashing. You may also program your application to return an error code to give you a better idea of what is happening.
The Kilo program will still operate if you enter a zero or any negative number in the Kilo text box. However, if you had written a program and needed the user to input a positive number greater than zero you could write code that would not proceed unless a valid number was entered. If that number was not entered you could have VB return an error that would alert the user to try again.
Now enter the following code for the cmdCalculate button (Figure 1-31):
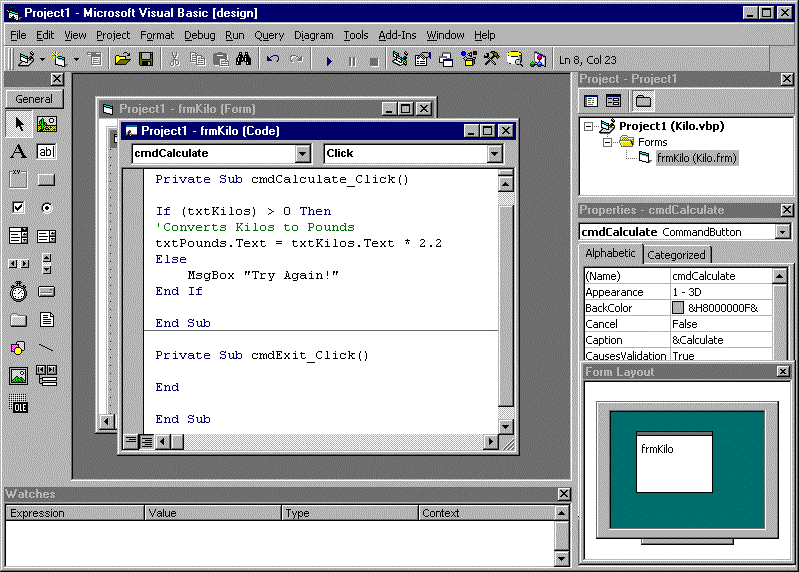
Figure 31: Adding code for a message box
Now if your user tries to enter a zero, the program will ask the user for another number (Figure 1-32).
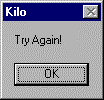
Figure 32: The message box asking the user to try again
In this way, you can head off potential errors or even force the user to input the desired data.
Once you are finished with your program and wish to produce it in a form usable on any computer, you need to compile it into an EXE file. To do so, click on File on the menu bar and select Make kilo.exe (see Figure 1-33).
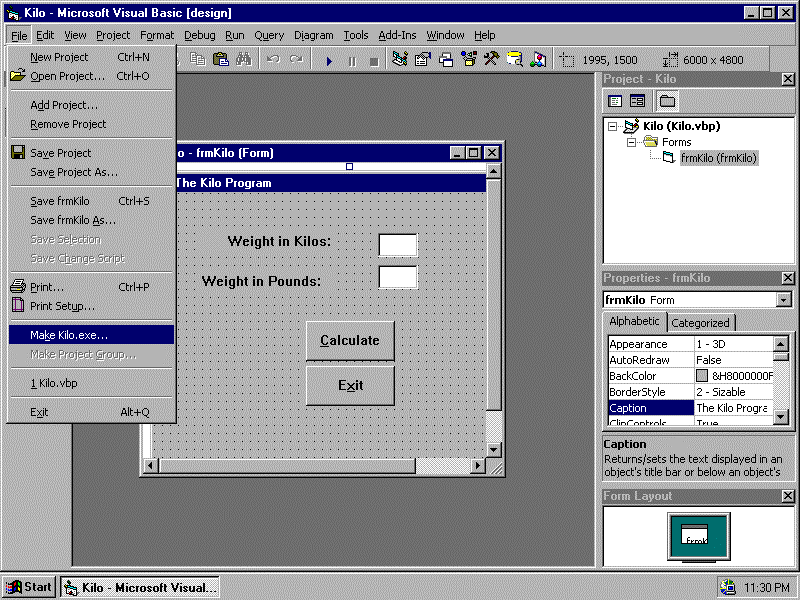
Figure 33: Making an EXE file
You will then be prompted to give your project a name (see Figure 1-34). For our purposes, let’s just call it Kilo.
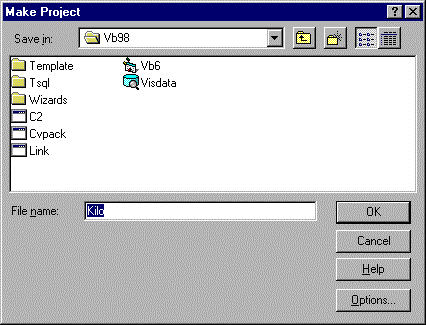
Figure 34: Giving the EXE file a name
You now have a file that will run on any computer. However, in order to use this, you first must ensure that the msvbm60.dll file is in your Windows system directory. This file contains all the necessary information that allows your project to be contained in a much smaller EXE file. The msvbm60.dll, at 1.376MB, is rather large, but this file allows the EXE files to be so small. If you have already installed VB on your computer, this file should already exist. This is only an issue if you wish to distribute the application to others. Previous versions of VB have their own version of this DLL. For example, VB 5.0 applications need the msvbm50.dll file in the Windows system directory.
Exercise 1-2: Creating a simple application
You will now create an EXE file for the application which you created in the first exercise.
In this chapter you have become familiar with the VB programming environment and even learned to create a simple program. You have learned some of the basics in creating objects and manipulating the properties of these objects. You have also briefly worked with some of the inherent debugging and error handling procedures of VB. This chapter will give you a basis to create more advanced applications with VB.
The Self-Test questions will help you measure your understanding of the material presented in this chapter. Read all the choices carefully, as there may be more than one correct answer. Select all correct answers for each question.
Which is not a property of the Err object?
Click on the Debug menu, then choose Add Watch access the Add Watch dialog box.
Right-clicking on a line of code and selecting Add Watch.
Click on the View menu, select the Immediate window, then right-click in the Immediate window.
Click on the View menu, select the Watch window, then right click in the Watch window.
A, B, and D. These are all valid ways of adding a watch to a piece of code.
You may not add a Watch through the Immediate window.