Maintaining and Supporting an Application
*Certification Objectives
*Fixing Errors
*Preventing Future Errors
*Deploying Application Updates for Desktop Applications
*From the Classroom
*Application Maintenance and Support
*Certification Summary
*Two-Minute Drill
*Self Test
*
To avoid a nasty [expletive deleted] in the text, let’s just say that stuff happens. Errors crop up, new ideas pop into your head, and time makes a program archaic. This, in a nutshell, is the reasoning behind maintaining and supporting an application.
Errors are what can make programming both challenging and frustrating. While good programmers test their programs, there are always some bugs that get past you. You can spend around 10 times (or more) the amount of time it took to write the program in testing and still not catch everything. Large companies like Microsoft perform in-house testing, send out beta versions of programs, and have thousands of people reporting errors. Even though they fix reported errors, you may still find some previously undiscovered errors in the final release. The moral of this is that it happens to the best of us. The other point you can derive from this example is that maintaining and supporting an application is an ongoing process.
In this chapter we’ll cover how to fix and prevent errors in your application. When this has been done, we’ll also walk through deploying updates of the application so users can then begin to use your improvements. The concepts and code covered in this chapter will help you not only when studying for the Microsoft exam but also in the real world. Understanding how to maintain and support an application is essential in both cases.
In programming there are three kinds of errors you’ll experience: logic, syntax, and runtime. Each have their own nuances, and can give their own special kinds of headaches.
Logic errors occur when your code executes without a syntax or runtime error, but the results aren’t what you expected. An example of a logic error would be a procedure that is supposed to add sales tax to a dollar amount. On a line of code you type a minus sign instead of a plus sign, resulting in the code subtracting the amount of sales tax, rather than adding it. While the code worked, it didn’t give the result you intended.
Unfortunately, the only way to really catch logic errors is by using the program. After you compile the application, you should then test it to see that the program is functioning as it should. As you find logic errors (or as logic errors are reported by others), it is a matter of poring over the code to find where the logic error occurred.
On the Job: In the real world, programmers deploy a preliminary release of the program called a beta release. People then use the beta release and test it for errors. As errors are reported to you, they are then fixed. The way to get people to act as "beta testers" is usually to offer them a copy of the final version for free or to have a department in your company test it. Many programmers also distribute their beta releases on the Internet or online BBSes, allowing users to try the beta release for free. As a last resort, it’s not uncommon to pay people to serve as beta testers. To my knowledge there was only one occasion in 1998 in which a program was sold as a beta release. This isn’t an advisable option, as many users will be ticked off at being charged for a program that’s still being tested.
Syntax errors occur from incorrect use of the programming language. They occur when you do such things as mistype a keyword or forget to close a multiline command (like forgetting End If after an If statement). The result is an error during compilation, forcing you to go through your code and find where the error exists.
In development environments other than Visual Basic version 6, syntax errors can be a problem. Fortunately though, VB provides syntax error checking. Auto Syntax Check can be enabled or disabled from the Editor tab of Options, which is accessed from the Tools menu. Enabling Auto Syntax Check causes VB to check your syntax when you move away from a line of code. For example, say you wanted to type:
Dim x As Integer
Instead of typing this however, you type:
Dom x As Integer
This would be a syntax error. If Auto Syntax Check is enabled, when you attempt to move from the line the error will be brought to your attention.
Another feature that saves you from syntax errors is the Auto List Members feature, which can also be enabled from the Editor tab in Options. What Auto List Members does is display a listing of all the possibilities for what you’re typing in your code. For example, if you were typing the Dim x As Integer statement, VB would provide you with a list of possibilities after typing Dim x As. In the listing, you could choose Integer, String, and so on. Because the possible members are automatically given to you, you are protected from making syntax errors. For more information on VB’s Options, review Chapter 2 of this book.
The final type of error you’ll come across is runtime errors. These occur when a command attempts to perform an invalid action. Examples of runtime errors include attempts to use a variable that hasn’t been initialized, or when your application tries to access a floppy disk that a user has forgotten to put into the disk drive. Runtime errors are the only kind of error that you can’t completely prevent after distributing an application. As such, you must incorporate code into your program that handles the possibility of runtime errors occurring.
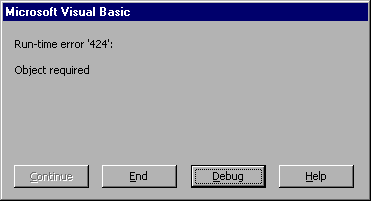
Runtime errors can occur when you attempt to run the project in VB or when your compiled application runs. While the error is the same, the options given to you are not. When a runtime error occurs when you attempt to run the project in VB, you are presented with a dialog box with up to four options, as in Figure 13-1. The Continue button allows your application to continue running with the error. Clicking it can produce unpredictable results as the program is running with errors. If a fatal error has occurred, however, it will be disabled. The second button is the End button, which will stop the program and return you to Design mode. The Debug button will break the program at the line that caused the error. With this, the application continues to run in single-step mode. In most cases, you will choose this button over the others because it brings you directly to the problem. The final button is Help, which will give you information about the error if something is available. In addition to these four buttons, the dialog box will also give you the error number of the runtime error, and a brief description of the error.

Figure 1: The dialog box that appears when a runtime error occurs, when running a project in VB
If a runtime error occurs in a compiled program, you are presented with an alert message as shown in Figure 13-2. The information in this default message is fairly basic. The name of the application is shown in the title bar, and there is an error number and brief description of the error. Unfortunately, the information given in these default messages is virtually useless to most users and may only be useful to a programmer while testing an application.
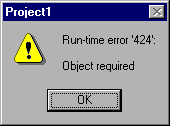
Figure 2: This alert message will appear when a runtime error occurs in a compiled application
Because the default messages that appear in a compiled program can be extremely cryptic to a user, it is important to implement your own error messages in an application. That way, when an error occurs, the user isn’t left completely dumbfounded by a message that is meaningless to them. In the next section, we’ll cover how to implement code that handles errors and how to add your own custom error messages.
In dealing with runtime errors, there are certain error-handling settings in VB that you should be aware of. These settings will determine how VB deals with errors encountered in the design environment. To change these settings, select the General tab of the Options dialog box, which is accessed from the Tools menu (see Figure 13-3).
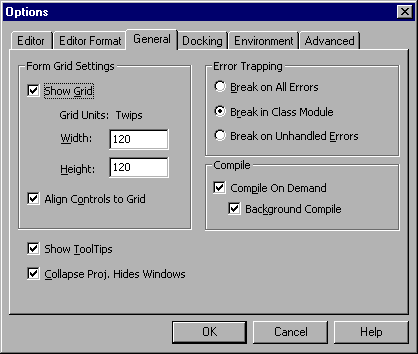
Figure 3: The Error Trapping section of the Options dialog box General tab allows you to change how VB handles errors in the design environment
The Error Trapping section of the General tab in Options allows you to configure how VB will handle errors. The first option is Break on All Errors. If this is selected, VB will break whenever a runtime error occurs. If you’ve added code to handle errors, it will ignore them if this option is selected. It’s useful if you want to see where and when errors are occurring, regardless of whether you’ve implemented error handlers.
Break in Class Module is the default setting in the Error Trapping section. If this setting is chosen, it will only come into full effect with projects that run code in class modules. Where it becomes useful is in code in which, for example, a Form calls on other code that exists in a module. If the unhandled error exists in the class’s code, it will be break in the class’s code. With the other options, it will break at the code that called the class, not in the code in the class module that actually causes the error. If the error exists outside of the class module, it treats it the same as Break on Unhandled Errors.
The important use of the Break in Class Module option is when you’re dealing with ActiveX servers. When this option is chosen, VB will break in the ActiveX server, rather than passing the error back to the client application. When creating applications that interact with ActiveX, it is important to choose this option.
The final option given to you here is Break on Unhandled Errors. This is the option you set once you’ve created—or are creating—error handlers and want to see if they work. This option allows you error-handling code to deal with runtime errors. When an error occurs that your error handler doesn’t deal with, it enters Break mode. There are two things to remember about this option. The first is that if an error occurs in a class module, it will break at the calling code. The second thing is that if you’re testing your error-handling code, you must set it to this option to test it properly.
Exam Watch: Know the different options for Error Trapping in the Options dialog box and what each can and can’t do. It is important to know these options for the exam.
The only way to prevent future errors in an application is to provide code in your program that traps errors and error-handling routines that deal with the problem. For example, let’s say that a user instructs your program to open a file that doesn’t exist. Rather than a cryptic message popping up (similar to what we saw in Figure 13-2) and the program exiting, you can incorporate code that handles the error. You could have your program "see" that an error has occurred and then direct execution of the program to code that deals with the problem. In such a case as a file not being found, a dialog box could be offered to the user, asking him or her to try again or cancel out of the procedure.
The first step to dealing with an error is trapping it. Once you set an error trap, it will remain enabled until one of two things occur:
Enabling an error trap is done with the On Error statement. This establishes error handling in your code. If an error occurs, it detours program execution another place in your program that you specify. Where execution is redirected depends on what you type after the words On Error, as is seen in the following code:
On Error GoTo ErrHandler
‘Code with error appears here
Exit Sub
ErrHandler:
‘Error handling code appears here
In the above example, execution is redirected to a label called ErrHandler. This is done with the statement On Error GoTo ErrHandler. Typing a word ending with a colon (such as ErrHandler:) creates a label. Code following the label deals with the error. Because VB will process your code line by line, you must put Exit Sub before the label. This is to provide a means of exiting the procedure when no error has occurred, and to keep the error handler from always running—even if no error has occurred!
In addition to redirecting execution to a label, you can use the following code to skip over a statement, and continue processing the next line of code. To do this, use the following code:
On Error Resume Next
Using this statement instructs your program to resume execution on the line after one that causes an error. It is typically used for inline error handling, covered later in this chapter, where errors are processed immediately after they occur.
Another use for On Error Resume Next is when you expect errors that don’t affect the remaining code. For example, let’s say you were creating a form for users to input e-mail and Web site addresses. Since these should all be in lowercase, you might create code that loops through each Text property and converts it to lowercase. Since labels don’t have a Text property, runtime errors would be generated each time a label is encountered. By adding On Error Resume Next before the loop, these errors would be ignored, and the next control (assuming it has a Text property) would be converted to lowercase.
Should you wish to disable an error trap, the following statement will disable the previous error trap:
On Error GoTo 0
Notice that the above sentence said previous error trap. The reason for this is that errors are handled in a call stack, which is also known as a calling chain. If you have a procedure that calls other procedures, and one of the called procedures has an error but no error handling, it will pass the error up the chain of procedures. This concept is illustrated in Figure 13-4.
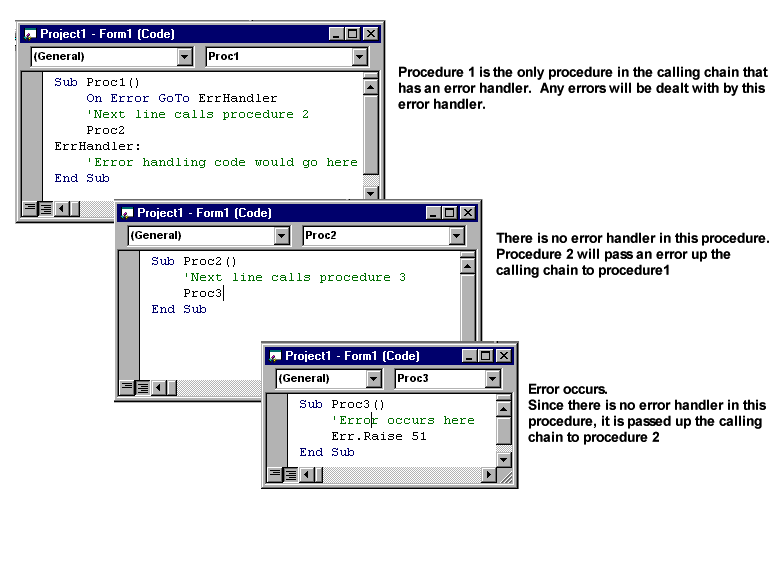
Figure 4: Passing errors up the calling chain
The way the calling chain works is that when an error is encountered, it passes the error up to the procedure that called it. In other words, if Procedure 1 calls Procedure 2 and Procedure 2 encounters an error, it will pass that error up to Procedure 1. If you think of Procedure 2 as a child of Procedure 1, it’s as if the child is asking its parent for help. As it’s passed up the calling chain, the error handler in the calling procedure will deal with the error. If no error handler is encountered when passed up the calling chain, VB will display an alert message box and end the application.
To effectively deal with the error, your error handler must have some way of knowing what error has occurred. This is done with the Err object. Err has properties and methods that contain information about the error that occurred and allows you to clear error values (explained later) or cause errors. The information contained in the Err object is essential to error handling.
The Err object has three important properties that you will use regularly in error handling. The first of these properties is Number, which contains an integer value that indicates the last error encountered. When a trappable error occurs in VB, a code is passed to the Number property of the Err object. By using Err.Number, you can allow your error handler to see what error has occurred. The values and description of error codes is available in VB Help under the heading Trappable Errors.
Exam Watch: Many students spent great amounts of time memorizing trappable errors, their values, and what the values signify. The VB version 6 exam does not expect you to know this. You are, however, expected to know how to trap and handle errors and know the properties and methods of the Err object.
The Description property has a String value that contains a brief description of the error. Using Err.Description allows you to display information about what error has occurred in your application. It contains information about the last error that has occurred.
The Source property is useful when your program works with other programs, such as Microsoft Excel. By using Err.Source, you can display whether it was an ActiveX server or your client application that generated the error. In the case of Microsoft Excel causing an error, the value of the Source property would be set to Excel.Application.
Because the values of Err’s properties contain the last error encountered, there are times where you will want to clear the values. This is done with the Clear method. Err.Clear resets the value of Err.Number back to zero.
In addition to clearing errors after you’ve dealt with them, the Err object has another important method called Raise. Err.Raise causes an error to occur, so that you can test your error-handling code. For example, the following code would generate a "File not found" error:
Err.Raise 53
By typing Err.Raise followed by an error code, you are able to cause an error. The error trap would then detour execution to the error handler to deal with the error.
Once you’ve identified the error and dealt with it, you must provide a way to exit the error handler. This is done with the Resume statement. There are three ways to use the Resume statement:
Resume
The above statement will return execution to the statement that caused the error, so that an operation can be completed after the error has been corrected.
Resume Next
Using Resume Next will return execution to the line immediately after the one that caused the error. This allows the program to skip over the offending code, and continue with the rest of the procedure.
Resume line or label
Using this statement will return execution to a specific line or label, allowing you to control where the program should continue after an error has occurred. While slightly different in use, these statements allow you to control how processing will resume after an error has occurred.
Exercise 13-1: Error Handling
On Error GoTo ErrHandler
Proc2
MsgBox "Procedure 1"
Exit Sub
ErrHandler:
MsgBox "Error: " & Err.Number & " has occurred in " _
& Err.Source & ". Error was " & Err.Description
Resume Next
Sub Proc2()
Proc3
End Sub
Sub Proc3()
Err.Raise 51
MsgBox "Procedure 3"
End Sub
On Error GoTo ErrHandler
Up until this point we’ve had one error handler that dealt with any error we’ve thrown at it. While these are valid error-handling routines, they aren’t very practical. In the real world, you would create error handlers that look at the Err.Number and perform an action based on the value of Err’s Number property.
One way of determining which action to perform, based on the value of Err.Number, is with an IF…THEN or IF…THEN…ELSE block. As was previously stated, the Number property of the Err object has an integer value. By comparing these error codes to specific values in such blocks of code, you can then execute code that deals with particular errors. This can be seen in the following code example:
Private Sub cmdSaveAs_Click()
On Error GoTo ErrHandler
CommonDialog1.ShowSave
ErrHandler:
If Err.Number = 0 Then
'Do Nothing
ElseIf Err.Number = 58 Then
MsgBox "File Already Exists"
Resume
Else
MsgBox "Fatal Error: " & Err.Description
End If
Err.Clear
End Sub
In this code a command button is used to display a common dialog box, which presents the user with a standard Save As dialog box. If there is no error, the value of Err.Number is zero and nothing happens, and the value of the Number property is cleared. If a file already exists, the second condition of the IF…THEN…ELSE block is met, and that section of code is executed. Finally, if neither requirement is met, then the ELSE section of code is executed. This allows you the freedom to execute certain error code to deal with specific conditions.
The other method of executing code based on certain conditions is by using a Select Case. In this, the error code is passed through a series of Case statements until the value matches that of the Err.Number value. The following code example deals with the same situation as that in the IF…THEN…ELSE block of code above, but as a Select Case.
Private Sub cmdSaveAs_Click()
On Error Resume Next
CommonDialog1.ShowSave
Select Case Err.Number
Case 0:
'Do Nothing
Case 58:
MsgBox "File Already Exists"
Case Else:
MsgBox "Fatal Error: " & Err.Description
End Select
Err.Clear
CommonDialog1.ShowOpen
End Sub
While the above code shows how useful Select Case is in error handling, it also shows something else. Using labels for error-handling routines is not the only way of creating error handlers. You can also do something called inline error handling. Inline error handlers deal with errors immediately after they occur. Error-handling code doesn’t use labels, and thereby doesn’t branch out from your code. In addition, it doesn’t use Resume statements. Each line of code is processed one line after another. If an error occurs in a statement, the On Error Resume Next causes VB to skip over the offending code and then execute the next line (which is the error handler). When it reaches the end of the error handler, Err.Clear is used to clear the Number property of Err, and code following the inline error handling is processed.
It is important to remember to use Err.Clear in inline error handling. The reason the Clear method is called after a Select Case is because there are no Resume statements. Resume statements are used in other error-handling styles and reset the Err.Number value to zero. If you don’t use Err.Clear, the error code would still be stored in the Err object. This would cause problems if your procedure were to cal another procedure that has its own error handling. In such a case, the uncleared Err object could cause the error handler of the called procedure to deal with this ghost error.
Exam Watch: If you have a question that presents inline error-handling code and has other error handlers being raised, check to see that Err.Clear is at the end of the Select Case. Err.Clear needs to be used at the end of an inline error handler. Failing to do so may cause another error handler to deal with an error that was raised in a previous procedure.
There are a number of times when you can save yourself coding time and decrease the amount of code in your application. You should always look through your code and see if there are places where the same code can be used in two or more places. For example, you may use an Open File or Close File procedure in a few places in your program. When this occurs, you should consider using a standard function containing error-handling code. After creating this function, you then invoke it. In doing this, you should return a value (such as a Boolean value) to the calling code, which indicates if the function succeeded or failed.
The following example shows a command button that opens an input box, which asks the user for an application’s name. We then assign the input to the variable strApp, which is passed to the function OpenApp. If the Function can open the application, the value of Err.Number is zero (showing that there is no error). In this case, the value of True is returned to the calling code, and a message box is displayed indicating success. If the function can’t open the application, it returns a value of False to the calling code, and a message box is displayed showing failure. Because most of the code resides in the function, there is less chance for logic and syntax errors because you’re not rewriting the same code over and over. It also makes your application smaller, because less code exists in the application.
Private Sub Command1_Click()
Dim strApp As String
Dim blnResult As Boolean
strApp = InputBox("Enter Application Name")
blnResult = OpenApp(strApp)
MsgBox blnResult & " result opening " & strApp
End Sub
Function OpenApp(strApp As String) As Boolean
On Error Resume Next
Shell strApp
Select Case Err.Number
Case 0:
OpenApp = True
Case Else:
OpenApp = False
End Select
End Function
Another style of error handling is to centralize your error-handling code. This means to create a primary error handler that tells procedures how to deal with errors. When an error occurs, the procedure passes the Err.Number to the central error handler. The error handler then analyzes the Err.Number value and tells the calling procedure how to process the error. It is important to remember that centralized error handling doesn’t free you from adding error handling code to a procedure—it does, however, minimize the amount of code needed in a procedure.
In the following example, code has been added to a command button. On clicking this button, an Input box is presented to the user that asks what application the user wants to open. If an error results, the ErrHandler is used, which passes the Err.Number to the central error handler, called ErrCentral. ErrCentral analyzes the error code and determines whether to ask the user to enter another application name, continue, or have the application close down. If it determines that the user should be asked for another application name, it presents a message box with Yes and No buttons. If the user clicks Yes, the value of True is passed to the calling code, which has the Resume statement processed, and the input box is redisplayed. If No is clicked, the value of False is passed to the calling code, which has the Resume Next statement processed, and the operation is canceled.
Private Sub Command1_Click()
On Error GoTo ErrHandler
Dim blnResult As Boolean
Shell InputBox("Enter Application Name")
Exit Sub
ErrHandler:
blnResult = ErrCentral(Err.Number)
If blnResult = True Then
Resume
ElseIf blnResult = False Then
Resume Next
End If
End Sub
Function ErrCentral(ErrNum As Integer) As Boolean
Select Case ErrNum
Case 53:
Result = MsgBox("Program Not Found. Try Again?", vbYesNo)
Case 5:
Result = MsgBox("Program Not Found. Try Again?", vbYesNo)
Case 0:
Result = vbNo
Case Else:
MsgBox "Error " & ErrNum & ": Unloading"
Unload Form1
End Select
If Result = vbYes Then
ErrCentral = True
ElseIf Result = vbNo Then
ErrCentral = False
End If
End Function
It is important to remember that Resume statements (such as Resume and Resume Next) can only appear in procedures that have the On Error statement. It is for this reason that some error-handling code has to appear in the calling procedure. If you put a Resume statement in a procedure that doesn’t have an On Error statement, an error will result.
This leads to the question of what happens when an error occurs in an error handler. In the case of centralized error-handling routines and error handlers that are called, the error is passed up the calling chain. The procedure that called the error handler then has a chance to deal with the error. If there is no error handling in the calling procedure to deal with this, an alert message is displayed and the application exits. This is the same as if there is no calling procedure. When error handling is not called, but instead is part of a procedure, the application shows a message and ends.
Because such errors can occur in error handlers, it is important to keep error-handling routines simple and to visually check the code for possible mistakes. From within the error handler, you could invoke other procedures that contain error handling. This method does provide error handling for your error handler, but it isn’t very practical. After all, the more redundant code you add to your error-handling routines, the greater the possibility of runtime errors. The best way is to be extra careful when creating error handlers.
On the Job: When creating error handlers, make sure to test the error handler as you create it. Write some code, then test the application before creating more. This way you can be sure where your error handler was working before problems arose. In addition, try to make the error handler as simple as possible. The more code you write, and the more elaborate you make the error handler, the greater chance for errors. Since you are creating something that deals with errors, an error in the error handler can mask that a problem even exists! Be extra careful, and double-check your code visually.
"If at first you don’t succeed, call it version one." This is a saying that I often pass on to programming students, and if it weren’t true there wouldn’t be such things as updates. There are a number of reasons to deploy updates for your applications. Sometimes you’ll get feedback from users and clients about bugs that didn’t show up during the testing phase. Other times, you’ll decide to incorporate new features, interfaces, and so on into your application. No matter what the reason, you’ll never escape the need for deploying updates.
Deploying an update is the act of transferring an updated application to distribution media (such as a floppy disk or CD-ROM) or to a Web site, where it can then be downloaded. In many ways it is identical to deploying a full application, which we covered in Chapter 11. There are however a few differences that you need to keep in mind.
The first step in the deployment process is packaging your application. The difference between packaging updates and full applications is what you include in the package. Any files included with your package will overwrite files on the user’s hard disk. In other words, if the full version of your application was installed on the user’s computer, then drivers, databases, and executables will overwrite existing files. If your application uses several executable files and only one has been updated, then only that single executable should be included with the update. Similarly, if your application uses a database file (such as a Microsoft Access database), you should not include the database with the updated application package. When the user installs this update, the empty database you include will overwrite the existing database on the user’s computer, destroying all the user’s data.
The differences between packaging a full application and an update start from the DAO Drivers screen of the Package and Deployment Wizard (see Figure 13-5). This screen appears when you are packaging applications that access data, such as a program that uses data from an Access database. From this screen, you can choose what Data Access Object (DAO) drivers to include with the package. If you are packaging an update for an application created with VB version 6, you don’t need to include these files. If you’re packaging an update for a program created with a previous version of VB, you’ll need to select the necessary updated drivers for your application.
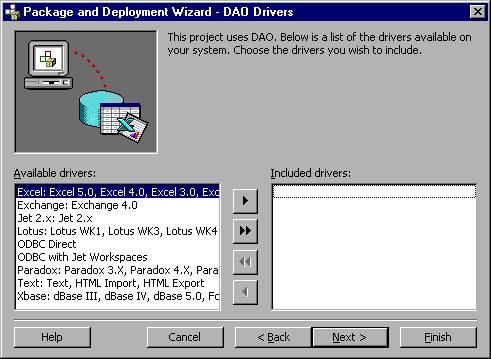
Figure 5. The DAO Drivers screen allows you to select what drivers to add to your package
Following this is the Included Files screen of the Package and Deployment Wizard (see Figure 13-6). This allows you to select which files to add to the package. If this were a full database application, this is where you would add any database files you’d like to include with your application. However, since this is an update, you would not include such a file. To do so would overwrite the user’s working data file when her or she installed the upgrade. Also listed here are files that would be installed into the Windows System directory. Again, if this is an update of a VB version 6 application, there is no need to include these files. The user would already have these files when he or she installed the full version of your application. You should pay attention to any DLL files that you’ve changed and determine if you want them included with the application though this screen.
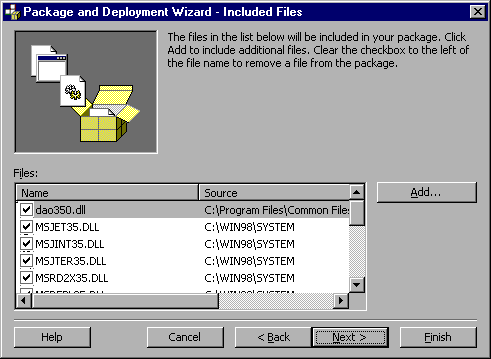
Figure 6: The Included Files screen of the Package and Deployment Wizard
After this, using the Package and Deployment Wizard is identical to what was covered in Chapter 11. You should select the same folders for the update that you choose for your full version. A warning will appear, telling you that this will overwrite previous installations. Since that is the purpose of an updated application, this is nothing to be concerned about.
Exercise 13-2: Packaging an Application Update
Once you’ve properly packaged your update, you’re then ready to get it out to the user. This is done with the Deploy part of the Package and Deployment Wizard. The main screen of the Package and Deployment Wizard is illustrated in Figure 13-7. This will allow you to deploy your application to floppy disks, a local or network folder, or an Internet Web site.
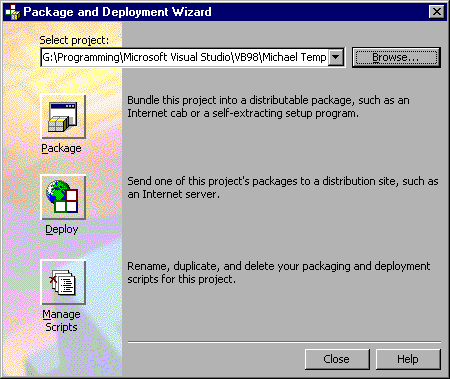
Figure 7: Main screen of the Package and Deployment Wizard
After choosing Deploy from the main screen, you are provided with a screen that has a listbox. This listbox contains a listing of packages created with the Package and Deployment Wizard. After selecting the package you want to deploy, you then click the Next button, which brings you to the Deployment Method screen.
The deployment methods available to you are Floppy Disk, Folder, and Web Publishing. The Floppy Disk option allows you to distribute your package to floppies, Folder allows distribution to a local or network folder, and Web Publishing allows you to distribute the package to a Web site. What you choose here will affect the screens presented to you afterward.
selecting Floppy Disk deployment and clicking Next, you are given the option of choosing which floppy drive the wizard is to use. By checking Format before copying, floppies will be formatted before files are copied to them.
Selecting Folder installation and clicking Next allows you to choose a local or network folder for deployment. This screen, shown in Figure 13-8, allows you to type in the full pathname of the folder, or select the drive and folder through drive and directory boxes. The New Folder button allows you to create a new folder for deployment. Finally, the Network button brings up a screen that allows you to browse your network. Using this, you can deploy your update on the network if you have the proper permissions.
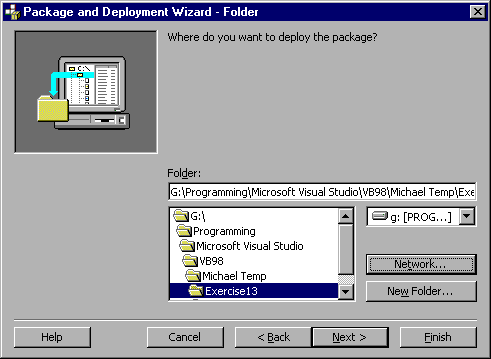
Figure 8: Folder screen of the Package and Deployment Wizard
Selecting Web Publishing and clicking Next brings up a listing of files included in the package. From this, you can select which files you want deploy to a Web site. Unchecking the check box before any filenames means that those files won’t be deployed. After clicking Next, you are given the option of including other files and folders to deploy with the package. The screen following this requests a URL. This is the Web site address, such as http://www.microsoft.com. You can also deploy it to an existing subdirectory on the Web site, such as http://www.microsoft.com/updates. It is important to remember that you must have an existing account with proper permissions for this to work.
After working through the screens of your deployment choice, you then reach the final screen of the wizard. Clicking the Finish button, your application update will be deployed to either floppy disk, a folder, or published to a Web site.
Exercise 13-3: Deploying an Application Update
| What is the difference between logic, syntax, and runtime errors? | Syntax errors occur due to incorrect use of the programming language. Runtime errors occur when a program attempts an invalid action. Logic errors occur when execution produces no syntax or runtime errors, but results aren’t what was expected. |
| A runtime error is occurring in my code. I’m certain the error is in the class module, but VB keeps breaking at the calling code. How can I make VB break at the line that’s actually causing the error? | In Options, chose the General tab. In the Error Trapping section, chose Break in Class Modules. |
| What happens when there is an error in my error-handling routine? | If the error handler was called, it will pass the error up the calling chain to the procedure that called it. If the procedure wasn’t called (or no error handling exists in the calling procedure), the application shows and message and exits. |
| I have added error handlers to my application, and now wish to deploy the updated application. | Use the Package and Deployment Wizard. First package the updated application, then deploy it. Follow the wizard and choose the deployment method you want to use. |
As any seasoned programmer will attest, sometimes the bulk of the work with application development doesn’t occur until after the application has been deployed. The rationale for this fact of the developer’s life is simple…application testing, or debugging, is only as good as the resources available to produce unique user scenarios involving an unlimited number of hardware and software conditions. Formal debugging, therefore, benefits greatly from the more is better mantra of testing. The epitome of maximum user scenarios almost always occurs in the real, post-deployment and post-development world of final release.
Within the development environment, the programmer should be familiar with proper techniques for recognizing and correcting compile errors resulting from incorrectly formed code, run-time errors that occur due to application requests for performance of impossible to carry out operations, and logic errors that result simply from code not performing as anticipated.
Visual Basic provides four primary debugging windows with which the exam taker should be thoroughly familiarized. These windows are the Immediate, Watch, Locals, and Output windows. Secondary debugging windows whose basic purpose the reader should be aware of, are the Call Stack and Threads windows.
Preventing future errors comes down to proper design and adherence to coding standards and conventions, and proper leveraging of available debug tools. With this in mind, for the exam, be aware of standard naming conventions, uses of the four primary debug windows, syntax and use of the Debug object.
— By Michael Lane Thomas, MCSE+I, MCSD, MCT, A+
Error-handling routines deal with runtime errors that occur in your program. There are different styles of error handling that you can use to make your application more robust. It is important to include such routines in all of your applications.
After making changes to an application, you must package and deploy the update so that users can use the upgrade. The Package and Deployment Wizard steps you through the process of packaging an application update. After packaging it, you can use the Deploy feature to have your update distributed to either floppy disk, a folder, or a Web site.
The following Self Test questions will help you measure your understanding of the material presented in this chapter. Read all the choices carefully, as there may be more than one correct answer. Choose all correct answers for each question.
Resume MyNext
Sub Proc1()
On Error GoTo EH
Proc2
Print "Hello World"
Exit Sub
EH:
Msgbox "Error Encountered"
Resume Next
End Sub
Sub Proc2
Err.Raise 53
Print "Hi World"
End Sub
Dum x As Integer