Establishing the Development Environment
*Certification Objectives
*Establish the Environment for Source Code Version Control
*Install and Configure Visual Basic for Developing Desktop Applications
*Installing Visual Basic 6.0
*Installing VB6 Through Visual Studio
*Installing Visual Basic 6.0 As a Standalone Program
*Configuring Visual Basic 6.0
*Editor
*Editor Format
*General
*Docking
*Environment
*Advanced
*Certification Summary
*Two-Minute Drill
*Self Test
*
The first step to using any program is installing and configuring it. You certainly wouldn’t get too far without doing that! Fortunately, VB is a relatively straightforward program to set up, thanks to those lovely wizards. Once it is installed, it is highly configurable to suit your needs and personal preferences.
In addition to the installation methods and configuration, this chapter will also cover Microsoft’s Visual SourceSafe. While the Microsoft exam doesn’t deal with this very much, you are expected to know about implementing source code version control, which is what SourceSafe is all about.
So grab a cup of coffee, sit back, and prepare to step through all the options that Microsoft gives you—before you code a single thing!
Any programmer who’s worked on a big project can testify to the necessity of version control. Sometimes changes are made that don’t work or changes that need to be made aren’t, and the need for tracking and sometimes returning to a previous version becomes apparent. In addition, large projects often mean large groups of files that can be difficult to manage. For this purpose, Visual SourceSafe (VSS) comes to the rescue.
VSS keeps a record of changes made to your source code. Changes to source code are saved to a database, and can then be edited and restored as you need it. Visual Basic 6.0 (VB) has the built-in capability to create projects from, add projects to, and invoke VSS. This is all done from the SourceSafe submenu on the Tools menu.
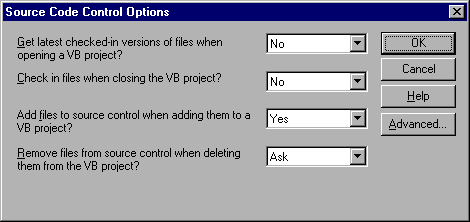
Also in the SourceSafe submenu, you can configure how VB will interact with VSS. Opening "Options" from this submenu, you can configure the options shown in Figure 1. For each of these options, you have three choices: Yes, No, and Ask. Setting these options will determine whether VB will open and save files to the VSS database, or if it should ask you each time you attempt to open or save a file. The final option in this dialog box determines whether deleted forms from your VB project should also be deleted from the VSS database.

Figure 2-1: Source Code Control Options dialog box
In using VSS, the user must have a valid user account. Accounts are created with SourceSafe’s Admin utility . If a user does not have a valid account, he or she won’t be able to access the database. Instead, the user will receive a message stating that the user in question isn’t found.
Using VB with VSS is almost transparent and is easy to use. Most of the work for SourceSafe is done by the VSS Administrator. A programmer’s interaction with a VSS database is mainly limited to a logon screen. When saving to the database, the VB programmer will be asked to provide his or her username, password, and the database he or she wishes to save to (or open projects from, if that is the case) .
Exam Watch: In the exam you may encounter a question in which a user is unable to access the VSS database. Remember that the VSS Administrator must set up a valid account for the user before he or she can use SourceSafe.
If Microsoft were to change its motto, it would probably be to something like "All roads lead to Rome". Microsoft has always had the habit of giving users more than one way of doing things. The installation of Visual Basic 6.0 is no different.
Visual Basic 6.0 is available as a standalone program, or it can be installed as part of the Visual Studio 6.0 Suite of products. VB is the same program in either installation, but the methods of installation are slightly different. In this chapter we will cover how to install VB both as part of Visual Studio and as a standalone program.
Before performing the installation, make sure that the computer on which you’re installing VB meets the system requirements. There’s no better way of wasting money and time than not having hardware that’s powerful enough to run the software. The system requirements for VB are listed in the following table:
| Operating System | Microsoft Windows 95, Microsoft Windows 98, or Microsoft Windows NT Workstation 4.0 (Service Pack 3 recommended) or later . |
| Processor | 486DX/66 MHz or higher processor. It should be noted that a Pentium or higher processor is recommended. Any Alpha processor running Microsoft Windows NT Workstation |
| Memory | 16MB of RAM for Windows 95 or Windows 98. 32MB of RAM is required for Windows NT Workstation |
| Display | VGA or higher resolution |
| Other Devices | CD-ROM drive (to install the software) and a mouse or other suitable pointing device |
| Disk Space | Standard Edition: typical installation
48MB, full installation 80MB. Professional Edition: typical installation 48MB, full installation 80MB. Enterprise Edition: typical installation 128MB, full installation 147MB |
Table 1: System requirements for Visual Basic 6.0
Exam Watch: Many installation questions seem to revolve around system requirements not being met. While it may not be a direct question, indirect ones may appear. This is not only the case in the VB 6.0 exam, but other Microsoft exams as well. Make sure you know the system requirements for VB.
The installation of VB6 is a simple process. Upon starting the setup program, a Wizard steps you through each phase of the installation process. It is rare to experience problems during the installation.
As has been said, and is pretty obvious, the first step of starting the installation process is starting the setup program from your installation CD-ROM. Once this is done, you’ll be met with the typical opening screen that welcomes you and tells you that you’ll be walked through the setup of Visual Studio. Clicking Next, you are then faced with the End User License Agreement. If you want to continue, click the "I accept the agreement" option button, then choose Next . Failing to do so will only give you the option of exiting the Setup Wizard. All other command buttons will become disabled except the Exit button.
After accepting the agreement, you will be given the option of Uninstalling previous
installations of Visual Basic and other programs that come with the Visual Studio Suite
(see Figure 2-2). While the Uninstall screen proclaims that it wants to remove Visual
Studio 97, standalone versions of these programs will also appear checked off . In other
words, if you’ve never owned Visual Studio 97 and have a copy of Visual Basic 5 on
your system, Visual Basic will appear checked. If you wish to keep your previous version
of Visual Basic, simply uncheck the box beside the program’s name.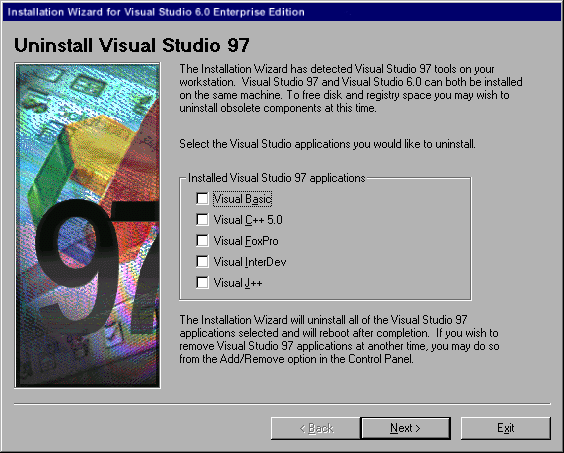
Figure 2 During the installation process, you are given the option to remove previous versions of Visual Basic and other programs
The next step is finally deciding what kind of installation you’d like to perform. You have three options here: Custom, Products, or Server Applications (see Figure 3). This may be a little different from some of the options given by other suites. Visual Studio offers different options for servers, workstations, and standalone computers. Server Applications installation skips over workstation programs and will install server tools. Products installation will install programs used on workstations and standalone computers, such as the Visual Basic program . Custom installation allows the installation of server and workstation/standalone products. For standalone computers, choose either Products or Custom.
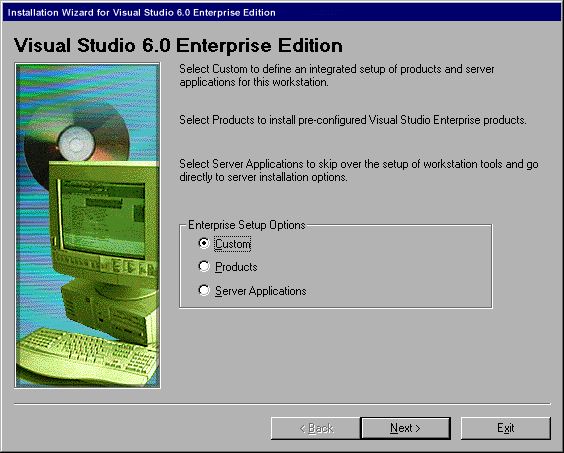
Figure 3 Visual Studio 6 offers three kinds of setup options
Following this, you will get a screen telling you that Visual Studio Setup is starting, followed by a screen welcoming you to the setup program. Clicking on the Continue button will get you on your way. You are then required to verify your Name and Company name, which it will enter for you from information it obtains from the system. If this information is incorrect, this is your only chance to change it . You are also required to enter the CD key that comes with your installation package . You will not be able to continue without a valid CD key.
After verifying and inputting this information, click Next and you’ll see a Product ID screen. This is the same information that will appear in the About screen in VB’s Help menu. The Product ID is occasionally requested by Microsoft when you call their support number. It is a good idea to write this number down. It will do you little to no good that it appears in the About this Product screen in Help if you’re unable to load Visual Basic!
The next screen will ask you if you wish to install other client products, such as InstallShield. This version of InstallShield is designed for Visual C++. Click the Install button if you’re also installing Visual C++, or Next if you’re not.
The following screen offers you a choice of changing the installation directory, exiting the installation, or customizing the installation. This is a different from the previous option screen because this customization deals with choosing what programs you want to install. If the current directory to install to is okay, just click the Custom button. You’ll be faced with a listing of different programs and tools (see Figure 4). If you just want to install VB, deselect everything except Microsoft Visual Basic 6.0 and Data Access . Parts of VB won’t run properly without the Data Access components installed. After selecting the components you wish to install, click the Continue button.
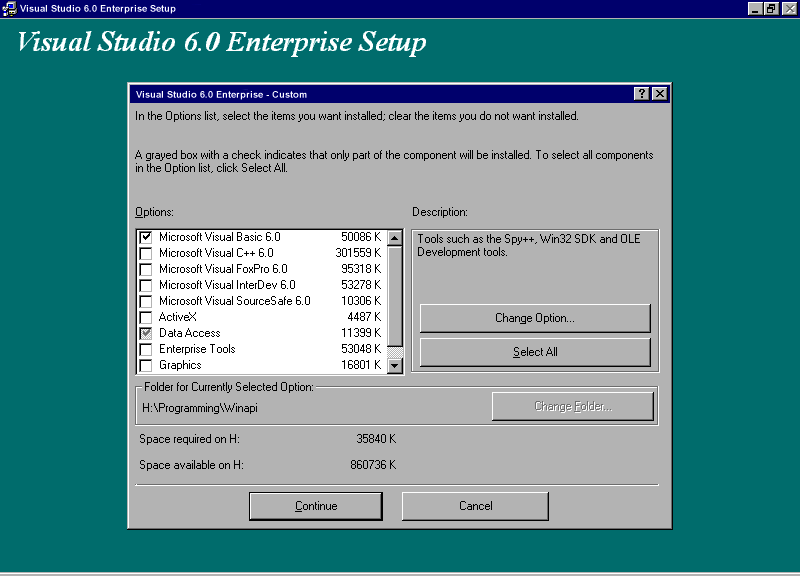
Figure 4 To install just Visual Basic 6.0 through Visual Studio, select just the Microsoft Visual Basic 6.0 and Data Access
VB (and any other components you selected) will now install onto your hard drive. No further interaction is required until after all files have been transferred, and your system files have been updated. Once this is done, a screen offering you the options to either exit setup or restart your computer appears. Clicking on the Restart Windows button will reboot the computer; on loading Windows, your system files will finish being updated. Upon entering Windows, you can start VB and begin programming.
One of the most important aspects of installing a program occurs before you even purchase it. As was mentioned earlier in this chapter, make sure your system has the minimum requirements to run VB. The minimum requirements are listed in Table 2-1.
In addition, make sure you’ve purchased the version of VB that suits your needs. As with many of Microsoft’s development programs and suites (such as Visual Studio 6.0), VB comes in several flavors. These are Standard, Professional, and Enterprise. With each flavor comes different tools. The basic components needed to create programs come in the Standard package. Extra tools and files are added to the standard package in Professional, and the Enterprise version carries tools that allow you to create robust network and standalone applications.
Once you’ve decided on the package you need and determined that your system will support VB, you’re ready to install it. After starting the setup program from the installation CD-ROM, you’ll be greeted with a Welcome screen. After clicking on Next, a screen appears that outlines the End User License Agreement, outlining your agreement in using the product. There are two choices here: one that accepts the agreement, and another that declines it. To continue with the installation, you must accept the agreement.
Continuing with the installation, you will be faced with a screen that requires information about you and proof that you are performing a legal installation. Two of the three fields here, Name and Company, will be filled in already from information obtained from the Windows Registry. If this information is incorrect, this will be your only chance to change it. The third field asks for a CD key. This is the registration number that appears on the package containing the installation CD-ROM. It’s use is to determine that you are making a valid install, rather than installing pirate software. After confirming and inputting the necessary information, click Next.
The dialog box that follows is a Product ID screen This contains an identification number that has been made up from the CD key you entered and information coded into the setup program. It is wise to write this number down. While this serial number can be viewed after your installation is complete (select Help | About Microsoft Visual Basic), that won’t do you any good if VB doesn’t install properly or won’t start at all. It is also a good idea to keep this number in a safe place.
The remaining screens involve choosing the type of installation you wish to perform, and where you want the files to be installed. If you don’t want VB to install to the default C: drive and directory, this is when you should change the default settings. However, if Setup detects that not enough room is available on the drive you’ve chosen, you will be given another chance to choose a different target directory. Of the installation types available, Typical installation will install the main components required to run VB on your system. Full installation will fully install VB and all of its components and documentation from the CD-ROM to your hard drive. Custom installation allows you to adjust the installation to suit your needs. If you choose Custom, you will also have to choose which components of Visual Basic you want to install. For most installations, Full is all that is required.
Following this, files will be transferred from the installation CD-ROM to your hard disk. This can be a long process, depending on the components or type of installation you’ve chosen, and the speed of the system. Information will be displayed about VB throughout the installation at this point. Also, a bar will display the progress of the installation. If for some reason this bar freezes and no hard disk activity occurs for some time, you may need to reboot your computer. Depending on when the problem occurred, VB installation may automatically continue from the point of failure, or you may be forced to run Setup again.
When all of the files have been successfully transferred, you will be informed that Windows will need to be restarted and asked whether you want to reboot the computer. Choose Yes, and your computer will restart, and the Windows system files will be updated. When Windows reloads, a submenu named "Microsoft Visual Basic 6.0" will appear on the Start | Programs menu. This is where you can start VB and begin programming.
Exercise 2-1 Installing Visual Basic 6.0
From the installation disk, start the setup program.
You will be met with an initial welcome screen. Click Next to continue.
Accept the End User License Agreement. Click Next to continue to an information screen.
The information screen will already have your Name and Company Name information filled in. It acquires this information from Windows. If the information is incorrect, change it. Enter your CD key, which is located on the back of the Visual Basic installation CD-ROM cover. Click Next.
The next screen is a Product ID screen. This includes an ID number that should be written down.
Follow the remaining screens, choosing the type of installation you want to perform. If you choose Custom, you will also have to choose the components of VB you wish to install.
When prompted, reboot the computer. Your system files will be updated when Windows reloads.
After installation, VB will be available from the Start | Programs menu
Visual Basic is a highly configurable development program. To configure VB, click Tools | Options . This will bring up a dialog box that has the following tabs: Editor, Editor Format, General, Docking, Environment, and Advanced. Clicking on the different tabs will bring up various options that you can change to best suit your needs.
Before accessing the Options dialog box, it is important to realize that you must have a project open . It doesn’t matter if this is a current project or a new project. If you don’t have a project open, Options will be disabled (grayed out) under the Tools menu.
The Editor tab allows you to configure the Code and Project Windows. The Project window enables you to navigate through the forms and modules that make up the application you’re working on. This window also allows you to switch between viewing the design of a form (the buttons, fields, and so on that will appear as the user sees them), and viewing the code for that form. Viewing the code brings up the Code window. This is where you do your actual programming (that is, write your code). The top section of this tab controls settings that deal with code, while the lower section controls window settings (see Figure 5).

Figure 5 The Editor tab of the Options dialog box
In the Code Settings section, there are a number of different options. The first of these is the Auto Syntax Check, which helps you prevent syntax errors in your code . VB will verify if the correct syntax has been used if this option is checked.
Below this is the Require Variable Declaration option . If this is checked, "Option Explicit" will be added to any new modules, making it a requirement that explicit variable declarations are used . When Option Explicit is added to the General Declaration section of your code, only explicit variables are allowed .
For those not familiar with variables (explicit or otherwise), it is important that you understand them. A variable is used to temporarily hold values during a program’s execution (almost like putting something in a box until we need it). When variables are used, a section of memory is held for any data we assign to the variable. You can then manipulate data in the variable as you would any other value (as we’ll see later).
The first step to using variables is choosing a name . As with everything in programming, there are rules to naming variables:
they must begin with a letter
they can’t contain a period or type-declaration character
they can’t be more than 255 characters
they must be unique within the same scope. This means the range in which the variable is referenced. In other words, you can’t have two variables named "MinWage" in the same procedure, form, and so on
It is also a wise idea to give the variable a name that’s meaningful. In the example "MinWage", you can guess that it refers to the minimum wage pay rate. One of the worst habits you can pick up is giving a variable a meaningless name. Imagine if you named a variable used for minimum wage "Bob" or "MyVariable". It might make sense now, but it won’t be of any use to you six months from now, when you’ve forgotten what it is.
Once you’ve chosen a name, you’re ready to use the variable in your program. The common (and best) method of doing this is to "declare" the variable by using the "Dim" keyword :
Dim MinWage As Integer
What you are doing when declaring a variable is telling your program that at one point in the program a variable called MinWage will be used to hold a value. The "As Integer" tells the program that the type of value will be an integer. You could also specify any of the following data types to be used in the variable:
Data Type |
Description |
| Boolean | Can except values of "True" or "False". Storage space: 2 bytes |
| Byte | Numbers ranging in value from 0-255 Storage space: 1 byte |
| Currency | -922,337,203,685,477.5808 to
922,337,203,685,477.5807 Storage space: 8 bytes |
| Date | Represents dates ranging from 1 January
100 to 31 December 9999 Storage space: 8 bytes |
| Double | -1.79769313486232E308 to
-4.94065645841247E-324 for negative values and from 4.94065645841247E-324 to
1.79769313486232E308 for positive values Storage space: 8 bytes |
| Integer | -32,768 to 32,767 Storage space: 2 bytes |
| Long | -2,147,483,648 to 2,147,483,647 Storage space: 4 bytes |
| Object | Used to refer to objects. By using the Set
statement, a variable declared as an Object can then have any object reference assigned to
it Storage space: 4 bytes |
| Single | -3.402823E38 to -1.401298E-45 for negative
values and from 1.401298E-45 to 3.402823E38 for positive values Storage space: 4 bytes |
| String | Codes in the ASCII character set (the first 128 characters on a keyboard), and special characters (such as accents, international symbols, etc.) making up the remaining 128. |
| Variant | Default data type. This is used when no data type has been specified, and takes up 16 bytes of storage space. It represents numeric values ranging from 1.797693134862315E308 to -4.94066E-324 for negative values and from 4.94066E-324 to 1.797693134862315E308 for positive values |
Table 2 Variable Data Types and Descriptions
Visual Basic doesn’t force you to explicitly declare a variable before using it. You could just put a variable in your code, such as the following examples:
MinWage=6.85
Minwage=6.65
Using this method creates implicit variables. However, while these appear to be the same variable with two values being assigned to it, notice that one variable is called MinWage, while the other is called Minwage. Visual Basic will create two variables because of this possible spelling error. This is a major problem with implicitly declaring variables.
This is where "Option Explicit" comes in handy. By typing this at the top of a module, every variable must be explicitly declared. This will keep you from making such mistakes as shown above. Every variable must be explicitly declared before it can be used.
Continuing with the other options on the Editor tab, Auto List Members is an option that makes it easier to program . When typing code in the Code window, a box will appear that completes a statement from where you point the cursor. Auto Quick Info determines whether information about functions and function parameters will be shown. Auto Data Tips will display a variable’s value where you place the cursor.
When typing code, it is always a good idea to use tabs. This is done by pressing the Tab key on your keyboard to indent certain lines of code. While this is by no means a requirement of programming, it is good practice. Look at the two examples of code, and you’ll quickly see how indenting makes code easier to read:
If x > y Then
Msgbox "X is greater than Y"
Else
Msgbox "Y is greater or equal to X"
End If
If x > y Then
Msgbox "X is greater than Y"
Else
Msgbox "Y is greater or equal to X"
End If
However, continually tabbing can quickly become monotonous. If the Auto Indent option is set, when you tab the first line of your code, all of the following lines of code will subsequently be indented . The width of the tabbing is determined by the value in the Tab Width property. This is a numerical value, and while its default is four spaces, you can set it anywhere from one to 32 spaces .
The Window Settings section contains three different options: Drag-and-Drop Text Editing, Default to Full Module View, and Procedure Separator. Drag-and-Drop Text Editing lets you drag and drop code from the Code window into the Immediate and Watch windows. When Default to Full Module View is checked, you can look at procedures in the Code window as a scrollable list of subprocedures. If this option is unchecked, the Code window will display one subprocedure at a time. The Procedure Separator property determines whether separator bars that appear between subprocedures will appear in the Code window. If this box is unchecked, no separation bars will appear before or after procedures.
The Editor Format tab allows you to configure the appearance of your code in the Code Window (see Figure 6) . Through this tab, you can set how each text style appears.
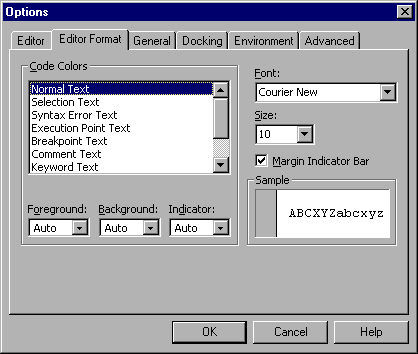
Figure 6 The Editor Format tab of the Options dialog box
The Code Colors section contains a list of various text styles. These include comments, keywords, and so on. After selecting a text style from this list, you can then set the foreground, background, and indicator colors. The foreground is the text that is typed; background is the background color of the code window . The margin indicator is the left and right margin of the code window. To the right of this, you can configure the font and font size. Remember that changes to text styles here don’t reflect text that will appear in your program . It only affects the appearance of code in the Code window. Before saving any of these changes (by clicking on the OK button), you can view what the changes will look like in the Sample window.
The General tab allows you to configure settings for your Visual Basic project. Error handling and compiling settings are found on this tab. There are three main sections to this tab: Form Grid Settings, Error Trapping, and Compile (see Figure 7).

Figure 7 The General Tab of the Options dialog box
The Form Grid Settings allow you to configure the appearance of the form grid in Design mode. This section contains a number of options. Show Grid specifies whether the grid appears on your form. Grid Units sets the units of measurement used in the grid. The default unit of measurement is twips (for more information on twips, see the Exam Watch Note below) . This option is separated into two parts: width and height. Below this is the Align Controls to Grid. Enabling this option will automatically align a control’s outer edges to the grid lines.
Exam Watch: You probably won’t encounter much regarding twips on your exam, but it’s interesting to know what one is. A twip is a unit of measurement that’s screen independent. This allows the placement and proportion of items appears the same on every display. How small is a twip? Very small . . . . it’s equal to 1/20 of a printer's point. In more practical terms, there are about 1,440 twips to an inch or 567 twips to a centimeter.
The Error Trapping section determines how Visual Basic will handle errors (which is covered more in depth in Chapter 3). Break on All Errors will cause the project to enter Break mode when an error is encountered . If you have incorporated an error handler in your code, it doesn’t matter. This option will cause a break to occur regardless. Break in Class Module is the default setting, will only enter Break mode when an unhandled error is produced in a class module. This option will cause VB to enter Break mode at the end of the code that produced the error. Break on Unhandled Errors will make Break mode occur when an error is trapped and no error handler is found. If an unhandled error is in a class module, the break will occur on the line of code that caused the error.
The Compile section has settings that determine how a project will compile. If Compile On Demand is checked, the project must be fully compiled before it starts . If Background Compile is checked, idle time will be used to finish compiling a project. This property is only available if Compile On Demand has also been selected.
The final two options on this tab are Show ToolTips and Collapse Proj. Hides Windows. The first of these two determines if ToolTips for the toolbar and Toolbox items are displayed . ToolTips are those little labels that appear when you hold your mouse over an object for a length of time. The second option sets whether a window is hidden when your project is collapsed in Project Explorer.
If you use a laptop computer, you may get the wrong impression when they first see the Docking tab in the Options dialog box (see Figure 8) . This tab has nothing to do with docking stations. What this deals with is how windows in VB will interact with one another. Docking occurs when one window can attach itself to other windows . If an option here isn’t selected, you will be able to move a window on the desktop, and leave it there. In such a case, one window won’t connect itself to another.

Figure 8 The Docking tab of the Options dialog box
There is only one section to the Docking tab, and it offers a list of windows that you can make dockable . Checking the check box beside an item will make that window dockable, while unchecking it will disable a window’s ability to attach to other windows.
As its name suggests, the Environment tab allows you to configure your Visual Basic development environment (see Figure 9). One of the features on this tab is the When Visual Basic Starts section . Here you can specify whether VB will create a new project when it starts, or if it will prompt you for what kind of project you’d like to open or create.

Figure 9 The Environment tab of the Options dialog box
In this dialog, you can also configure how VB will react when you start (by pressing F5 for example) a program you’ve created. You can have it automatically save changes to your project, prompt you to save changes, or not save changes at all .
Templates can also be configured through the environment tab. You can specify which templates to show and the directory in which you want to save templates . Various kinds of templates are listed. To not show them, simply deselect the check box beside the template type that you don’t want shown. If you wish to change the directory that your templates are stored, you must know the path—no browse feature is available here.
The Advanced tab determines settings for various features of your current Visual Basic project. There are four configuration options for this tab: Background Project Load, Notify when changing shared project items, SDI Development Environment, and what External HTML Editor you wish to use (see Figure 10).

Figure 10 Advanced Tab of the Options dialog box
The Background Project Load affects how fast control is returned when a project is loaded . It determines if code is loaded in the background, an option that returns control to the developer faster. By default, this option is checked.
Notify when changing shared project items allows you to be notified when you change and try to save a project item that is shared. When items are shared by two or more projects, each project has a copy of that item. Because of this, this option will ask if you wish to synchronize all copies of an item before the project is saved.
The SDI Development Environment allows you to configure VB’s Integrated Development Environment (IDE). You can use a Single Document Interface (SDI) environment or a Multiple Document Interface (MDI) environment . When the SDI Development Environment is checked, windows can be moved anywhere on the screen, and will remain on top of other applications (when VB is the current application). In other words, you can see your other open applications (or the Windows Desktop) looming in the background. MDIs contain child windows, which are contained in a single parent window. The differences become obvious when you look at Figure 11 and Figure 12. The SDI Development Environment option allows you to choose between these two styles. Changing this option will only become apparent after you restart VB.
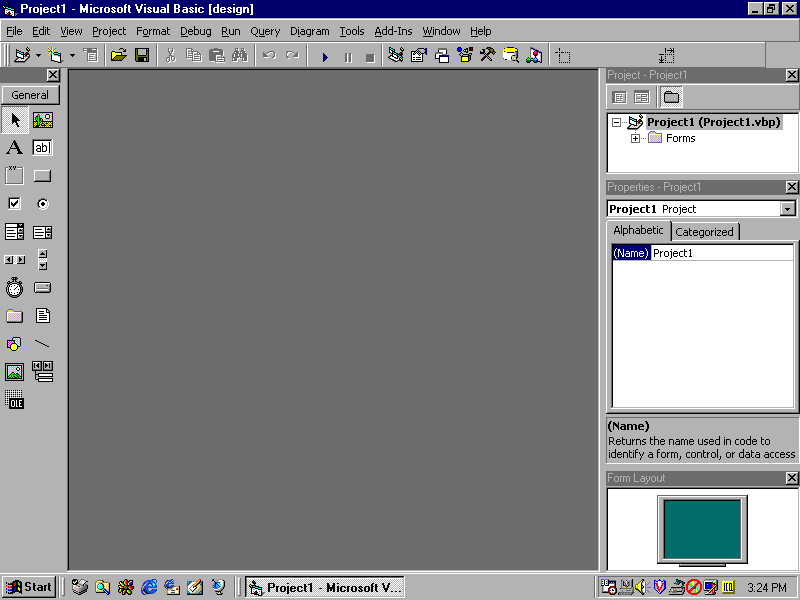
Figure 11 How VB appears with the SDI Development Environment option unchecked
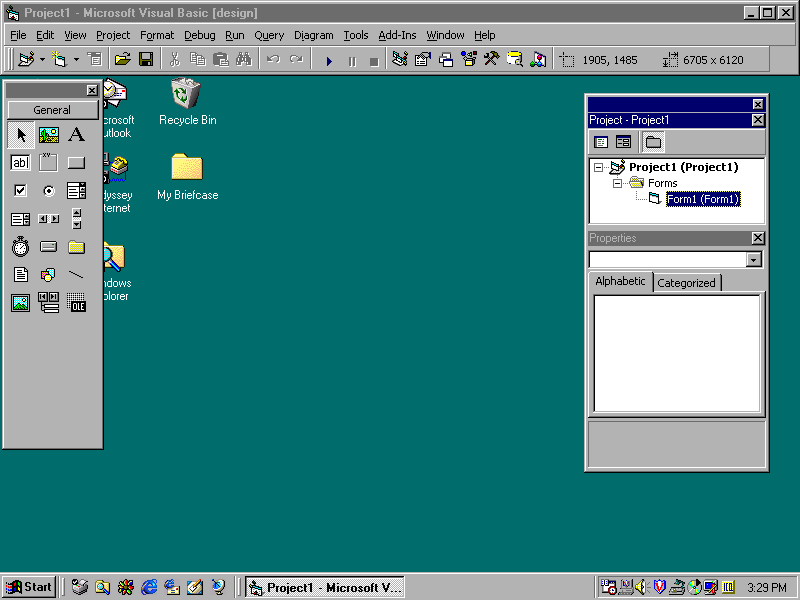
Figure 12 How VB appears with the SDI Development Environment option checked
The final setting on the Advanced tab allows you to configure which program you would like to use as your default external HTML editor . If unaltered, VB will use the Windows Notepad program for your HTML editor.
Exercise 2-2 Configuring Visual Basic 6.0
| I want to install Visual Basic 6.0 on my system, but I don’t want any other programs installed. | Install either the standalone installation of Visual Basic, or during setup of Visual Studio 6.0, choose Visual Basic 6.0 and Data Access. |
| We’ve just installed a new hard disk and I moved my templates to a new directory on the new hard disk. Now when I attempt to use a template, VB can’t find them. | In the Options dialog box, click the Environment tab and input the path of the new template directory. |
| I’m tired of writing Option Explicit to the top of every module. | From the Options dialog box, click the Editor tab and choose Require Variable Declaration. This will insert "Option Explicit" to the top of each of your new modules. This means that explicit variables must be used in these modules. |
| I’m worried about making changes to my source code and finding that the old source code worked better. | Implement source code version control with VSS. |
VSS allows for source code version control. The ability to create projects from, add projects to, and run VSS is integrated into VB. Source code files are saved to a database. This allows you to restore previous versions of source code if needed.
In addition to the different flavors of VB (Standard, Professional, and Enterprise), you can also install this development program through standalone installation or through the setup of Visual Studio 6.0 development suite.
While the installation process is different between Visual Studio and standalone setups, configuration is identical. VB is a highly configurable development program. You can set how code will appear, how compiling will occur, the appearance of projects and VB, and much more. Configuring VB is a simple matter of pointing and clicking on the options you wish to set.
The Self-Test questions will help you measure your understanding of the material presented in this chapter. Read all the choices carefully, as there may be more than one correct answer. Select all correct answers for each question.
VB Enterprise requires a minimum Pentium II processor.
B. VB Enterprise requires 128MB of free hard drive space for a typical installation
and 147MB of free hard drive space for a full installation. For this system, you could
install Standard or Professional editions, which require 48MB for typical installation or
80MB for full installation.
Dim variable name (As data type)
Specifying the data type is optional.