Creating User Services
*Certification Objectives
*Implementing Navigational Design
*Captions and Names and Indices . . . Oh My!
*Adding Code to a Menu Interface
*Dynamically Modifying the Appearance of a Menu
*Adding Pop-Up Menus to an Application
*Creating an Application that Adds or Deletes
*Menus at Runtime
*Adding Controls to Forms
*Setting Properties for Command Buttons, Text
*Boxes, and Labels
*Command Buttons
*Text Boxes
*Labels
*Assigning Code to a Control to Respond to an Event
*Creating Data Input Forms and Dialog Boxes
*Displaying and Manipulating Data by Using
*Custom Controls
*ListView
*ImageList
*Toolbar
*Status Bar
*Creating an Application That Adds and Deletes Controls at Runtime
*Using the Controls Collection to Manipulate Controls at Runtime
*Using the Forms Collection to Manipulate Forms at Runtime
*Writing Code That Validates User Input
*Creating an Application that Verifies Data Entered by a User at the Field Level
*Creating an Application that Verifies Data Entered by a User at the Form Level
*Creating an Application that Enables or Disables Controls Based on Input in Fields
*Enabling Controls Based on Field Input
*Disabling Controls Based on Field Input
*Writing Code That Processes Data Entered on a Form
*Adding Code to the Appropriate Form Event
*Initialize
*Terminate
*Load
*Unload
*QueryUnload
*Activate
*Deactivate
*It’s all About Timing
*Adding an ActiveX Control to the Toolbox
*Using Data Binding to Display and Manipulate Data from a Data Source
*Instantiating and Invoking a COM Component
*Creating a Visual Basic Client Application that Uses a COM Component
*Creating a Visual Basic Application that Handles Events from a COM Component
*Creating Call-Back Procedures to Enable Asynchronous Processing Between COM Components and Visual Basic Client Applications
*Implementing Online User Assistance in a Desktop Application
*Setting Appropriate Properties to Enable User Assistance in a Desktop Application
*Help File
*HelpContextID
*WhatsThisHelp
*Creating HTML Help for an Application
*Implementing Messages from a Server Component to a User Interface
*Implementing Error Handling for the User Interface in Desktop Applications
*Identifying and Trapping Runtime Errors
*Handling Inline Errors
*Certification Summary
*Two-Minute Drill
*Self Test
*
This chapter covers a number of nontrivial items that Microsoft definitely wants you to know. In other words, be prepared to see them on the exam!
First up, we’ll be covering a number of important aspects of programming. This includes navigational design, creating input forms and dialog boxes, validating input, and more. We’ll also be going through Microsoft’s vision of COM: ActiveX. The final coverage this chapter will deal with is making a more robust application by providing help and error handling.
While this chapter covers a substantial amount of material, it’s important to keep in mind that Visual Basic 6.0 provides numerous tools that assist in making the work easy. VBremains the most user-friendly and easy-to-use development program on the market. As we work through this chapter, these facts quickly become apparent!
If you can’t get around in a program, then it probably shouldn’t even have been written. That’s exactly how important navigation in a program is. The way you implement navigation into your VB program is with menus and controls. In this chapter, we’ll cover adding both of these to your fledgling applications.
The way to implement menus on forms is with the Menu Editor. This tool allows you to add, view, and delete a list of menu items for a particular form. Because menus, like other controls, belong to individual forms, this allows you to create different menus for each of your forms. It also means that you will have to specify each form’s menu interface separately.
To start the Menu Editor, you must have an open form and be in Design time. If you’re viewing code, Menu Editor won’t start. After confirming that you’re in the right mode, you can start the Menu Editor in one of three ways :
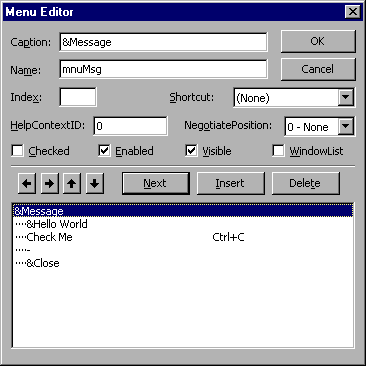
After doing this, you’ll see a screen similar to that shown in Figure 1. The big difference between the figure and what you’ll see on your screen is that yours won’t have any menu items . . . yet!

Figure 1 The Menu Editor dialog box
The top half of the Menu Editor dialog box displays properties of a menu item selected from the scrolling list on its bottom half. Notice that the structure of the menu system is hierarchical—similar to the structure of directories and subdirectories in Windows Explorer. In the middle of the Menu Editor are buttons that allow you to add, delete, and modify your menu system.
Like everything else, items in your menu system must have a name. The standard prefix (called Hungarian notation) for menu items is "mnu" . The logic behind this is that when you’re looking through your code, you’ll automatically be able to see that the code is for a menu item.
Each menu item must have a different name, or you must use the Index field. When more than one menu item has the same name, each item becomes an element of an array, and thereby needs an index number. Imagine that you named three menu items "mnuItem", and you call mnuItem in your code. Which mnuItem are you referring to? By adding an index number, you can have mnuItem(0), mnuItem, and so forth. Each element of the array can be accessed by its index number, which can be set to 0 or 1 to start the array. The largest number the Index property can be set to is 32767, giving you a total of 32,768 elements to work with!
Captions are what a user sees on the menu. If you’d like the user to press the Alt key to access a menu item, just put an ampersand ("&") before the letter you’d like to use . For example, if you have a menu item called "Messages" and you want the user to use Alt-M to access it, type "&Messages" in the Captions field. It is important to remember that an access key like this is different from a shortcut key—an access key is only available when the menu item is showing, while a shortcut key can be used any time . You can specify a shortcut key for a menu item with the Shortcut drop-down list in Menu Editor.
The final four properties that we’ll discuss at this point are Checked, Enabled, Visible, and WindowList. If the Checked check box is enabled in Menu Editor, a check mark will appear beside the menu item. If it this box is unchecked than no check mark will appear. The enabled property determines whether the item will respond to events . If it is unchecked, the menu item will be grayed out by default in your application. The visible property is fairly straightforward, as it determines whether your item will appear on the list. If it is unchecked, the menu item won’t appear. Finally, WindowList is used to specify that the menu control contains a list of open Multiple Document Interface (MDI) child forms in an MDI application. MDI child forms are windows that appear within your main application (such as multiple spreadsheets open in Excel). When the WindowList is checked, any MDI child forms will be displayed under this menu control. Together, each of the properties here will determine the appearance of your menu or menu item.
Exercise 3-1: Creating a Menu Interface
Select Tools | Menu Editor.
After finishing Exercise 3-1, you notice that while you have a nice interface, it doesn’t do anything. Don’t worry. Throughout this chapter we’ll use the form and menu created in the above exercise and add code to it. By the end of this chapter, it will be a functioning (though not particularly functional) application.
In Design view, you can view and select items on your menu interface. By clicking on a menu item, you’ll bring up the code window for that particular item. This will enable you to program what will happen when a user clicks on that particular item.
While each item has its own methods and properties, it only has one event procedure—Click . In other words, when the program is running, the code will only execute when you click on that menu item (or programmatically call the click code, which simulates a user clicking the menu item). No other event can execute the code.
Exercise 3-2: Adding Code to a Menu Item
MsgBox "Hello World"
Unload Me
In the above exercise, you’ll note that for the Close menu item we didn’t specify the name of the form that we wanted to close. Instead we used the "Me" keyword . This keyword acts as an implicitly declared variable, allowing us to unload the form without referring to its name. Because it was the only form in our program, when it closed, our program was completely shut down.
The easiest way to modify the appearance of a menu is by toggling its property values. Rather than adding or deleting menu items programmatically from your interface, you can simply change the visible property. Another example is having a check appear beside a menu item to show whether an option is selected or not during runtime. Such appearances can easily be manipulated by adding code to your program that will change a menu item’s properties.
Exercise 3-3: Dynamically modifying the appearance of a menu
mnuCheck.Checked = True
Each of the properties for Checked, Visible, WindowList, and Enabled can be toggled by using the code Object.Property=True or Object.Property=False. You can also change the caption that will appear in your menu. To do so, go into the Code window and type Object.Caption="New Name". By altering the properties of a menu, you can dynamically modify the menu’s appearance.
Often applications will also have menus that pop up when a user right-clicks the screen. You might think that this is a highly evolved bit of coding, but it’s actually one of the simplest, handiest bits of code you’ll come across.
In the MouseDown event of a Form or Control, type the following code:
If Button = vbRightButton Then
Me.PopupMenu mnuMsg
End If
What this snippet of code will do is look at whether the user clicked his or her right mouse button . It they did, then the menu named "mnuMsg" (which we just created) will pop up. While the Me keyword was used here, you can easily replace it with the name of the Form or control the pop-up menu to pop up on.
By creating a menu control array, you can dynamically add menu items to or delete them from your program. You can think of an array as an expanding file folder to which you add elements (which are like files). Because we can add and delete elements in an array, this allows us to add items to and remove them from our menu interface.
Before we dynamically add menu items, we’ll create a control (for our own use) to see our results. In Menu Editor, create a new menu. Select the last item in your current menu and click Next. Click the left arrow button to create a new menu. Name your new menu "mnuNew", with the caption "New Menu". Click Next, and then click the right arrow button to create a menu item. Add the following menu items:
Name Caption Index
MnuAdd Add
MnuRemove Remove
MnuArray - 0
Exam Watch: Remember that to create a separator bar, you should use a hyphen in the caption.
In the following exercise, we will add items to our menu by adding elements to our menu control array. We created our array by inputting a 0 into the Index of mnuArray (the separator bar). In the end result, we’ll be able to click Add to add a menu item, and Remove to remove a menu item.
Exercise 3-4: Adding and Removing Menus at Runtime
Option Explicit
Dim IntCount
IntCount=0
intCount = intCount + 1
Load mnuArray(intCount)
mnuArray(intCount).Caption = "Array " & mnuCount
mnuArray(intCount).Enabled = True
Unload mnuArray(intCount)
intCount = intCount – 1
Adding controls to your forms is one of the easiest things to do in VB. Older programmers know the difficulties of programming each and every control from scratch, but with VB, you’re a double-click (or a simple drag of the mouse) away from adding controls. It’s as simple as that.
VB comes with a toolbar that has icons depicting common controls (see Figure 2). These include buttons, text boxes, labels, and much more. By double-clicking on one of these icons, a control will automatically be placed on your active form. You can also single-click on a toolbar icon, then drag your mouse across the form—thereby drawing a control to the size you want.
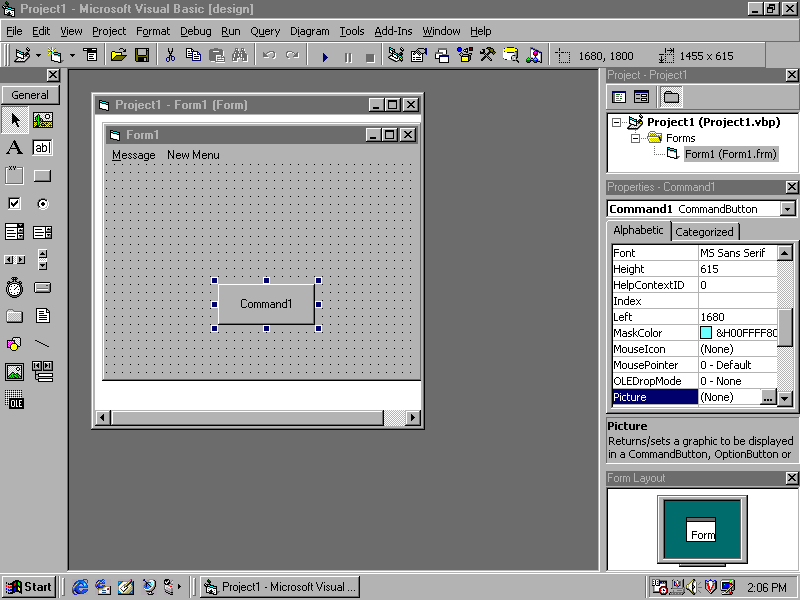
Figure 2 The left side of this picture shows the toolbar containing icons of different controls
After adding a control to your form, you can click on it to display handles that will allow you to resize your control. Doing so allows you to adjust the control to a size that matches other controls on your form. You can also move the control anywhere on your form, allowing you to create a structure that achieves better functionality and visual appearance.
On the Job: Remember to limit the amount of controls you add to a form. Not only will this increase the performance of your application, but it will make the application easier to use. Having too many controls on one form can make an application confusing for a user.
Clicking on a control you’ve added to your form brings up the properties for that control in the Properties Window (see Figure 3). If the Properties Windows isn’t already open, you can view it by selecting View | Properties Window or by pressing F4 . In viewing the Properties Window, you’ll notice that many of the properties for each of the controls are similar to one another. Through this window, you can alter the name, color, and other aspects of each control.
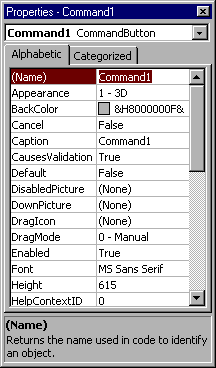
Figure 3 The Properties Window allows you to change the properties of a control or form
If there are no other properties that you change on a control, you should change the Caption and Name properties. While VB gives each control a default name, it is not very descriptive. For example, the first command button you place on a form is given the Name and Caption of Command1. Any additional buttons will be Command2, Command3, and so on. Imagine a user’s confusion as to what tasks each of these controls perform! Also imagine your own confusion when writing code for each of these controls. It would be much easier to view cmdExit with the caption Exit to know what that button does. It is always important to give meaningful names and captions to controls in good programming. For a full listing of naming conventions, see Appendix A of this book.
As you click each of the properties for a control or form in the Properties Window, you’ll notice that the text at the bottom of the window changes. This text provides help, describing what each property does.
It is also important to note the methods offered for changing each of the properties. Here are some examples. When clicking on a form, you bring up that form’s properties. You can click on the Name property and type in frmForm. However, when you click on the Picture property, a button with an ellipsis appears. Clicking this button brings up a window that allows you to browse your hard disk for a graphic, which will appear on your form. Clicking on the Appearance property displays a listbox that allows you to choose whether you want objects to appear as flat or with a 3D effect. In these different ways, you can alter the appearance of the form.
Command buttons are the most common control in an application (see Figure 4). Clicking on a command button will run the code associated with that event. In looking through the events associated with a command button (by checking the Event combo box of the Code window), you’ll see that there isn’t a double-click event for this control. The default event for a command button is Click. For a full listing of the standard namings of controls and variables, refer to Appendix A of this book.
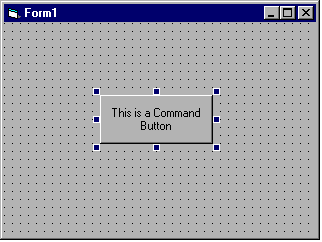
Figure 4 A Command Button on a form
Of the properties associated with command buttons, the Name property is most commonly changed in Design time, while the Caption and Enabled properties are most commonly manipulated at runtime. The Hungarian prefix for command button names is "cmd". The caption is what appears to the user on the button face, while the Enabled property determines whether the user can use this object. The Enabled property has a Boolean value (true or false), and can be changed in Design time through the Properties Window, or during runtime with code.
Text boxes are another of the most common controls found in programs (see Figure 5). It is commonly used to obtain input from users and is often useful for returning information. By default, information can only be written and returned to a single line. However, the MultiLine property allows for text to be written to multiple lines . If MultiLine is set to true, word-wrapping will be performed and will break text into paragraphs when hard returns are used. If the MultiLine property is changed to do this, you should also change the ScrollBars property during Design time. The default value for this property is None, but you can set this to Vertical, Horizontal, or Both, allowing users to scroll down and across long pieces to text.
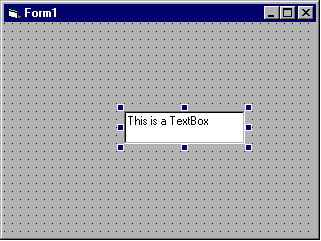
Figure 5 A text box on a form
As with other controls, the first thing you’ll change in the Properties Window for this control is the Name. The Hungarian prefix for this control is txt.
The default property for this control is Text This is what appears in the text box. You can not only set this property in Design time, but also during runtime. Whatever appears in this property is the contents of the text box and can be read and edited (by default) during runtime.
The Label control displays text to a user and can’t be directly changed by the user. The most common use for labels is to provide information to the user about what other controls are for, and what information to place in such things as text boxes (see Figure 6). Now, doesn’t that make labels sound unimportant? Not at all. Providing information is the cornerstone of any application. Whether it’s a game or a database program, the user must know what’s expected from them and what’s going on. Labels are often used to provide that information.
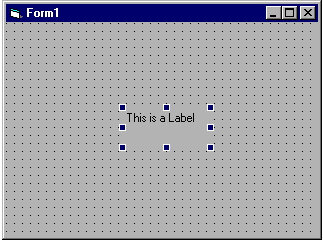
Figure 6 Label on a form
The label control is depicted in VB’s toolbox with a capital A. As with any control, the first property to change is the Name. The Hungarian prefix for labels is lbl. The Caption property allows you to change the text displayed in the label . This property can be changed during Design time, or during runtime programmatically.
As mentioned throughout this chapter, controls respond to events. For example, when you click on a command button, code executes. When the Text property of a text box alters, the Change event is triggered. Each control has different events that can cause code to be executed.
Assigning code to a control is a simple process. We’ve already done a similar process when we created menus, and assigning code to respond to an event in a control isn’t really any different. You assign code to a control through the Code window. Accessing the Code window can be done by either clicking the View Code button of the Project window or by double-clicking the control. Double-clicking a control will bring up the Code window with the default event for that control. After that, it’s just a simple matter to typing.
If you wish to navigate through the Code window and assign code to a different event, the right listbox at the top of the Code window provides a list of events associated with that control (see Figure 7). Selecting an event from the list provided will take you to the subprocedure associated with that event. Also, if you wish to assign code to a different control on that form (or the form itself), the left listbox at the top of the code window allows you to switch to other sections of code associated with controls. Navigation is always as simple as a mouse click.
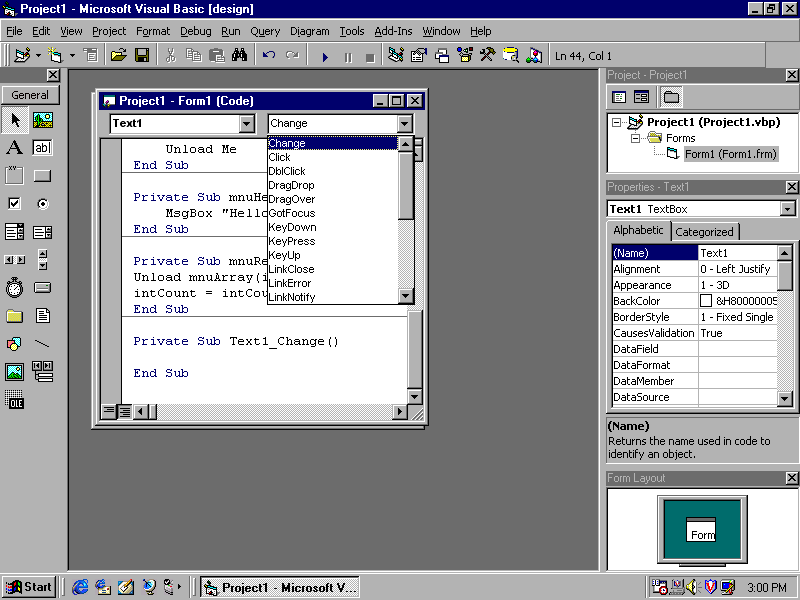
Figure 7 Assigning code to a control’s event is done through the Code window
Creating data input forms and dialog boxes is done by combining the various controls we’ve covered and a few controls we’ll cover next. To create a standard data input form, simply add the number of text boxes required and some method of accepting the data entered (such as with a command button). In doing so, users can enter the into the text box. Clicking the command button, for example an OK button, will execute code that will manipulate, save, and so on, the information in the text box.
As an example, let’s say you wanted to create a small application that determines how much you would pay in taxes for a product purchased in Ontario, Canada. For this, you would need a means to accept input and let the user know that the input should be in Canadian dollars. The user would also have to perform an action so that the answer would be given when they’re finished inputting data. The following exercise steps you through creating such an application
Exercise 3-5: Creating a Data Input Form
Dim x As Currency
x = txtAmount.Text
lblAnswer.Caption = "$" & x * 0.15
Creating dialog boxes are also a matter of adding controls and code to a VB form. An example of a dialog box would be to create a file dialog box. Most of the work of creating a file dialog is simply putting the controls on the form. For such a dialog, you need a DirListBox, a FileListBox, and a DriveListBox. After placing these controls on the form, it is just a matter of making each control aware of the others. To do this, simply double-click each of the following controls and add the following code:
| Control | Code |
| DirListBox | File1.Path=Dir1.Path |
| DriveListBox | Dir1.Path=Drive1.Drive |
Remember that (as with other examples) the code will only work if the names are correct. If you have named your objects differently than appears in the code, then you must change the examples of code to suit these objects.
Upon adding this code, you’ll be able to change from one directory to another by clicking on what appears in each control. While small application does very little, it does illustrate how easy it is to create a dialog box.
Sometimes the general controls in the toolbar just aren’t enough. That’s when you use custom controls. Custom controls are stored in OCX files and contain controls that allow you to do all sorts of things. A few of the more popular ones are listed below. It is however important to remember that when you use a custom control in your project, you will have to include the OCX file with the distribution of that product. Failing to do so will cause the control not to appear on the form, as the code for that control is contained in the OCX file.
You can add custom controls to your project by selecting Project | Components. A dialog box appears showing a list of available components that you can add to your project. The ones we will cover are part of Microsoft Windows Common Controls 6.0 (MSCOMCTR.OCX). By selecting the check box beside this item and clicking OK, the controls will appear in the toolbar.
For each of these controls, you can click on the related icon and draw the control onto your form. Right-clicking the control and choosing Properties will bring up special property pages. You can also bring up the property pages from the regular Properties window, by clicking on the Custom item. In these property pages, you can alter various aspects of the control.
This control allows you to display items in one of four views: large icons (standard), small icons, list, or report. When configured and run, ListView looks like the right pane in Windows Explorer. The view style and other properties can be configured either programatically or through the control’s property page.
The General tab of the property page allows you to set which view is used to display items in the list. You can also sort items, configure how they will appear in the list, and set whether labels for items use single or multiple lines.
The ImageList control acts as a repository for image files. These files can be bitmaps, GIFs, JPGs, icons, or cursors . Instead of storing such images throughout your application, it allows you to store the files in one or more ImageLists, which can be used to provide images to other controls.
When you place an ImageList on a form it appears as a box containing a number of squares. This will not be visible when you run the application. Instead, images can be called from the ImageList. Before this is done, you must put images into the ImageList through its properties page.
Images are added to the ImageList through the Images tab (see Figure 8). Clicking the Insert Picture button allows you to add images. Each new image will have a new index number (incremented by one). If you want to remove a picture, click the Remove Picture button. Each of the images following that image will have its index renumbered. It is important to remember that the image index is renumbered. If you removed image 2 from the ImageList, image 3 would now have the index number of 2. This could cause problems if you were calling on image 3 (or higher) in your code!
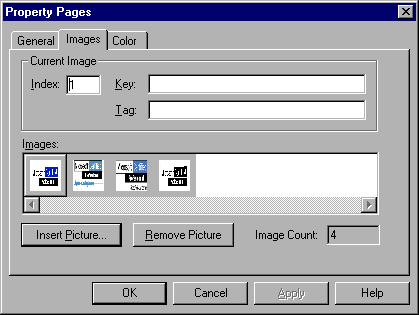
Figure 8 The Images tab of the ImageList properties page
The Toolbar control is just what it sounds like. It allows you to put a toolbar with buttons on your form (see Figure 9). It is configurable to add as many or as few buttons as you wish. Bringing up the property page for this control, you can add new buttons and alter the caption, ToolTip text, and so forth. Code can be associated with the button through the Code window, allowing code to be executed when a button on the Toolbar is clicked.
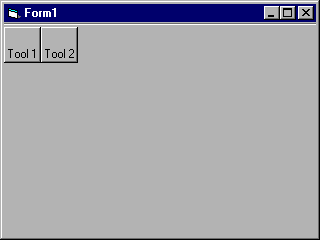
Figure 9 A form with the Toolbar control (as seen during runtime)
This control provides a standardized way of providing status information to a user (see Figure 10). From its property page you can change settings that alter its behavior and appearance. Of the different tabs available from this page, the most important one is the Panels tab.
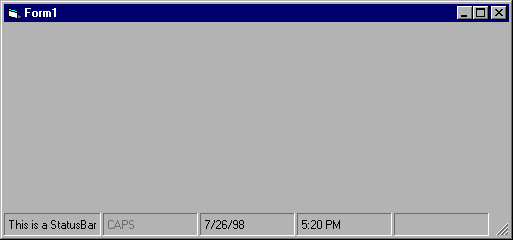
Figure 10 A form with the StatusBar control (as seen during runtime)
A status bar is made up of different panels that display different information. This information can exist in the form or text, date, time, the current status of a key, and so on. Because each panel displays different information, each must be configured and/or programmed to display the information. Such changes are made through the Panels tab of the StatusBar property page (see Figure 11).
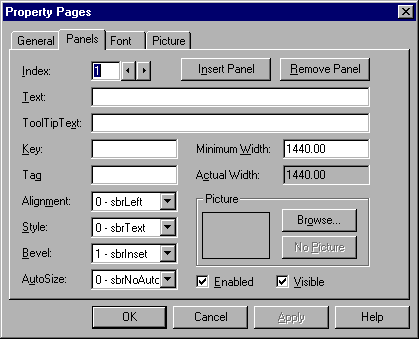
Figure 11 The Panels tab of the StatusBar property page
Adding and deleting panels from the status bar can be done with the Insert Panel and Remove Panel buttons. You can navigate from one panel’s options to another’s by clicking on the arrow buttons beside the index number. The index reflects which panel’s options you are viewing.
The Text property allows you to enter text that can appear in your status bar. It will only appear if the Style property (explained later) is set to sbrText .
The ToolTipText property allows you to display text that will appear when the user puts their mouse over the panel. This text should be descriptive, to show the user what that panel does.
The Key property allows you to identify a particular panel in your code. It is text that allows you to name a panel, and should thereby be different from other panels.
The Alignment and Bevel properties affect the appearance of a panel. Bevel allows you to change the appearance of the border surrounding a panel. There are three options for this property: sbrNoBevel, sbrInset, and sbrRaised. The Alignment property determines the alignment of the contents of a panel. With this property, you can set a panel’s contents to be justified left, right, or centered.
The Style property determines the contents of a panel. sbrText assigns information from the panel’s Text property to appear in the panel. sbrCaps, sbrNum, sbrIns, and sbrScrl will set a panel to display the toggle status of the Caps lock, Num lock, Insert, and Scroll lock keys, respectively. sbrTime and sbrDate will show the time and date in a panel, respectively. The sbrKana option is often a source of confusion. It is only useful on Japanese computers that have a Kana lock key. For those truly curious, you’ll be interested to know that this toggles the display into Kanji mode.
On the Job: There are many custom controls available for purchase through third party companies. There are also a number of Freeware controls for use on the Internet. While Visual Basic allows you to create your own custom controls, it is well worth your time investigating whether or not what you need already exists. Buying or using such controls may save you time and money in the long run.
Adding and deleting controls at runtime can be done effectively with a control array. To create an array of controls, you must start by creating one control in Design time. In the Properties Window, you must then select the Index property for this control and input a value (0 or 1). This is a similar process to what we did with menus earlier in this chapter. After doing this, you can then add and delete controls at runtime.
Another name for this is a "controls collection." While you must create at least one control in Design time, you can create more than one for your controls collection. One method for creating multiple controls in Design time, is adding controls to the form and giving them the same name. In the Index property for each of these controls, you increment the value by one. Another method is creating one control, then copying and pasting the same control as many times as you want onto your form. Because it is the same control, VB will automatically assign index values. It is important to remember that you can’t delete controls from the array that were created in Design time. Only controls created at runtime can be removed from the array .
Adding controls during runtime is done with the Load statement and by incrementing the index associated with the controls. For example, to add a control named txtMyBox to an array with one existing control that has the value 0, you would type the code:
Load txtMyBox
You could also increment the value by using a variable for the index, which we saw earlier in this chapter.
To remove controls from a control collection, the Unload statement would be used. To remove the text box we added in the previous example, you would use the following code:
Unload txtMyBox
There is very little difference to manipulating controls in a control collection than there is from manipulating individual controls at runtime. For a single control, you specify the name of the control in your code, the property you wish to change, and the value you’re changing it to. For example, to change the text in a text box named txtMyBox, you might type:
txtMyBox.Text="This is my text"
There is one major difference between this, and manipulating a control that’s a member of a control collection—the index. Remember that each member of a control collection has the same name, but different indices. As such, to change the third text box’s text in a collection, the code would then read:
txtMyBox.Text="This is my text"
In the above example, it is assumed that the first text box had an index of 0, the second had the value of 1, and the third index was 2. While this example shows only one value of a text box, you could have changed the properties of any control in a similar manner. The major difference is to specify the index of the control you wish to alter.
Forms collection refers to all forms that currently exist in memory. Remember that a collection is a special group of objects. Collections also have a Count property that you can use to count the number of elements that are part of the collection. You can also use looping to go through each form currently in memory. An example of how to do this is shown in the following code:
Dim frmForm as Form
For Each frmForm in Forms
frmForm.Show
Next frmForm
In the above code, a variable named frmForm is declared. The next snippet of code loops through each form in memory and shows it on the screen.
Mistakes happen and people are unpredictable. As such, it is always a good idea to prepare for those mistakes and implement code that verifies that a user put in the information that the user was expecting. For example, imagine someone typing in their name in a field that expected a numerical value. Upon attempting to calculate that value, errors will occur. For situations like this, it’s important to validate the data a user has input.
The key to validating the information contained in a field (such as a text box you provided for user input on your form) is analyzing the field’s contents. This is easily done with an
IF…THEN statement. This will look at the data entered by a user, determine if it’s valid, and then perform (or not perform) some sort of action.Exercise 3-6: Verifying Data Entered at the Field Level
Create a label with the caption Enter a number between 1 and 10.
Create a Text box beside the label, and name it txtInput.
Create a command button, name it cmdOK, and give it the caption OK.
Double-click your new OK button and add the following code:
If txtInput.Text < 1 Or txtInput.Text > 10 Then
MsgBox "Number must be between 1 and 10"
End If
Another method of validating user input is through keystroke events. There are three such events that can be used. Each event occurs in the following order: KeyDown, KeyPress, and KeyUp.
The KeyPress event occurs if the key that’s pressed represents an ASCII character. As this suggests, KeyPress has a single parameter of KeyASCII, which is an integer that reflects an ASCII value. Most keys have such a value. For a listing of character values, review the two ASCII Character Set charts in VB’s help documentation.
The following example of code can be placed in the KeyPress procedure of any textbox. When the user presses a key, it takes the ASCII value of the key pressed and (in the next line) automatically changes to lower case. In this way, you can enforce that all input is in lowercase (such as when asking the user to input the URL of a Web site).
Char = Chr(KeyAscii)
    KeyAscii = Asc(LCase(Char))
In addition to the KeyPress event, there are also the KeyDown and KeyUp events. KeyDown occurs when the user presses a key, and KeyUp occurs when the user releases a key. In other words, when the key goes down, KeyDown occurs. When the key is released, and goes back up, KeyUp occurs. By separating a keystroke into these events, the programmer is given greater flexibility in programming what happens during certain keystrokes.
KeyDown and KeyUp events don’t look at the same information as the KeyPress event. While KeyPress looks at the KeyASCII parameter, KeyDown and KeyUp look at the KeyCode. The KeyCode is a collection of constants that reflect certain keys. These constants include such things as navigation and function keys that aren’t recognized by the KeyPress event. This allows KeyUp and KeyDown to detect keystrokes that the KeyPress event wouldn’t be able to detect.
KeyCodes start with the prefix vbKey. There are numerous constants, and all can be viewed by referring to "KeyCode constants in VB’s help documentation. By using these constants in your programming, you can control what happens when certain keys are pressed and released. In the following example, if the user presses the F5 key (or releases it, depending on whether the code is put in KeyDown or KeyUp), a message box is displayed:
If KeyCode = vbKeyF5 Then
MsgBox "You pressed F5"
End If
By utilizing these different events, you will be better able to control what happens when certain keys are pressed. This will enable you to control what the user can and can’t do with input and certain keystrokes (such as function keys, navigation keys, and so on). In doing so, the end result will be a more robust program.
You can also verify data input at the form level. This is done by inserting code into the General section. To use a version of our previous exercise, let’s change the code in the command button to:
intDept = txtInput.Text
checkInt
This will invoke a procedure that we’ll set up at form level.
First, in the General Declarations section, declare a variable named intDept. This is done by typing:
Dim intDept as Integer
After creating this variable, create the following procedure in the General section:
Private Sub checkInt()
If intDept <> 10 Then
MsgBox "This program is only for members of Dept. 10"
End If
End Sub
Now, when information not equal to 10 is placed in the field and the OK button is clicked, a form-level procedure will be executed. It will check whether the number is equal to 10, then provide a message box stating that they must be from Dept. 10. In doing so, we have verified at the form level whether the input was valid.
Different events can cause controls to be enabled or disabled . An example you’ve already experienced was when you installed VB in Chapter 2. If you refused to accept Microsoft’s agreement for using the product, the Back and Next buttons were disabled. This left you with the choices of accepting the agreement or exiting the installation program. This was done by toggling the properties of the command buttons.
By adding code to the Change event of a field, you alter the Enabled property of a control. Let’s say we wanted a user to input his or her name before he or she could progress to the next screen. By analyzing the input of the field, the program could determine if the field was blank or not, then enable the Next button. This can be done with an IF…THEN statement.
If txtInput.Text <> "" Then
cmdNext.Enabled=True
End If
The first line of this code analyzes the contents of the text box and determines if it’s not equal to being empty. If it isn’t empty, it changes the command button’s Enabled property to True.
Similarly, we can disable controls by analyzing input. This is done by changing a control’s enabled property to False.
If txtInput.Text <> "" Then
cmdNext.Enabled=False
End if
We can also use an IF…THEN…ELSE and combine these two code snippets. What we would do is have the code look at the field’s contents, and if we wanted it to have information in it, enable a command button. If it were empty, it would be disabled.
If txtInput.Text <> "" Then
cmdNext.Enabled=True
Else
cmdNext.Enabled=False
End If
As we have seen in this chapter, code can be added to a form that will process data entered into any field on that form. In addition to this, code can also be added to different events associated with the form object. In doing so, code will execute when certain events are triggered, such as the form loading or unloading.
An important part of writing code to a form is knowing under which events one should write it. The Form object has a number of different events associated with it. While some events seem remarkably similar, their importance lies in what they do and the order they do it in.
When an instance of a form is created, the Initialize event is triggered . This event will run before the Load event actually runs. Initialize occurs when an instance of a form is created by your application.
Terminate is the flip side of Initialize . It is the last event triggered in a form. The Terminate event occurs when all variables in a form have been set to nothing. It occurs immediately after the Unload event.
When a form loads into memory, the Load event is triggered . It is the traditional place to set form-level variables, properties, and other startup code.
The Unload event is the common place to put "cleanup" code . Code placed in this event generally closes any forms that are still open, cleans up any variables, and basically clears memory space that has been used by the application.
The QueryUnload event takes place immediately before the Unload event. This event is used for code that prompts the user to save changes or give the user the option to cancel the Unload. An example of a QueryUnload event is when you exit from Microsoft Word and you are asked if you would like to save changes to an open document. Clicking Cancel will stop the Unload (closing of document and shutting down word) from occurring. Microsoft put the code that enables you to have these options in the QueryUnload event.
The Activate event doesn’t occur when the form loads, but when it becomes visible with the Visible or Show property . When a form becomes the active window, the Activate event is triggered. The way to visibly tell if the form is the active window is that the title bar will appear highlighted and the window will appear on top of the Desktop.
This event occurs when the form is no longer the active window . It does not occur when a form is unloaded. This event is triggered when a user switches from one window to another. In doing so, the form is no longer the active window, and the form’s Deactivate event triggers.
To help you understand the relative timing of these Form events, the following table has been provided. Because questions may appear on your VB exam that deal with the order these events occur, it is advisable to review them before going into your exam. The table shows the order of a form loaded and then unloaded from memory, and explains when the event occurs.
| Events that occur when a form is loaded into memory | |
| Initialize | Occurs when an instance of a form is created. |
| Load | Occurs when a form is loaded into memory. |
| GotFocus | Occurs when there are no enabled or visible controls on the form. This is the case when implementing splash screens in your application. |
| Events that occur when a form becomes the active form | |
| Activate | Occurs when the form becomes the active window or when it becomes visible with the Show or Visible property. |
| GotFocus | Occurs when there are no enabled or visible controls on a form. |
| Events that occur when another form becomes the active form | |
| LostFocus | Occurs when there are no enabled or visible controls on a form. |
| Deactivate | Occurs when the user switches from one form or window to another. |
| Events that occur when a form is unloaded from memory | |
| QueryUnload | Used to prompt user to save changes or cancel the Unload event. |
| Unload | Occurs when a form is Unloaded from memory. |
| Terminate | Occurs when all variables in a form have been set to nothing. |
Table 1: Events that occur when a form is loaded and unloaded from memory
Adding ActiveX controls to the Toolbox is as easy as adding any other custom control. This is done through Components on the Project menu. By scrolling through the list, various ActiveX controls are available. Clicking the check box will select the control, which can then be installed to the Toolbox. Once an ActiveX component is added, it will (or should) act like any other control in VB.
Exercise 3-7: Adding ActiveX Controls to the Toolbox
Data binding occurs when you bind a data source, such as the Data controls, with a data consumer, such as the DBCombo box or a text box. When this is done, information contained in the data source can be displayed in the data consumer. You can also manipulate the data displayed through the data consumer.
The traditional way of data binding in VB is to add a data source and data consumers to your form, then set the properties that bind the data during Design time.
Exercise 3-8: Binding Data During Design Time, and Manipulating Data
VB 6 also allows you to set the DataSource during runtime. This is a new ability for programmers that wasn’t permitted in previous versions. Doing so is straightforward, and similar to setting the value of any other property during runtime. By using the following example of code, you can set the DataSource, DataField, and table or query you wish to use with your program.
Text1.DataMember="Employees"
Text1.DataField="LastName"
Set Text1.DataSource=Data1
The term COM stands for component object model. COM is a standard that defines how different objects communicate with each other and how separate components can manipulate each other. In short, it allows different objects to interact. Not only does it allow you to use reusable components, but enables you to use objects that are exposed by existing programs (such as Microsoft Office). An exposed object, in its most basic definition, is something (such as a text box in another program) that our program can "see", and thereby manipulate. Exposing objects will be covered in more detail later in this book.
Both ActiveX technology and OLE (object linking and embedding) are based on the COM specification. OLE is an obsolete form of the COM. It has been replaced by ActiveX components, which have increased functionality over its predecessor, OLE.
Exam Watch: ActiveX has replaced OLE, but you may still see some references to OLE in the exam. Also, some older features of ActiveX still use the term OLE in their names. An example of this is the OLE container control. Don’t allow this to confuse you.
Previous to VB 5.0 and documentation previous to 1996, ActiveX components were referred to as OLE servers. Because the term server has a completely different meaning in networking terms, this often lead to some confusion. "Doesn’t this mean that the server component has to be on a server, and the client portion on a workstation?" was a common question that popped up. Not at all. ActiveX components expose objects to your application. The ActiveX component your application is using could be on the same hard drive, or accessed on a computer half-way around the world!
ActiveX components have an object structure that is visible to the ActiveX client application. Objects that are visible to other programs are known as exposed objects. However, for an object to be exposed, it must be listed in the Windows Registry.
The first step to creating a VB client application that uses ActiveX components is to set a reference to the server for your application. This can be done by clicking Project | References. You will see a listing of libraries that have been registered with the Registry. The next step is using the ActiveX component name and classes.
If you don’t know the objects available in a library, pressing F2 will bring up the Object Manager . This will display all objects in your current project, VB, and any objects exposed to it through the library you selected from References.
Once the references have been set, you can begin using the ActiveX components in your code. The first step is to create and instantiate object variables for the ActiveX component classes. This is done with regular object declarations, and the CreateObject and GetObject functions or the "As New" keyword.
You can declare an ActiveX component as a new object with the following declaration :
Dim variable As New Object
If you were going to use Microsoft Excel as an ActiveX component, this would be written as:
Dim objXL As New Excel.Application
You can also use the Set keyword to return a reference to an ActiveX component by returning its value to a variable. This is done with CreateObject and GetObject. To use the same example as above, this would be done with the following syntax:
Set objXL = GetObject ("Excel.Application")
or
Set objXL = CreateObject ("Excel Application")
Why the different possibilities? Because many applications (that is, ActiveX components) don’t support the As New keyword. Because of that, you may have to use CreateObject or GetObject.
Once you’ve declared the variable, you can then begin to evoke an exposed object in your code. The syntax for this is:
Servername.classname.procedure
Therefore, if you had made a reference to Microsoft Access 8.0 and wanted it to close down, you would type into your code:
Access.Application.Quit
In this example, if Microsoft Access were currently open, the application would shut down.
Handling events associated with ActiveX components is done with the WithEvents keyword . An example of this would be declaring an instance of a Module in Microsoft Access. In the form’s General Declaration section, you would type:
Private WithEvents AccRep As Access.Report
After typing this in, you can now check the object section of your Code window (the left combo box), and see that it is now listed as an object of the form. You’ll also see that the right combo box lists all events associated with that object. You can now handle events of the ActiveX component as if it were an object you created as part of your own application.
Without asynchronous processing (explained in the next paragraph), a client will make a method call to an ActiveX component and then wait for the ActiveX component to return the call. This processing is known as synchronous. With asynchronous processing, the client application is freed to execute other code while it waits for the COM component to finish what its doing . As you can see, using asynchronous processing makes for a much more robust program.
Asynchronous processing goes through several steps to complete a task. The first is when the client makes a method call. This starts the task, but does not instantly return the result. The client is then able to perform other tasks as the COM component works on its task of returning a result to the client. Since some time may pass before a result it returned, the ActiveX component must then provide notification that a result is ready.
As you can see, asynchronous notifications are important to asynchronous processing. Without them, you would be quietly minding your own business, working on something else, and never knowing that a result has been achieved! These notifications must exist for the client to know that a result has been returned. Providing notifications can be done with events or with call-back methods.
The easiest way to provide notification is by raising an event. Implementing this method can be broken down into two parts, with the first part being the responsibility of the ActiveX component’s author. The second part falls on the shoulders of you, the developer.
The COM component’s author must first define the tasks and notifications to be performed and provide externally creatable classes that will manage notifications. These classes must be provided with methods that you can later call on. These methods will initiate the various tasks of the component and provide a way to request notifications. Events handled by clients must also be declared so that these clients can receive notification. Code is then written that starts tasks and watches for things that the component will find meaningful. Finally, code is written to raise the event when a task is complete or when something meaningful has occurred. When this is all done, the author’s job is finished, and the client developer’s job begins.
The developer who uses this COM component starts by creating a WithEvents variable that contains a reference to the object that provides notification. Event procedures associated with this variable will contain code to handle notification events. Code must also be written that makes a request of the COM component and calls the methods that perform the required tasks.
As you can see, implementing asynchronous processing has two parts to it: you start at the component side and finish on the side of the client application. When both sides write their code and follow procedures correctly, asynchronous processing can be achieved.
One of the most important things you can offer a user is online help. User assistance can exist in the form of help files, WhatsThisHelp, Messages, and HTML documents, among other options. By implementing online user assistance, users will find the program more functional and robust. I can’t stress enough how important this is.
Help files contain organized information and are displayed when the user presses F1, selects a Help feature from the Help menu, or performs another action that invokes Help to display. Standard help files are stored in a binary format and are compiled with a special compiler. To display this information in your application, you must set certain properties in your application to invoke the help files.
Help can be added to your project at Design time or runtime. Adding help at Design time is done through the Project Properties, and the Properties window of each control and form. After adding such things as help files to your project at Design time, you can change these properties programmatically so their values alter at runtime. In doing so, you can change such things as the help file your project uses.
Applications can only use one help file at a time . You can associate a help file with your application in Design time by designating the path and filename of a help file. This is done by selecting Project Properties from the Project menu, then inputting the location of the file in the Help File Name field on the General tab. However, since your application can only point to one such file at a time, you may want to change to a different file during runtime.
Assigning a help file during runtime is done programmatically. By using the following example of code, you can change which help file is associated with the program:
App.Helpfile= "C:\Win98\Helpfile.hlp"
The HelpContextID property is used to provide context-sensitive help in an application. You can configure the HelpContextID for an object through the HelpContextID property in the Properties window, or programatically. By using the following example of code, you can set the value of this property during runtime:
Object.HelpContextID=number
By default, the HelpContextID is set to zero. This means that no help is associated with that object. In such a case, help for the container or parent object (such as the form) will be displayed.
A problem that commonly occurs with HelpContextID is when an invalid number is associated with an object. In other words, you set the HelpContextID to a number that can’t be found. Say you meant to type 10 as the HelpContextID, but through a slip of the finger, typed in 100. That context number doesn’t exist in help, and the F1 key will be ignored when pressed.
Exam Watch: When the HelpContextID is set to zero, no help is associated with that object. In such a case, help for the parent object is displayed. When an invalid number is used (that is, a non-zero), the F1 key will be ignored.
WhatsThisHelp provides a pop-screen that provide context-sensitive help in an application. The value of this property is Boolean, and is set through the form’s WhatsThisHelp in the Property window . By default it is set to False. Setting it to True enables What’s This style help. However, while the ability to display this type of help is turned on through the form’s properties, you must set an ID number for each object on that form. The ID number associates a particular object with a help topic and has a numerical value. You can set the WhatsThisHelpID through an object’s Property window.
While experienced programmers are familiar with standard help files (that have the .hlp extension), they may be surprised that VB allows help files to be created using HTML. HTML stands for the hypertext markup language, and is most commonly used in creating Web pages. Unlike standard .hlp files, HTML help is compiled through a special program and has the extension .chm .
While HTML files can be created using any HTML editor (such as Notepad, FrontPage, Dreamweaver, and so on), such documents must be compiled into a .chm file. A product that enables programs to create such help files is the HTML Help Workshop. With this program, you can create new HTML files, import existing HTML files, and compile them into a format that can be used for help. The program is relatively simple, but requires the user to either have existing HTML documents, or knowledge of HTML.
After being compiled, .chm files can be set as the applications help file in the same manner as associating .hlp files . VB supports both formats.
When dealing with ActiveX components, it’s very important to provide some sort of help for users. If extended help is to be used with a component, you must first create a help file with help topics for each item and context ID numbers for each topic. You then configure your project—through the General tab of Project Properties (as explained earlier in this chapter)—to use this help file. After this is done, it’s just a matter of setting the help file topic to items in your project.
Pressing F2 to bring up the Object Browser, you must select your project from the Projects/Libraries listbox at the top left of the browser. You then select the class from the Classes list, located at the top right of the browser. Right-clicking the member to which you want to assign help will bring up a pop-up menu from which you can choose Properties. Choosing Properties, you will see a Member Options dialog box. It is here that you will enter the context ID in the Help Context ID field. When this is done, extended help will now be available to your component.
Imagined how displeased you’d be if you were working on a document in a word processor, and the thing crashed on you without any warning. Imagine how relieved you’d be if the program gave you a chance to save the work before it exits from the error. This is an example of error handling. When a bad thing happens in the program, the error handler in that program deals with the problem.
As you can tell from this example, error handling is an important part of a robust application. It also saves your butt from lynch mobs of angry users.
Runtime errors occur, as you might guess, only during runtime of an application . They occur in situations such as when there is an attempt to open a file that doesn’t exist or when a user forgets to insert a floppy disk. While they can’t be completely avoided, they can be trapped. Trapping runtime errors involves writing code to catch the errors when they occur. This allows the program a chance of correcting, or offering a chance to correct, the error. It can, for example, prompt the user to save data before exiting, or skip over the offending code.
Writing an error-handling routine involves checking the error, handling the error in some way, and exiting the error handler. The On Error statement enables error trapping and redirects the program to code that will deal with the error. The error trap will stay enabled until the error-handling procedure ends or until the trap is disabled. By placing On Error in your code, followed by the GoTo statement and the name of your error handler, you can redirect the error to your error-handling routine (as the following code illustrates).
On Error GoTo ErrHandler
The error is checked with the Err object . This object allows the routine to view an error number and allows the routine to then deal with the problem. This object has three very important properties:
The Err object also has two important methods to help you with error handling: Clear (which resets the Err.Number to 0), and Raise (which causes an error that you can use to test your code). Together, the properties and methods of the Err object are invaluable to error handling.
One you have dealt with the error, you must provide a way for execution to exit the routine. You can use the Resume statement to return to the statement that caused the error . Resume Next can be used to return to the statement following the code that caused the error. You can also return to a specific line by typing Resume followed by the line number. If no resume statement is used, the procedure exits.
Now that we’ve covered the elements required for an error handler, let’s look at an example of an error handler.
On Error GoTo ErrHandler
Exit Sub
ErrHandler:
If Err.Number=10 Then
MsgBox "My Error Statement to User is Here"
Resume Next
Else
MsgBox "Some other error has occurred"
Resume
End If
In both the real world and the Microsoft exam, there will be moments where you will need to know how to turn off error handling. An error handler is immediately disabled as soon as it exits a procedure. However, you can also disable error handling with the following code:
On Error GoTo 0
This will disable error handling, even if the procedure has a line numbered as 0.
Error handling does not necessarily need to be a separate procedure that is called when errors are encountered. It can be also be implemented in a procedure. When this is done, you need to add code that keeps the error handler from always running. Remember that code will run from line to line until the procedure ends. Because there is occasional need to end or exit a procedure, the Exit statements are used.
Exit Sub or Exit Function is used to keep the error handler from running if no error occurs. Exit Function is used when the error handler is contained in a function (which is a procedure that returns a value). The error handler comes between the Exit Sub and End Sub statements to separate it from the procedure’s normal flow. The following code illustrates its use:
Sub MyProcedure()
    On Error GoTo ErrorHandler
    . . .
    Exit Sub
    ErrorHandler:
    . . .
    Resume Next
    End Sub
While you can redirect and branch to errors, you can also set up error handling right after the place where they occur. This method is especially handy in areas where an error is likely or suspected. By typing code such as the following:
On Error Resume Next
the error is immediately dealt with. There is no need to redirect it to a separate error handler because the error is handled where it occurs.
Start Q&A
| I want to add menus to my program, but don’t want to go through the hassle of creating them at runtime. | Use the Menu Editor that comes with VB. Menu Editor allows you to create custom menus in Design time for your application. |
| In want to spice up my help files, and provide help that people will find easy to navigate. | Use HTML help files with your application. HTML provides more powerful features to your help files, while offering them in a format that people are used to. HTML is the same language used to create Web pages, which people are used to, so they will find it easy to navigate through the help file. |
Navigation in an application is done by implementing menus and controls to a form. Menus can be created by using the Menu Editor tool, while various controls are available from the Toolbar. In addition, you can add custom controls to your application. To do this you must first add them to the Toolbar by installing them from the Components item on the Project menu.
One of the primary objectives of programming is the manipulation of data. This is done by entering code through VB’s Code window. Entering code can alter the properties of controls, verify information provided by user input, and manipulate data that has been entered. The Code window is where actual programming takes place.
An important aspect of creating applications is providing help. This is done in numerous ways. One method is through setting properties of controls. Online help is also available by creating help files. These can be the traditional .hlp files or HTML help files.
Another important part of programming is error handling. This refers to trapping errors and controlling how errors are dealt with. How a program handles errors is an indication of how well a program functions.
The Self Test questions will help you measure your understanding of the material presented in this chapter. Read all the choices carefully, as there may be more than one correct answer. Select all correct answers for each question.
Me.PopupMenu mnuMsg