Using Visual Data Access Tools
*Certification Objectives
*Universal Data Access
*ADO 2 (ActiveX Data Objects)
*ODBC 3 (Open Database Connectivity)
*OLE DB
*RDS 1.5 (Remote Data Service)
*From the Classroom
*Microsoft Universal Data Access Strategy
*Connecting to a Data Source
*Bound Controls
*Data Properties for Data Controls
*ConnectionString
*CommandType
*RecordSource
*Getting Data from a Connection
*Data Properties for Bound Controls
*Using Other Data-Bound Controls
*TextBox, Label
*CheckBox
*PictureBox, Image, OLE
*ComboBox, DataCombo, ListBox, and DataList
*DataGrid
*MSHFlexGrid
*DataRepeater
*Chart
*Organizing Data
*Using the Data Environment Designer to View the Structure of a Database
*Converting an Application from DataControls to DECommands
*DEC Features
*ADODC vs. DEC
*UserConnection Designer
*Using the Data View Window to View the Structure of a Database
*Creating Database Queries using Query Builder
*Visual Data Manager
*Using the Query Designer to Create SQL Statements
*Presenting Data
*Creating Data-Bound Forms Using the Data Environment Designer
*Data Environment Designer Properties
*DEConnection Properties
*DECommand Properties
*Cursor Type Details
*From the Classroom
*Microsoft Universal Data Access Strategy
*ODBC and Connection Strings
*Creating Data-Bound Forms Using the Data Form Wizard
*Creating Data-Bound Forms Using the ADO DataControl
*ADO DataControl Properties vs. DEConnection/DECommand properties
*Creating a Report Using the Data Report Designer
*Building a Data Report Manually
*Building a Data Report Using Drag and Drop
*Certification Summary
*Two-Minute Drill
*
This chapter discusses the technologies that Visual Basic provides to connect applications to data sources, and the terms Microsoft uses for these data access strategies. You will create data-enabled forms using the Data Environment Designer, the Data Form Wizard, and the ADO DataControl. You will also learn about some of the additional data tools provided in VB, including the Data Report Designer and the Query Builder.
In Chapter 3 you learned that Microsoft provides tools for database integration. When working with a simple, local database (for example, a table in an Access database residing on your own hard disk) then integrating an application with data can be quite simple.
However, things are rarely so straightforward in the real world. Your application may need to use data from the user’s hard disk, from a separate relational database residing on your network, or maybe even across the Internet. You may even need to use a data store that is not traditionally considered a database, like Excel or Outlook.
The issue for developers, therefore, is how they can get the data they need in a manner that is simple, reliable, and consistent. Microsoft’s answer is Universal Data Access (UDA).
Microsoft defines UDA as their "strategy for providing high-performance access to all types of information (including relational and non-relational data) across an organization from the desktop to the enterprise." (For more information see microsoft.com/data/). But still left unanswered is what UDA actually is.
ActiveX Data Objects (ADO) are the direct, everyday interface between the VB developer and the data. An ActiveX Data Object behaves like any other object—you invoke its methods, you reference its properties, and you monitor its events.
A sample Access database for the fictional company Northwind has been provided with your copy of VB. The following VB code segment demonstrates how easy it is to use ADO to get any needed data from this Access database.
Dim myConnection As ADODB.Connection
Dim myRecordSet As New ADODB.Recordset
Set myConnection = New ADODB.Connection
myConnection.Provider = "Microsoft.Jet.OLEDB.3.51"
myConnection.Open "C:\Program Files\Microsoft Visual Studio" & _
"\VB98\NWIND.MDB", , "admin", ""
, "admin", ""
myRecordSet.Open "SELECT * FROM Employees", myConnection
txtName.Text = myRecordSet.Fields("LastName")
myRecordSet.Close
myConnection.Close
These nine lines are all that is required to use the ADO to read the LastName field from the first record in the Employees table, and display the content in a text field txtName. All of the information contained in the database can be found in the Connection object myConnection and the Recordset object myRecordset.
ADO is a successor to and a superset of two previous object models: DAO (Data Access Objects) and RDO (Remote Data Objects). If you are maintaining previously authored applications in VB it is possible to continue using these older technologies, but Microsoft recommends using ADO for new development.
ODBC is a protocol for using SQL-based relational databases. After installing the appropriate ODBC driver for a particular database, it becomes possible to access the content in the database without having to know that particular database is implemented.
It is a common misperception that ODBC can only be used with sophisticated databases, such as Oracle or SQL Server. However, you can use ODBC to connect to any database if the appropriate driver exists. In addition to shipping drivers for Oracle and SQL Server with VB, Microsoft also ships ODBC drivers for Access, FoxPro, dBase, and even plain text. (This means you can use the power of SQL statements to run complicated queries on a simple text file, without importing it into a real database.)
Any maker of any version of any database product, if they write the needed driver correctly, can allow every VB developer in the world to use their product without having to learn a new interface. So why would anybody want to use anything else?
Here are three reasons:
For these reasons and others, Microsoft predicts that ODBC will eventually be eclipsed by OLE DB, discussed in the next section.
Many developers are using OLE DB every day, and they don’t even know it.
An application communicates with ODBC primarily by passing it text strings (usually SQL statements). By contrast, OLE DB uses a more granular object model. This is part of Microsoft’s larger strategy of breaking down data sources to provide smaller and more flexible components of functionality. (This approach isn’t accepted across the industry yet. Though Microsoft intends to expose all SQL Server functionality through OLE DB, this probably won’t be an option for some third-party databases for at least a couple of years.)
There are some advantages to this approach to exposing database functionality:
VB developers do not have direct access to OLE DB through a supplied control, but it is indirectly available either through ADO or by using an available API.
If you plan on doing DCOM development in the future, you will become much more intimately familiar with the details of OLE DB. However, because so much of its complexity is hidden from the VB developer, you can use it effectively without being familiar with all of its intricate workings. (If you do want to learn more about it, try www.microsoft.com/oledb/).
Of the four UDA components discussed, the only two that are directly accessible through the toolbox controls are ADO and RDS ("Microsoft ADO Control 6 (OLEDB)" and "Remote Data Control 6").
RDS is most useful for three-tiered applications—especially Web-based three-tiered applications.
Exam Watch: Three-tier architecture describes the distribution of application processing across the following three tiers:
Client tier (for example, a user’s machine)
Middle tier (such as Microsoft Transaction Server or an ActiveX DLL)
Data source tier (such as an SQL Server)
When developing networked applications, reducing bandwidth is always a priority. If you are designing an Internet application, and one of your Web pages contains controls bound to a data source, you wouldn’t want your application to contact the data source tier across the network every time the user scrolls from record to record. RDS allows this information to be cached, either at the middle tier or at the client tier. This minimizes use of bandwidth, and thus speeds up execution.
RDS operates "on top" of ADO to negotiate the relationship with the data provider. While ADO works with a "live" connection to the data, RDO works with data that is disconnected and cached, either at the client or the middle tier.
You don’t have to worry about distributing RDS to your users, as long as they are using Internet Explorer 4 or higher. (When a user installs Internet Explorer 4 on their machine, they also install the RDS client automatically.)
Microsoft has presented developers with a cohesive strategy for accessing information throughout the enterprise, from the Desktop to enterprise server environments. Microsoft’s universal data access uses OLE DB as its low-level data access interface. For developers weaned on OBDC, OLE DB provides access to not only relational but nonrelational data as well. Contrary to competing forms of universal storage, OLE DB allows user access to data where it resides, avoiding the need to move the data into a single storage source.
OLE DB providers form the basis for simultaneous access to heterogeneous data sources. OLE DB providers for accessing VSAM, AS/400, and IBM AIX, and more are under development. Microsoft’s next version of SQL Server, version 7, will leverage OLE DB as its native data access interface.
Keep in mind that Microsoft ADO is the high-level data access interface built on top of OLE DB providers. RDO is an object model used for accessing relational data via OBDC. DAO is an object model for accessing local or SQL data via the Jet engine. All future development should focus on using ADO on top of OLE DB.
ADO is currently shipping version 2. ADO 2 provides numerous new features including persistent record sets, distributed transactions, and tighter integration with Visual Studio tools like the Data Environment Designer in VB.
The Data Environment Designer provides a highly programmable Design time environment for creating runtime programmatic data access. Data Environment objects can also leverage drag-and-drop to automate creation of data-bound controls.
For the exam, be sure to be familiar with the uses of the Data Environment, Data Form Wizard, Data Report Designer, and the ADO object model.
— by Michael Lane Thomas, MCSE+I, MCSD, MCT, A+
If you have developed database applications in other environments, then you have probably experienced some frustration in working with your data sources. It can take pages and pages of code to read in all the required data, present it to the user for modification, and save it back into the data store.
VB provides a compelling alternative. In a few simple steps, you can take the controls you are familiar with (TextBox, CheckBox, and so on) and enable them to read from and write to the database. (This is the same approach described briefly in Chapter 3.)
In order to do this, we must first connect to a data source. There are two ways of creating this connection:
Although the Data Environment Designer is more powerful, it takes a few extra steps to set up. Therefore, we will first examine connecting to a Data Source using a ADO DataControl, and address the Data Environment Designer later.
When a control is connected to a data source, it is considered bound. Though in the code example above we used code to manually populate the txtName control with the contents of the LastName field, we could have saved time by using Bound mode instead. This means that we would have instructed the TextBox control to automatically load the contents of the field into the text box, and then automatically save the user’s changes back into the database when completed.
In its simplest form, using Bound mode requires only three steps:
In this section, we will perform the first two steps. (We will perform step three in "Getting Data From a Connection", below.)
Before proceeding, we want to make a copy of the Northwind database, so we may mutilate it to our hearts’ content. (The location of this database may vary, but it probably will be in a path similar to C:\Program Files\Microsoft Visual Studio\VB98\Nwind.mdb. If it is in another path, use the Windows Find command to learn its location; if it isn’t on your machine, it is available from the VB installation CD-ROM.)
Our goal in this exercise will be to create a simple VB program that links to the Northwind database. At the end of the exercise, you will be able to see how many records are in the Employees table, but you won’t be able to actually see the records themselves.
Exercise 4-1: Creating a Program to View Data in the Northwind Database
AdoDc1.Caption = AdoDc1.Recordset.AbsolutePosition
AdoDc1.Recordset.MoveLast
If you’re the kind of user that likes to click on every button to see what you can break (you know who you are!), you’ve probably clicked on the other buttons and seen how they provide navigation among the eight employee records.
On the Job: Some databases (like FoxPro) require you to connect to a directory. Unlike an Access database, which stores all the tables and indexes entirely contained in a single file, a FoxPro database is made up of a different file for each table and index in the database. Therefore, when selecting the location of the FoxPro database, instead of selecting a file, you will be selecting the directory where all of the resources reside.
Above, we observed how to set the needed DataControl properties to connect to a data source. The three most important properties to support this process are ConnectionString, CommandType, and RecordSource.
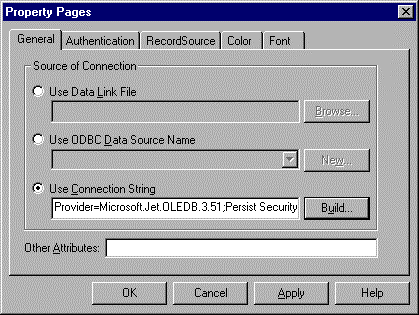
This property defines the location of the data source. Unfortunately, the contents used for this property vary greatly. When you use VB to populate this property, you are provided three options (presented here in ascending complexity, not in the order presented on the form, in Figure 4-1): ODBC Data Source Name, Connection String, and Data Link File.

Figure 1: Three options to set the ConnectionString property
The default for this property is 8 - adUnknown, but you will probably want to change it to 1 - adCmdText (retrieve content using an SQL Statement), 2 - adCmdTable (retrieve an entire table), or 4 - adCmdStoredProc (retrieve content as defined in a stored procedure.) Note that stored procedures are often more efficient than defining a query with adCmdText, because the database can preprocess the procedure, and execution can be faster. However, you do need additional access rights on the database to create new stored procedures.
Depending on the contents of CommandType, the RecordSource property will be used to store the name of the Stored Procedure or Table in the database (for example, "Employees"), or the SQL required for creating the record set (for example, "select * from Employees")
It is necessary to set the properties ConnectionString, CommandType, and RecordSource for every instance of the ADO DataControl used, but the defaults for the other properties will frequently be usable. (More information about these other properties is provided later in this chapter.)
After completing Exercise 4-1, you can navigate back and forth among the employee records, but you can’t actually see any of the underlying content. Maybe your mom is impressed, but your clients probably won’t be. (If they are, try giving them some shiny bolts and washers to play with—they’ll be mesmerized for hours.)
Many of the controls included with VB can be bound, and many third-party controls have this ability as well. (To quickly see if a control can be bound, see if it has a Data section when the properties are categorized. )
In Exercise 4-1, we used the ADO DataControl to connect to the Employee table of the Northwind database. In Exercise 4-2, we will illustrate how easy it is to bind controls to this DataControl by setting the DataSource and DataField properties.
Exercise 4-2: Binding Text Boxes to the Employee Table
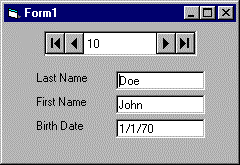
As the exercise above should make clear, it is possible to create a simple application with very little work, if you are willing to accept the default behavior provided by VB and the underlying database.
Above, we observed how to set properties to enable controls to bind to a data source. The four properties most frequently involved with this are DataSource, DataField, DataMember, and DataForm.
DataSource This can point either to a DataControl or a Data Environment. All of the Data Environments and all of the DataControls on the current form will appear in this property list, but not the DataControls on other forms.
DataField This determines which field from the DataSource or DataMember will be bound to the control.
DataMember When using the Data Environment Designer, this property defines the DECommand within that designer. When using a Data Control, this property is not used.
DataFormat This determines how to display the content of the field. (It is often not necessary to set this field.)
When using a DataControl is it necessary to set DataSource and DataField; when using the Data Environment Designer it is necessary to set DataSource, DataField, and DataMember.
In the examples in this section, we have bound controls to the DataControl at design time. However, when using VB version 6, it is also possible to bind a control to a data source at runtime. (For example, we could have two separate connections, and a text box could switch back and forth, depending on user preferences.) Note that this was not an option in previous versions of VB.
You are not limited the TextBox control when binding to a data source. A majority of the Microsoft intrinsic controls, and several nonintrinsic controls, support data binding. Some of these controls, and the issues involved in using them, are discussed in this section.
Note that this is not a comprehensive list of the available controls by any means. This section only covers the controls that support binding for the controls that are intrinsic to VB 6, and a few of the more common nonintrinsic data-bound controls. Note that to observe these nonintrinsic controls you must have the corresponding items enabled from the Components dialog box (as shown in Figure 4-3). Many third-party controls also support data binding; for details on their operation consult the documentation supplied by the vendor.
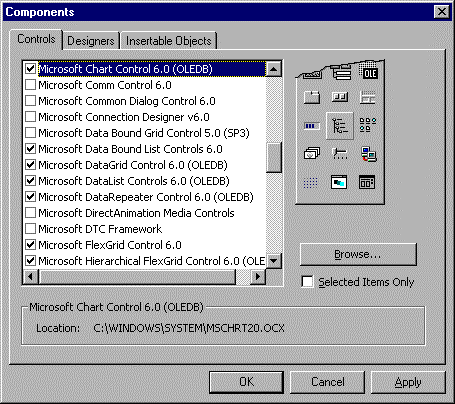
Figure 3: The Components dialog box—adding nonintrinsic controls
We have already demonstrated the techniques required to bind a text box to a DataControl. Binding a Label control uses an identical process, except that it is the Caption property, not the Text property, that automatically binds to the field. (Note that as a rule, the property binding to the database field is the same as the default property for that control.)
Although labels are, by their nature, not editable from the user interface, it is still possible to use them to update a database. If a Label control is bound, if the Caption property is modified programmatically, the new Caption value can be saved into the database.
Remember that the check box doesn’t have two states, it has three: checked, unchecked, and grayed. You can usually bind a check box to your database’s equivalent of a Boolean field, but the precise behavior may vary slightly from database to database. If you find that your results are unsatisfactory, consider using a combo box with Yes/No options bound to a text field, or alternatively leaving the CheckBox control unbound and manipulating it with code instead.
These controls allow you to view Binary Large Objects that are stored in a database. The PictureBox and Image controls can only be used with standard VB graphic types (BMP, ICO, WMF, GIF, or JPG.) By contrast, the OLE control can be used with a much wider variety of graphic and document formats.
Distinguishing among these four controls is a cause of endless confusion both in real-world development and on the exam. We will focus our discussion on the distinction between the ComboBox and the DataCombo, but you can apply the same principles to ListBox and DataList, accordingly. (For an explanation of the distinction between the ComboBox and ListBox controls, refer to Chapter 3.)
A combo box binds to a DataControl exactly like a text box does, and with the same results: The Value field reads from and writes to the field specified in DataField and DataSource. The developer is still responsible for populating the List field manually to provide the options available for the Value field.
All that is added in DataCombo (and DataList) is the automated population of these lists. A separate DataControl needs to be created and referenced in the RowSource property of the DataCombo control, and the field to load needs to be referenced in the BoundColumn property. This can be disorienting, but Table 4-1 should clarify the issue.
Field Populated |
DataControl Name |
DataControl Field |
|
| Bound Field | Value | DataSource | DataField |
| Picklist Values | List | RowSource | BoundColumn |
Table 1: Fields used in DataCombo and DataList
Note that it is conceivable that the DataSource and RowSource could refer to the same control, for example, if you wanted a list to provide the values already entered in that field. However, in a majority of cases the RowSource will be pointing to an entirely different table or query.
Exam Watch: Value, DataField, and DataSource apply to most data-bound controls, but List, BoundColumn, and RowSource apply only to the population of the lists in the DataCombo and DataList controls.
A DataGrid is a very powerful way to create a lot of functionality very quickly. This control provides a direct exposure to all of the data defined by the DataControl in a spreadsheet format. Although the compact format sometimes can be disorienting to an end user, data grids are popular for presenting data for navigational or summary purposes.
Although a data grid has a DataSource property, unlike the controls listed above, it has no DataField property (or, more precisely, there are several DataField properties that are assigned to the specific columns inside the grid).
If you go back to the form created in Exercise 4-1, you can bind a new grid with the following steps:
Right click on the DataGrid, and select Retrieve Fields. (When you retrieve fields, you copy the definition of each column currently defined in the record set into a corresponding column in the grid. These become the defaults for each column, but is easy to override these definitions.)
Though the appearance may look a little clumsy, these grids are easy to customize. If you stop the application and right-click into the data grid to investigate the properties available, you will see how easy it is to change the appearance of the grid—for example, making certain columns wider, locked, or invisible. Some of the more frequently used properties are listed below:
At the grid level: Caption, AllowAddNew, AllowDelete, ColumnHeaders, BorderStyle
At the split (splits are columns grouped together) level: AllowRowSizing, RecordSelectors, MarqueeStyle, ScrollBars, AllowFocus
At the column level: Caption, DataField, DataFormat, Alignment, Width, WrapText, Locked, Button
The full feature set of the data grid exceeds our discussion here, but you may want to browse through the various tabs of the DataGrid control to familiarize yourselves with the options available before taking the certification exam. (If you like the functionality available in the data grid, you may want to investigate purchasing True DataGrid, manufactured by Apex, at www.apexsc.com/. The grid provided for free within VB is a simplified version of Apex’s commercial product.)
We will observe an example of a form with a data grid on it below, in "Creating Data-Bound Forms Using the Data Form Wizard."
The MSHFlexGrid control allows the user to visually sort, format, and combine summary and detail database content. There are two major differences between the MSHFlexGrid and the DataGrid:
This control allows multiple iterations of another control to be displayed in the space defined by the DataRepeater control.The control to be repeated should be populated into the RepeatedControlName property (for example, with MSCAL.Calendar.7 or RICHTEXT.RichTextCtrl.1.) This control is new in VB version 6.
Although this control is more frequently used by programmatically populating it with the data points, is possible to bind this control and present the retrieved record set as a graph.
Microsoft provides a variety of tools in VB to view and manipulate your connections to your data sources. We will discuss the following three in this section:
In Exercise 4-1 and 4-2 we used a DataControl, but for the remainder of this chapter we will use a new feature in VB 6 called the Data Environment Designer.
Using Data Environment Designer has many advantages over using form-based DataControls:
The Data Environment Designer allows you to create and manipulate the following objects:
DataEnvironment This is the highest-level object in the designer, but it really is only used to group the other content; it isn’t used for programming.
DEConnection This determines which database will be used, how the database will be accessed, and with what permissions.
DECommand This is the actual definition of the data accessed within the DEConnection. It can refer to a table, an SQL statement, or a stored procedure.
Because the Data Environment Designer didn’t exist before VB version 6, you likely will encounter DataControls if you are working on legacy applications. If you have to provide support for these existing applications you can continue to use DataControls, but to take advantage of the newest Microsoft technologies, you will have to convert your application to support the Data Environment Designer. In Exercise 4-3 we will perform this conversion on the project built in Exercises 4-1 and 4-2.
Exercise 4-3: Converting from DataControls to Data Environment Designer Controls
Your application is now connected to your database through the Data Environment Designer.
If you return to the Data Environment Controller you created, you will observe many more features available. Some of these include the following:
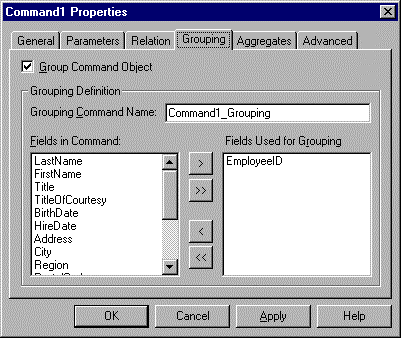
Figure 4: Setting properties for a DECommand on the Grouping tab
The properties associated with the DEConnections and the DECommands will be discussed in "Creating Data-Bound Forms Using the Data Environment Designer."
If the Data Environment Designer offers all this, why would anybody ever use the ADODC control? Good question.
Data Environment Connections will eventually replace standalone DataControls. When Microsoft introduces a technology that is somewhat redundant to another Microsoft technology, support for the old technology usually withers and dies within a couple of years. (If you doubt me, go have a chat with a crusty old Excel Macro programmer.)
That said, there may be some legitimate reasons for continuing to use DataControls, at least for a while:
The UserConnection designer (available from Project | Add Microsoft UserConnection) is a simpler version of the Data Environment Designer, intended for developers who are still supporting RDO applications. Because Microsoft recommends using ADO for new development, it is unlikely that this designer would be used frequently, except for legacy applications. It is not on Microsoft’s exam outline, and is only mentioned here to put it in proper context.
At first blush, it can be hard to tell the difference between the Data Environment Designer and the Data View window (both new in VB 6.) They both appear to be hierarchical lists of the tables and fields available to your application.
The primary distinction is that the Data Environment Designer interacts much more closely with your application, while the Data View Window interacts more directly with the databases. From the Data Environment Designer, you can drag fields onto a form, but from the Data View window you can view the structure of the underlying tables using the Database Designer. (It is also possible drag items from the Data View window to the Data Environment Designer, but not vice versa.)
On the Job: You can drag from the Data View window to a DataEnvironment Designer, and you can drag from a DataEnvironment Designer to a form or DataReport, but you cannot drag from the Data View window to a form or DataReport.
The Data View window provides an excellent summary of your data resources. In addition to allowing the user to view DEConnections from multiple DataEnvironments, it also allows drag-and-drop access to the DataEnvironment connectors.
Perhaps more valuable, however, is the integration of the Data View window with the Microsoft Visual Database Tools—the Database Designer and the Query Designer. (The Query Designer is discussed under "Creating Database Queries Using Query Builder"; the Database Designer is discussed below.)
The Database Designer provides a visual representation of the relationships among the tables, by creating database diagrams. Unfortunately, these diagrams cannot be used with every database provider. For example, they work with SQL Server databases, but they do not work with Access databases. (Similarly, you can create new tables and views from the VB interface when using SQL Server databases, but not with Access databases.)
A Data View window showing this contrast is presented in the following illustration.
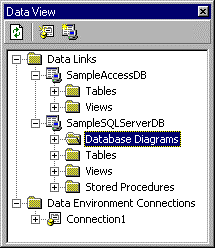
Figure 5. Database diagrams—not available for Access databases
Because our Northwind Access database will not support database diagrams, the screen shots from this section are from the Pubs database that comes with SQL Server.
After creating a new Data Link to the Pubs database (Right-click on Data Links, then choose Add a Data Link), right-click on Database Diagrams, and select New Diagram.... This presents a big, empty white screen. However, if you drag the Authors, Titles, and TitleAuthor tables from the Data View onto the big empty white screen, you will not only see the fields available for these tables but also the relationships among these tables.
On the Job: If you have worked with Access, you may be used to seeing database diagrams that visually represent the relationships at the field level. Unfortunately, as you’ll notice later, the diagrams available in VB only represent the relationship at the table level. However, you can right-click on the link itself to observe which fields are being mapped.
The default behavior is to present the names of the columns only. However, if you right-click within the table in the database diagram, you can choose among these display options: Column Properties, Column Names, Keys, Name Only, and Custom. (The properties shown by Custom are selected in Modify Custom View. An example of Column Properties is presented in Figure 4-6. Note that in many cases the properties of the tables and relationships can be modified as well as displayed.
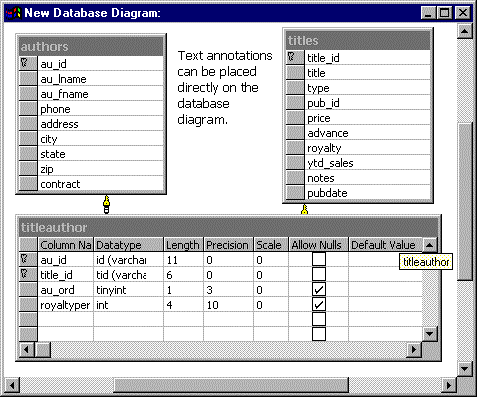
Figure 6: Database diagram, with Column Properties for the TitleAuthor table
The remaining options available from the Diagram menu are primarily associated with formatting. The diagram in Figure 4-6 includes an example of a text annotation, which can be added by selecting New Text Annotation from the Diagram menu.
Some other options include:
If you’ve worked with other database applications in the past, you’ve probably worked with SQL statements. It probably wasn’t too hard to hand-code simple SQL statements, like the following:
Select EmployeeID, Salary from Salaries where Salary < 50000
However, it can be difficult to manually construct correct grammar for SQL queries that span multiple tables with complex filtering. Fortunately, Microsoft has provided a visual tool to automatically generate grammatically correct SQL statements from simple parameters defined by the developer.
In Exercise 4-4, we are going to use the Query Builder to create the SQL to filter all of the orders taken by employees that live in London. To do this, we will relate the Orders and Employees table using the Set Table Join button, and then apply the appropriate filter on the City field in the Employees table. Exercise 4-4: Creating a New Query with the Query Builder
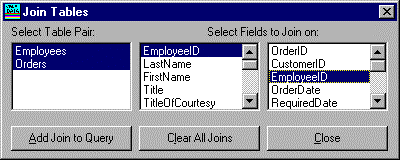
Figure 7: Joining EmployeeID field in Employees and Orders tables
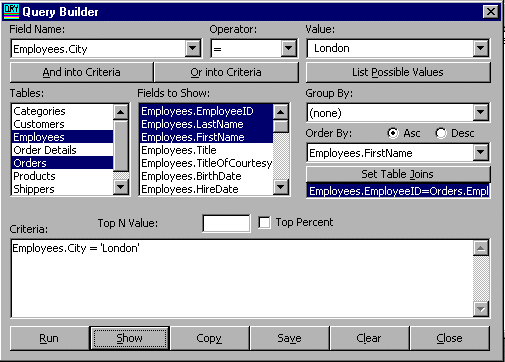
Figure 8: Query Builder—adding a filter on the City field
To use the queries built by this screen, click the Copy button to bring the SQL into the clipboard. Then the SQL statement is available for use anywhere else in your application (for example, as the RecordSource for a DataControl.)
Query Builder is one component of the Visual Data Manager add-in, illustrated in Figure 4-9, below. The Visual Data Manager is not as new as the Database Designer, but it still has the following advantages over its rival:
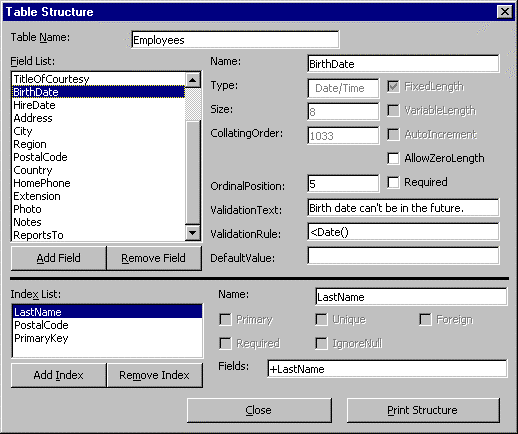
Figure 9. Using the Visual Data Manager to view table structure
Starting with VB version 6, you can also build queries by creating a New View from the Data View menu. To do so, simply drag the desired tables from the Data View into the New View window, create any additional relationships required, check the boxes for the fields you want, specify any needed criteria, and select Run from the Query menu to confirm that the query runs correctly. The resulting screen should resemble Figure 4-10. A note for the test: the VB test outline mentions the Query Builder, but not the Query Designer. However, even if the Query Designer doesn’t appear on your test, it is still valuable to know what functionality it provides.
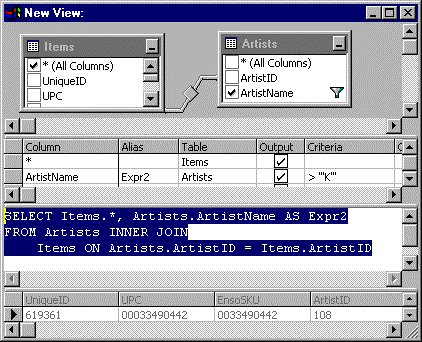
Figure 10. Using the Query Designer to generate SQL
This tool is intended to create new views to be saved back into the database, but there is no reason you cannot use it to create grammatically correct SQL statements. Just select the SQL statements created, copy, and paste to where you need it.
On the Job: Because the view is executing on the server-side, depending on what database you are using the grammar may be slightly different than the grammar used by ADO, RDO, or DAO. Common culprits include single versus double quotes, differing characters to indicate wild cards, and different interpretations of the Unique statement. If you use this approach to generate SQL for your code, make sure that you test that the SQL works correctly in your current context.
Once you have determined and established access to your data sources, it is time to create the connection onto the form. In this section we will be discussing the following approaches to creating the needed forms:
In addition, we will be discussing the Data Report Designer, which allows simple reports to be created and integrated with the Data Environment Designer quickly and easily.
Instead of dragging a control from the Toolbox and then setting its properties to bind to a DECommand, it is possible to automatically drag controls directly from a Data Environment Designer onto the form. To do this, you simply have to have the DECommand in the Data Environment Designer expanded to expose the fields, drag the field onto the appropriate form, and drop it at the desired location.
This seems very impressive, and it is a nice addition to the development environment, but it is clearer to understand what is happening if you realize that VB is simply performing the following three steps that you have already learned:
The bound control is usually a text box; however Boolean and Caption fields have other defaults (CheckBox and Label, respectively.) You can change these settings under Options from the corresponding Data Environment.
When using this technique, remember that you have no DataControl on the form, and so you will need to develop your own navigation interface.
Although you can implement a quick-and-dirty application by keeping the property defaults, an understanding of all the properties associated with DEConnection and DECommand is vital for developing more complex applications. These properties are presented in the following sections. (Where applicable, sample values are listed in parentheses.)
The following five properties are grouped under Connection:
The following four properties are grouped under Design Authentication:
The following four properties are grouped under Run Authentication:
The following three properties are grouped under Command:
The following nine properties are grouped under "Advanced":
Exam Watch: The makers of the test frequently have questions where one or more of the options are properties or values that don’t exist. Even if it isn’t possible to memorize all of the terms, try to at least familiarize yourself with them so it is easier to tell when the test authors are pulling your leg.
There are four cursor types, listed below in descending order of flexibility:
A dynamic record set allows the user to see all updates made by other users.A keyset record set will be able to see changes to records that existed when the record set was generated, but will not be able to see new records that have been created since then. A static record set is a read-only copy of the record set, and forward-only is like static except the cursor can only move in one direction. These cursor types are compared in Table 4-2.
Name |
Read/Write |
Advantages |
Disadvantages |
| Dynamic | R/W | Reflects new and deleted records | Consumes more resources |
| Keyset (previously Dynaset) | R/W | Reflects updated records | Does not reflect added or deleted records |
| Static (previously Snapshot) | R | Faster performance | Consumes more resources |
| Forward-only Snapshots | R | Fastest performance | Cannot move backward |
Table 2: Recordset comparison
Microsoft has presented developers with a cohesive strategy for accessing information throughout the enterprise, from the desktop to enterprise server environments. Microsoft’s universal data access uses OLE DB as its low-level data access interface. For developers weaned on OBDC, OLE DB provides access to not only relational but nonrelational data as well. Contrary to competing forms of universal storage, OLE DB allows user access to data where it resides, avoiding the need to move the data into a single storage source.
OLE DB providers form the basis for simultaneous access to heterogeneous data sources. OLE DB providers for accessing VSAM, AS/400, and IBM AIX, and more are under development. Microsoft’s next version of SQL Server, version 7, will leverage OLE DB as its native data access interface.
Keep in mind that Microsoft ADO is the high-level data access interface that is built on top of OLE DB providers. RDO is an object model used for accessing relational data via OBDC. DAO is an object model for accessing local or SQL data via the Jet engine. All future development should focus on using ADO on top of OLE DB.
ADO is currently shipping version 2. ADO 2 provides numerous new features including persistent record sets, distributed transactions, and tighter integration with Visual Studio tools like the Data Environment Designer in VB.
The Data Environment Designer provides a highly programmable Design time environment for creating runtime programmatic data access. Data Environment objects can also leverage drag-and-drop to automate creation of data bound controls.
For the exam, be sure to be familiar with the uses of the Data Environment, Data Form Wizard, Data Report Designer, and the ADO object model.
— By Michael Lane Thomas, MCSE+I, MCSD, MCT, A+
When you use a connection string, you are essentially concatenating multiple parameters required by the database into a single property, separated by semicolons. For example:
ODBC;DRIVER=SQL Server;UID=sa;DATABASE=MyDatabase;SERVER=SqlServer65
A DSN is very similar to a connection string, storing the same parameters but in a different place—either in the Registry, or in a standalone file.
There are three types of DSN connections: User, System, and File. These are segregated on the first three tabs on the ODBC Data Source Administrator dialog box, illustrated in Figure 4-11. All three of these DSNs allow similar access to database resources, but they are primarily distinguished by their scope:
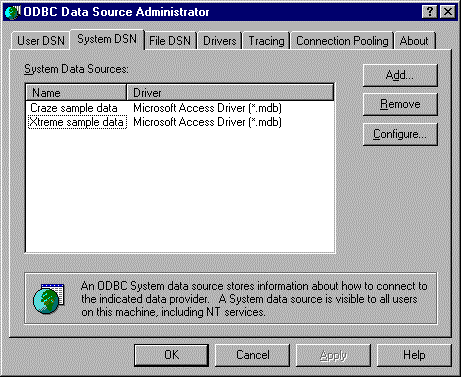
Figure 11. ODBC Data Source Administrator dialog box, System DSN tab
The attributes for the File DSN are stored in a simple text file, so it provides an excellent resource to understand what is going on behind the scenes. (The User and System DSNs are stored in the Registry, so they’re a little harder to observe.) If you have created a File DSN, then you can open this DSN as a text file. The DSNs are frequently stored in C:\WINDOWS\ODBC\Data Sources\, but if you have trouble finding the directory on your machine, use the Window Find feature and search on the file name of your File DSN. If you open up your File DSN with Notepad, the content should resemble the following:
[ODBC]
DRIVER=SQL Server
UID=sa
DATABASE=MyDatabase
WSID=MARTOMI
APP=Microsoft (R) Developer Studio
SERVER=SqlServer65
What this should emphasize is that the DSN doesn’t contain mysterious information—just the parameters required to connect to the database.
When you use a connection string, you can either point to a DSN, or you can pass additional parameters in the connection string that identifies the information that would normally be in the DSN. This is called using a DSN-less connection.
The Data Form Wizard has been around for the last several versions of VB, but even though it isn’t cutting edge, there are still times where it may be the best choice for form development. Because it creates forms using a one-time wizard, you cannot use this interface to make changes after the initial creation. However, it still may be useful in the following circumstances:
There are multiple ways to initiate this wizard:
In Exercise 4-5, we will use the Data Form Wizard to create a data form containing the fields for the Employee record.
Exercise 4-5: Using the Data Form Wizard
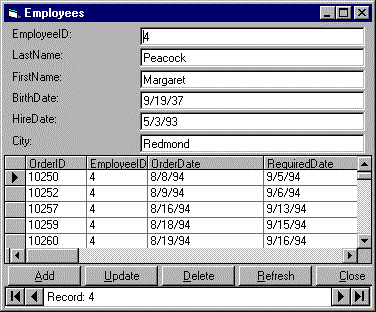
Figure 12. Form created by Data Form Wizard
Using the Data Form Wizard, in just a few minutes you can construct a multitable relational interface. But more important, you now have an example that you can extend and customize to meet your specific needs.
The approaches to development are somewhat different when using the ADO DataControl. For example, you can’t drag bound fields directly onto the form, and you can’t refer to the same DataControl from multiple forms..
However, the actual properties associated with the ADO DataControl are remarkably similar to those used when developing with the Data Environment Designer. The biggest difference, of course, is that the properties associated with both the DEConnection and the DECommand are rolled up into a single object.
Table 4-3 lists the properties associated with ADO Data Control. As should be clear, most of them map quite closely to the DECommand or DEConnection, though in some cases, the mapping is approximate.
| ADO DataControl Properties | DEConnection or DECommand Properties |
| BOFAction | No exact equivalent—see below |
| CacheSize | CacheSize |
| CommandTimeout | CommandTimeout |
| CommandType | CommandType |
| ConnectionString | ConnectionSource |
| ConnectionTimeout | ConnectionTimeout |
| CursorLocation | CursorLocation |
| CursorType | CursorType |
| EOFAction | No exact equivalent—see below |
| LockType | LockType |
| MaxRecords | MaxRecords |
| Mode | No exact equivalent—see below |
| Password | DesignPassword, RunPassword |
| RecordSource | CommandText |
| UserName | DesignUserName, RunUserName |
Table 3: Correspondence of Design time properties for ADO DataControl to DEConnection/DECommand
The following properties map less definitively to the Data Environment Designer controls.
| I need to get an application up and running for my boss in 15 minutes. How should I build my form? | If all you need is a no-frills presentation of simple table data, the Data Form Wizard may be adequate. |
| I have an existing application that is using a DataControl. Should I convert it to use ADO? | You have to weigh the costs of development against the benefits, but the benefits are much greater when converting an existing DAO DataControl than an existing RDO DataControl. |
| If I am converting my application for ADO, should I use an ADO DataControl or the Data Environment Designer? | If you are writing new forms you probably should use the Data Environment Designer, but for existing forms, it may be faster just to replace your old RDO or DAO DataControls with the ADO variety, especially if you were using the DataControl to provide navigation. |
| My application will start out in Access, but it may have to scale up to a more powerful database in the future. How should I develop my application? | If you aren’t already, you should be using ADO—switching the back-end database will be much easier than it would be with DAO and RDO. With ADO, most of your code should be database-independent without modification, but you’ll want to test your application on the more powerful database early in the development cycle. |
| I’m heading a team of developers on an application, but whenever I move the data source, they never remember to update the DataControls on their forms. How can I keep my team aligned? | The advantages of using the Data Environment Designer over the ADODC increase when multiple people are working on development, because changes made in the Data Environment Designer will propagate across the application (assuming that the source code is managed correctly.) |
| The controls provided by Microsoft just aren’t flexible enough to provide the behavior I need. What do the pros do? | Many developers prefer not to use bound controls. They prefer to perform the database manipulation and field population through code. This requires more work, but you have much more design flexibility. |
If you’ve worked with previous versions of VB you know that the reporting tool was integrated loosely with the development environment, to put it mildly. (It was simply a version of Crystal Reports that came bundled with VB, but required separate and redundant connections to the same data source.)
In VB version 6 Microsoft has provided the Data Report Designer, which resembles a hybrid of the Access Reporting tool and a stripped-down version of Crystal Reports. Although the feature set isn’t nearly as full as these other tools, it does integrate much more tightly with the rest of your VB application, especially because it supports dragging-and-dropping fields from the Data Environments directly onto the Data Reports.
Superficially, the process of designing a data report resembles designing a form: add the data report to the project, drag controls from the Toolbox onto it, and then use the Show method from your code to display it to the user.
Note, however, that although the same General controls are available for forms, MDI forms, property pages, and user controls, these controls gray out while editing a Data Report. The only controls available for use will be the ones under Data Report in the Toolbox, as shown in Figure 4-13.
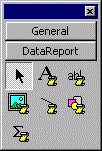
Figure 13. DataReport controls available from the Toolbox
The steps for creating a data report will be explored in Exercise 4-6.
Exercise 4-6: Creating a Data Report
The runtime interface Microsoft provides is rather spartan. You can scroll from page to page, you can print, and you can export the contents of the report to a file. You cannot create other clickable events on the report (to provide a drill-down interface, for example). The few features available in the Data Report are summarized below:
Microsoft has integrated the data report with the data environment to allow developers to accelerate report development by performing the following steps:
As you have observed, the functionality provided is limited but extremely easy to set up. For complicated applications you may need a more powerful reporting tool, such as the commercial version of Crystal Reports, but for simple applications (and the certification test) you probably won’t mind the small feature set.
Universal Data Access is Microsoft’s approach to providing flexibility and simplicity in connecting to data sources. It is made up of ActiveX Data Objects (ADO), Open Database Connectivity (ODBC), OLE DB, and Remote Data Services (RDS).
The primary VB tools for working with the structure of databases are the Data Environment Designer and the Data View window.
It is possible to create forms with bound controls by using the Data Environment Designer, the Data Form Wizard, and the ADO DataControl.
Microsoft provides additional tools for using data with forms, including the Data Form Designer (which allows database reporting) and the Query Builder (which allows users to design and test queries visually.)
The following Self-Test questions will help you measure your
understanding of the material presented in this chapter. Read all the choices carefully,
as there may be more than one correct answer. Choose all correct answers for each
question.
Which of the following are components of Microsoft’s Universal Data Access?