Using COM Components
*Certification Objectives
*Introduction to ActiveX Components and the Component Object Model
*Benefits of COM
*Interoperability
*Versioning
*Standardization
*Abstraction
*Clients and Servers
*Client
*Server
*Types of ActiveX Components Available in Visual Basic
*ActiveX Controls
*ActiveX Code Components
*ActiveX Documents
*Using ActiveX Controls in a Client Application
*Using ActiveX Code Components in a Client Application
*Creating a Reference to an ActiveX Component
*Ambiguous References
*A Word about Type Libraries
*Creating the Object Reference and Binding
*Early Binding Method
*Late Binding Method
*Using the CreateObject Function to Create a New Instance of an Object
*Objectvar
*Appname
*Classname
*Servername
*Using GetObject to Create a Reference to an Existing Object
*Objectvar
*Pathname
*Appname
*Classname
*Handling Events Generated by Components
*Releasing the Object
*Managing Components
*The Visual Component Manager
*Publishing Components
*Finding Components
*Reusing Components
*The Object Browser
*Registering and Unregistering Components
*Registering In-Process (DLL/OCX) Components
*Registering Out-of-Process (EXE) Components
*From the Classroom
*Leveraging COM
*Certification Summary
*Two Minute Drill
*Self Test
*
Earlier in this book you learned how to use classes to encapsulate code into objects for reuse in an application. ActiveX COM components extend this model to allow code to be compiled into objects that can be reused between applications. This chapter will provide you with a basic understanding of ActiveX components, the different types of ActiveX components, and the steps necessary to create a Visual Basic client application that uses the services provided by an OLE server.
The idea that software components should be reusable within an application and between applications is fundamental in object oriented programming (OOP). However, without a standard way to make objects talk to one another, it can be difficult or impossible for a developer to use components from other developers or from different development languages. Microsoft’s solution to this problem was the introduction of the component object model (COM), a binary standard that defines the way software components should expose their functionality. By standardizing the communication method through a set of standard interfaces, COM allows developers to focus on the core task of what the application does, instead of how to make the various parts of an application communicate with each other. In VB the compiler handles most of the technical details of implementing and calling COM interfaces for you, giving you the freedom to deal with COM components at a fairly high level of abstraction.
In VB the principal COM object you use is the ActiveX component. ActiveX is a type of COM object built on Microsoft’s object linking and embedding (OLE) technology. It is important to remember, however, that ActiveX components are COM components, but not all COM components are ActiveX components.
Exam Watch: Microsoft loves COM, and they want you to know it. They have been known to sprinkle questions throughout the MCSD track exams on COM. For the VB exam you probably only need to know what COM is and that ActiveX is based on it. However, if your track to the MCSD title goes through the dreaded Windows architecture exams, make sure you are familiar with the iUnknown, iDispatch, and iAdviseSink interfaces of COM components.End Exam Watch Note
Because COM is a binary standard, components that conform to this specification are language independent. This means that software components can be written in any programming language, and as long as they adhere to the basic rules of COM, they will work in any other programming environment that supports COM components. The important point here for the VB programmer is that VB can use COM components without modifications to the client application, regardless of who wrote them, how they were written, and in what programming language they were written . Conversely, components written in VB will work in any COM-compliant client. This cross-language compatibility has lead to a large number of components available for use in your VB applications. Later in this chapter I will demonstrate how to make these components work for you in your applications.
The rules of COM are very specific regarding how the interface to that object can change between versions. Don’t confuse the term interface here with a user interface like a form or control. When speaking the COM language , interface refers to a programmatic interface. That is, the properties and methods used to access the functionality of a software component. COM versioning rules can be summed up in the following statement: When creating a new version of an existing COM component, you can add interfaces, but you cannot remove or modify existing interfaces.
Exam Watch: When creating a new version of an existing COM component, you can add interfaces, but you cannot remove or modify existing interfaces.
This rule is crucial when you consider the fact that COM is based on the principle of reuse between multiple applications. In order to ensure that applications using a particular component do not break when newer versions of that component are installed on the system, newer versions must be able to support all of the functionality of previous versions of the component. This rule does not preclude newer versions of the component from improving previously released features, as long as they are exposed in a way that would not break compatibility with clients that were built using older versions of the component. The beauty of this system is that by updating one component you can improve the functionality it provides in all of the applications that use it without updating any of the client applications themselves. Also, you can feel safe in the comfort that the rules of COM ensure that current applications using the older version of the component will not stop working when the component is updated .Standardization
One way to make users feel more comfortable with a new application and to lessen their training burden is to write software that allows them to apply the skills that they have already learned to your applications. By reusing standard user interface components such as ActiveX controls, programs can be written that look and operate in ways that users are probably familiar with from using other applications or the Windows operating system itself.
To illustrate this point, consider scroll bars. Most applications have them, and they work the same way in each of those applications because the same software component is used to incorporate them in each application. It is easy for developers to take this skill for granted, but learning to use a scroll bar can be a major accomplishment for a novice Windows user. When this same novice user starts to learn a new application that also uses the scroll bar control, they immediately are familiar with this paradigm and have a head start on learning the application. Also, the more exposure a user has to scroll bar controls, the better they are able to use them in all of the applications that use them
When using nonstandardized component models, the developer of the client application must deal with each component separately regarding how to talk to that component from the client application. With a standardized model such as COM, the developer need not worry about making the components work inside their program and can focus more on the tasks required in building the application.
When describing the interactions between components, there are two roles. These are the roles of the client and the server. These two terms get recycled quite a bit in technospeak and can have slightly different meanings when describing different technologies. Here I will describe these terms as they apply to components.
The client is the application or component that calls the properties and/or methods of a component object. The client acts as a consumer of the functionality provided by the server. A standard EXE type application in VB can only act as a client and never as a server .
The server is the component that provides services to the client through calls to its methods and properties. ActiveX servers are also commonly referred to as OLE servers (from the fact that ActiveX is built on OLE) or OLE automation servers (OLE automation is another term for the interaction between ActiveX components). Two examples of OLE servers are ActiveX controls and ActiveX code components.
It is important to understand that because a component can be built from other
components, an OLE server can take on the client role with respect to one component and
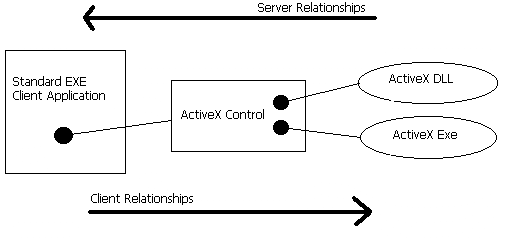
the server role with respect to another. Take for example the application outlined in
Figure 6-1. The ActiveX control illustrated in the middle of the diagram acts as both an
OLE server to the standard EXE client application and as client to both the ActiveX DLL
and ActiveX EXE components. The ActiveX DLL could also be used as a client if it made use
of another ActiveX DLL component implement its functionality . 
Figure 1: In this diagram, each component acts as server with respect to the components on its left, and client to components on its right. Note that the ActiveX control acts both as client and server with respect to different components
VB can be used to create three basic types of ActiveX components: ActiveX controls, ActiveX code components (DLL/EXE), and ActiveX documents (DLL/EXE). These types of components are described in more detail below:
ActiveX controls are software components built around a visual element called a UserControl (For more information on UserControl objects, refer to the "Building ActiveX Controls" chapter in this guide). When ActiveX controls are added to a VB project, they appear as new controls in the VB Toolbox. ActiveX controls are compiled into files with the .OCX extension, which stands for OLE Control (The X in OCX is just there to round out the extension to three characters). ActiveX controls run in the memory area allocated to the client’s process (In-Process).
ActiveX code components are libraries of classes that can be used by the client application to create objects. These components come in two flavors:
For more information on the differences between these types of servers, see "In-Process vs. Out-of-Process Servers" in Chapter 7. For the purposes of this discussion, the important difference is that In-Process components run more quickly because they do not have to access memory across process boundaries.
ActiveX documents are components that are compiled so that they can be used inside OLE containers such as Microsoft Word or Microsoft Internet Explorer. The most common use for this type of component is for use in applications intended to run as Web pages in Internet Explorer. ActiveX documents can also be compiled as both In-Process (DLL) and Out-of-Process (EXE) components. This type of ActiveX component will be discussed in more detail in the "Building COM Components" chapter.
On the Job: Although ActiveX documents can be created in VB, they cannot be used in VB clients in the same way as ActiveX controls or ActiveX components. They must be embedded inside a Web browser control or other control that is designed to host these types of components.
Since Microsoft added the ability to create ActiveX controls to VB version 5, literally thousands of reusable controls have been created that do everything from displaying CAD drawings to browsing the Web. ActiveX controls allow you to skip a lot of the mundane programming tasks like adding text-editing functionality to your application by simply dropping a precompiled component into your application and using its functionality as if it were built into VB. The steps to add an ActiveX control to your project and use it are as follows:
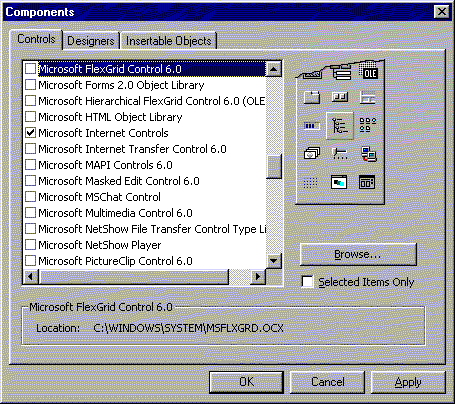
Figure 2: The Components dialog box is used to add ActiveX controls to the VB Toolbox.
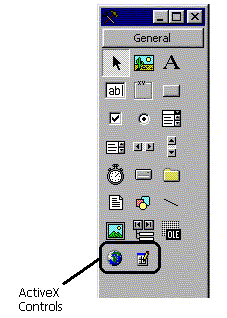
Figure 3: ActiveX controls have been added to the Toolbox
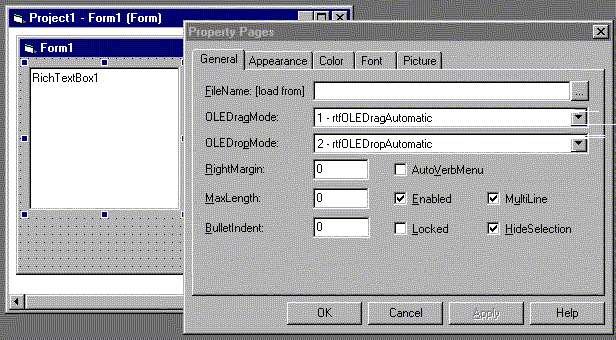
Figure 4: The RichText control has a built-in property sheet like many ActiveX controls
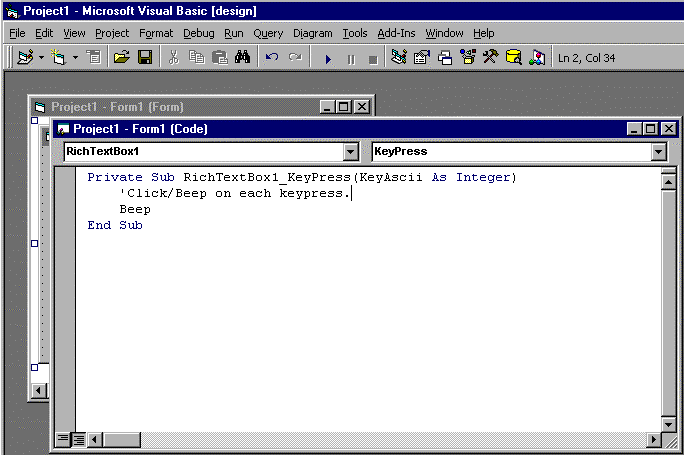
Figure 5: You can add event handlers to ActiveX controls just like you do with standard VB controls
The exact procedures required to use an ActiveX code component in your application can vary somewhat based on the type of component you are using and your application’s requirements for performance and features. At a top level, however, the steps required for using these components are:
Before you can use the classes in a component, you must first tell VB which components you will be using in your project. Here is how you accomplish this:
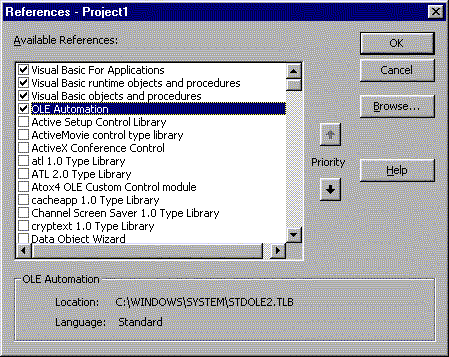
Figure 6: Use the References dialog box to add ActiveX code components to the project
Because VB is fairly relaxed about forcing you to be explicit when referring to the properties and methods of objects, there can sometimes be an ambiguity when two or more objects expose members with the same name. VB resolves this ambiguity by assuming that you mean the component with the highest priority as defined in the References dialog box . The following example demonstrates this point:
‘*** Declare a variable to reference an ADO Recordset (Explicit)
Dim RS As ADODB.Recordset
‘*** Declare a variable to reference a DAO recordset (Explicit)
Dim RS As DAO.Recordset
‘*** Declare a variable to reference either a DAO or ADO recordset
‘*** depending on priority settings (Ambiguous)
Dim RS As Recordset
In general, it is best to be specific instead of relying on the priority settings to solve these conflicts. Bugs introduced by ambiguous references are often very hard to detect when debugging an application.
A type library is a dictionary of classes and interfaces, that is, properties and methods, supported by a component. Although components created in VB always have the type library compiled into them it is also quite common for components created by other programming environments to store their type libraries in external OLB (object library) or TLB (type library) files .
A component does not have to supply a type library to be a valid COM object, consequently, not all of them do so. To determine if a component has a type library, try adding a reference to the component’s DLL or EXE file in the References dialog box as described previously. If you get the "Can’t Add Reference to Specified File" error message, the type library is not compiled into the component. At this point, if there is no TLB or OLB file, you can assume there is no type library provided for the component. Although it does make things tougher on the programmer and can degrade performance, a component without a type library can still be used in VB. The following limitations apply to components without type libraries :
Exam Watch: When talking about COM components, the exams sometimes make references to components that do not support the iDispatch interface. Supporting the iDispatch interface, in essence, means that the type library has been compiled into the component. These types of questions usually relate to components that do not supply a type library.
Before you can use the properties, methods, and events of an object from a component, you must declare an object variable and set an object reference to it. There are several ways to declare and set object variables. The primary reason for selecting one method over another is that the way you declare the object reference determines what type of binding VB can use with that object. Binding is the process of setting up a property or method call to an object variable. The reason that you should care what type of binding is used is that there is a lot of overhead involved with the binding process that is added every time you reference a method or property of an object. Also, it just so happens that early binding is a much faster approach than late binding because if VB can employ certain compiler optimizations when it knows what type of objects will be referenced through a particular variable. Unfortunately, as previously mentioned, sometimes it is not up to the developer to make this call. Components without type libraries require the use of the slower late binding method . Early Binding Method
Early binding is when, in the variable declaration, you tell the compiler in advance what type of object it will reference. To do this, simply declare the variable in the following manner:
Dim variable as [component].classname
Here is an example of this type of declaration that declares a variable that will be used to reference an Access Data Object Recordset object.
Dim AdoRS as ADODB.Recordset
Although it may appear to the contrary, the variable does not store the actual object but a reference to an address in memory where the object lives. This reference is also referred to as a pointer. What is actually stored in the variable is an address in memory used to keep track of the object itself. At this point, we have only defined a variable to store a reference to an object. The object itself has not yet been created.
By specifying the New keyword in the declaration, we can tell VB to create the object the first time one of its properties or methods is referenced . Here is an example of using the New keyword in a variable declaration.
Dim AdoRS as New ADODB.Recordset
If you do not specify the New keyword in your declaration, you will need to use the Set command to either point your variable to an existing object or create a new instance of the object, as shown in the following examples:
'*** Create a new instance of the ADO Recordset Object.
Set AdoRS = New ADODB.Recordset
'*** Set the Ado Recordset object reference to point to an existing ADO Recordset Object.
Set AdoRS = AnotherRS
So far I have presented the late binding method as a last resort approach when early binding is impossible because a component has not provided a type library. There actually is one benefit to using the late binding method to declare object references. The benefit is that a variable declared this way is not limited to referring to a specific type of object. This flexibility gives you the freedom to decide at runtime what type of object will be referenced with the variable. This also gives you the ability to reuse object variables to refer to different objects throughout the program, but this is generally considered a bad programming practice and is not recommended.
When using late binding, object variables are not declared with a specific class name. Instead, the variables are declared as type "Object" as shown in the following example:
Dim AdoRS as Object
Declaring an object variable using the variant, form, or control type also forces VB to
use late binding, so be careful to avoid accidentally invoking the late binding methods by
using these nonspecific declarations. To ensure that the faster early binding method is
used in situations in which you must declare an object to reference a form or control,
refer to the specific type of form or control to create the reference as shown below :'***
Declarations that force late binding
Dim c as control
Dim f as form
'*** Early Binding alternatives
Dim c as CheckBox
Dim f as Myform
Because late binding does not allow VB to know what properties and methods are available to an object ahead of time, the compiler will not pick up on misspelled or incorrect property or method names in your code. When using late binding, be especially careful to check that the properties and methods you invoke actually exist in the class and are spelled correctly.
The New keyword is not available with late-bound objects, therefore you cannot use it to create new instances of objects declared with the "Object" type. To provide a way to create a new instance of these objects, use the CreateObject method as described in the following section.
Begin Q&A
| I want to optimize my code for speed with an ActiveX DLL component that supplies a type library. | The type library allows you to use the faster early binding methods. |
| I need to use the same variable to reference several different forms within its lifetime. | Use Late Binding. Each form is created from its own class definition at runtime and is thus a separate type of object. The only way to reuse an object reference for different forms is to use the late bound "Form" or "Object" types. |
| I am using an ActiveX EXE component without a type library and want to optimize speed. | You have no choice here but to use Late Binding. The speed part of the equation will have to be worked in elsewhere. |
The CreateObject function is provided to create a new instance of an externally creatable object from an ActiveX code component and return a reference to that object. When I refer to an object as externally creatable, I mean that it is a top-level object exposed by a component in such a way that the client can create them directly, as opposed to a dependent object, which is created by the component itself and passed back to the client through property references or method calls . The CreateObject function is only used to create a new instance of an object that is not already running. If you want a reference to an object that already exists in memory, use the GetObject function described in the later in this chapter. The syntax for the CreateObject function is : Set objectvar = CreateObject("appname.classname",[servername])
The CreateObject function returns a reference, or pointer, to the object it creates. This pointer is stored in a variable declared as the generic "object" type. It is also acceptable to use an object explicitly declared with the same class as the object you are creating (which would allow early binding). The reason you don’t see this much is that when you are able and willing to use declarations that allow early binding, the New keyword is a simpler method of creating an instance of an object than the CreateObject function. The only reason I know of to use the CreateObject function with early bound object variables is to use the functionality that it exposes for creating objects that run on a remote machine.
This is the name of the OLE automation server that will provide the object. This is usually the name of the EXE file without the .EXE extension. For example, the appname for Excel.exe is "EXCEL". This relationship between the EXE filename and the appname is not enforced but is standard practice. For this reason, be sure to look up the actual appname in the component’s documentation before using it with the CreateObject function. It is also important to make sure the appname and classname are spelled correctly because errors in specifying these parameters will not be realized until they cause a runtime error in your application, the compiler cannot and consequently does not check the appname and classname.
Every OLE automation server application must support at least one externally creatable object. This object can then be used to create dependent objects. The classname parameter specifies the class name of this externally creatable object. For example, Excel provides an externally creatable object called "Application".
This innocuous-looking optional parameter is a good example of where Microsoft is heading with the VB development and Visual Studio in general. The servername parameter is a new feature of the CreateObject function in VB version 6 that allows you to specify the name of the machine you want the component to run on. This functionality is a significant leap in the abilities of VB as an environment for creating multi-tier applications. To find the servername of a particular machine, select the Network option from the Control Panel and click the Identification tab. The servername is the entry in the Computer Name text box as shown in Figure 6-7. The machine acting as server must be configured to allow components to run remotely, and the classname must be registered on the both machines or a runtime error will occur.
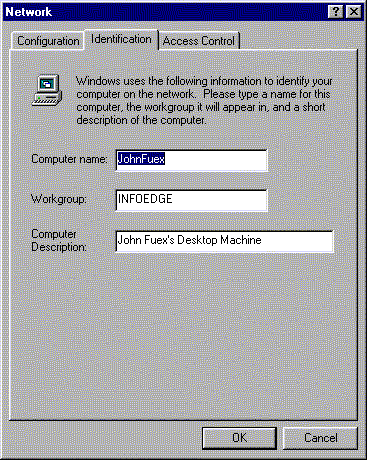
Figure 7: The servername parameter is obtained from the Identification tab on the Network Properties dialog box. In this case the servername would be "JohnFuex"
The following example demonstrates how to use of the CreateObejct function with Microsoft Excel to get a reference to the externally creatable Application object. Once the Application object is obtained, it is then used to return a reference to a new dependant worksheet object.
'*** Example of using the CreateObject function
‘*** Declare the reference variables
Dim xlApp as Object
Dim xlSheet as Object
‘*** Create an Excel application Object on machine named AppServer
Set xlApp = CreateObject("Excel.Application","AppServer")
'*** Use the xlApp Object to create a dependant Worksheet object
Set xlSheet = xlApp.Worksheets.Add
‘*** Call the Calculate method of the Worksheet Object
xlSheet.Calculate
‘*** Close the Excel Application
xlApp.Quit
‘*** Release the object references
Set xlSheet = Nothing
Set xlApp = Nothing
If an object has already been created and you want to retrieve a reference to the object in memory, the GetObject function is what you will need to use. The syntax for the GetObject function is:
Set objectvar = GetObject(["pathname"], ["appname.classname"])
The GetObject function returns a reference, or pointer, to the an existing object. This pointer is stored in a variable declared as the generic "object" type. It is also acceptable to use an object explicitly declared with the same class type as the object that you are going to reference with the variable (early binding).
This parameter is used to specify a full path and filename of the file containing the object to retrieve. If you specify an empty string for this parameter (" "), a new instance of the specified type is created and GetObject works exactly like the CreateObject function as shown in Table 6-1 .If you specify a filename but no classname, the class that is registered to the extension in the pathname is used. You must specify the pathname, appname.classname, or both of these parameters.
GetObject Call |
Result |
| Set xl = GetObject( ,"Excel.Application") | xl references application object of Excel if it is running and generates a runtime error if Excel is not running. |
| Set xl = GetObject("","Excel.Application") | If Excel is not running, it is started and xl references an instance of the Application object. |
Table 1: Sending an Empty String as the Pathname Argument to GetObject Causes Very Different Behavior Than Not Specifying the Argument at All
This is the name of the OLE automation server that will provide the object. The appname is exactly like the appname parameter described in the CreateObject function.
Refers to the name of a class used to define an externally creatable object in the OLE automation server. This parameter works exactly like the classname parameter described in the CreateObject function.
This example demonstrates how to use the GetObject function to both start a new instance of Excel and return a reference to an existing instance of Excel..
‘*** GetObject Examples
‘*** Declare the object variable
Dim xl as Object
Dim x2 as Object
‘*** Reference existing excel object or create new one
Set xl = GetObject("","Excel.Application")
‘*** Get another reference to the Excel Application
‘*** this would normally error if Excel was not open
‘*** but we know it is open because the last call opened it.
set x2 = GetObject(,"Excel.Application")
‘*** Reference Excel Spreadsheet named Budget.xls
Set xl = GetObject("c:\spreadsheets\budget.xls")
‘*** Display Number of Worksheets in Budget.xls
Msgbox xl.Worksheets.Count
‘*** Release Object References (Decrementing Usage Counter)
Set xl = Nothing
Set x2 = Nothing
When we added an ActiveX control to the form, VB automatically added the event handler stubs to the development environment of the form and passed the events raised by the control to the client application. ActiveX code components can do this as well, but only if they are declared in the Declarations section of the module using the WithEvents keyword. This keyword cannot be used unless the variable is declared using early binding techniques. Here is an example using the WithEvents keyword with the Access Data Objects component (note the event handler stubs are available in the VB IDE after declaring the AdoRS variable in Figure 6-8):
‘Declarations Section
‘--------------------
‘
‘*** Create an Object Reference variable such
‘*** that events are generated in Visual Basic
‘*** from the object.
Dim WithEvents AdoRS as ADODB.Recordset
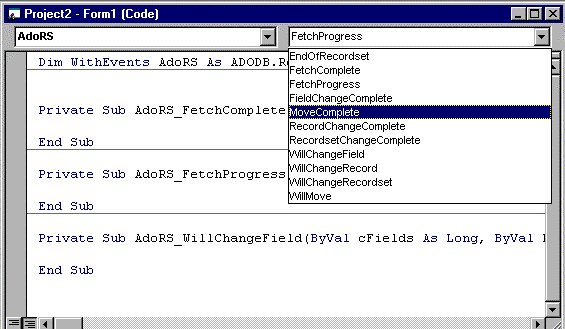
Figure 8: By using the WithEvents keyword to declare the ADO Recordset object, the events are added to the VB IDE
The last step in using a component is to release the resources associated with the component’s objects when you are done using them. Although the objects will be released when the variable goes out of scope, it is a better idea to explicitly release the object by setting it to the constant Nothing. This is especially true if, after you are done with an object, there is more code that will need to execute before the variable referencing the object goes out of scope. Here is an example of releasing an object reference:
Set AdoRS = Nothing
A word of warning: because variables that reference objects are only pointers to the objects themselves, it is possible to set two variables that point to the same object. Because of this, COM uses reference counting to determine how many variables are still pointing to an object in memory. The object itself cannot be destroyed until the reference counter hits zero . The following code segment demonstrates this behavior.
Dim AdoRS as ADODB.Recordset
Dim AdoRS2 as ADODB.Recordset
‘*** Object is created and reference counter is set to 1
Set AdoRS = NEW ADODB.Recordset
‘*** ADORS2 now points to the same object as ADORS
‘*** and Reference count is incremented to 2
Set ADORS2 = ADORS
‘*** Frees the memory associated with pointing
‘*** to the object and decrements the reference counter to 1
‘*** Object is not destroyed because ADORS2 still references it!
Set ADORS = Nothing
‘*** Frees the memory associated with pointing
‘*** to the object and decrements the reference counter to 0
‘*** Object is now destroyed since no variables reference it.
Set ADORS2 = Nothing
It won’t be long before your development machine is brimming with ActiveX controls and components. With just a basic installation of VB you will find that you have dozens of these components preinstalled on your system. Add to this the fact that you can download, purchase, and (using the techniques in the next chapter) even create them yourself. This propagation of components on your machine can quickly make it a hassle to keep up with all of them, much less know how to use them all. Microsoft has given us the Visual Component Manager and the Object Browser to tame this mess.
Microsoft has been pushing the idea for some time that we should all be developing in components. With the introduction of the Visual Component Manager in VB version 6, Microsoft has finally given you a tool for keeping track of all these components you are creating and/or installing on your development machines. The Visual Component Manager (pictured in Figure 6-9) was added to tackle the problem of managing a large number of separate components in an application. It provides a way to find the needed components when the time comes to reuse them in your applications.
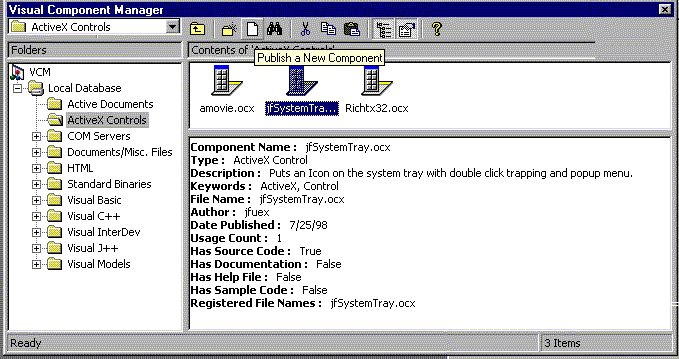 Figure 9: The Visual Component
Manager is one of the new features in VB 6
Built on the Microsoft Repository technology, the Visual Component Manager allows you to publish components to a repository-based catalog, where they can easily be located, inspected, retrieved, and reused.
Publishing a component to the Visual Component Manager stores it along with some basic fielded information and keywords into a Microsoft Repository database. The database can be stored locally in a Jet database, or on the server in a Microsoft SQL Server database. The components can be searched and retrieved for use in other projects by any developer with access to the Repository database. The steps for publishing a component to the Repository are outlined below:
Using the Visual Component Manager you can search for a particular component by component name, type, description, keywords, or annotations. With full text search capability, you can find components even if you don’t know the exact component name. To search for a component:
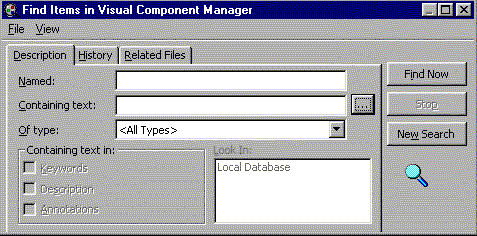
Figure 10: Use the Find Items in Visual Component Manager dialog box to locate a specific component
Once you have found the component that you want to use in your project you can register it on your machine and add it to the project using by simply clicking Add to my Project on the component’s shortcut menu in Visual Component Manager. If a component has multiple files associated with it, they are added to the project along with the primary component file. For components stored in the Repository, you can use this process instead of using the Components and References dialog boxes for adding ActiveX controls or components to a VB Project.
The Object Browser dialog box can be used as a quick reference for the type libraries
that have been added to your project. It provides a searchable listing of class
descriptions, including constants, properties, and methods associated with each type
library. For each property or method, the calling conventions appear in the lower section
of the dialog box when selected and, if the author of the component was thoughtful enough
to provide it, each member item will have a short description of what its purpose is. This
tool will save you a lot of trips to the reference manuals, and it is a lot easier to use
than online help files . In Figure 6-11, I used the Object Browser to search for and find
the purpose of the Filename property of the Rich Text control. 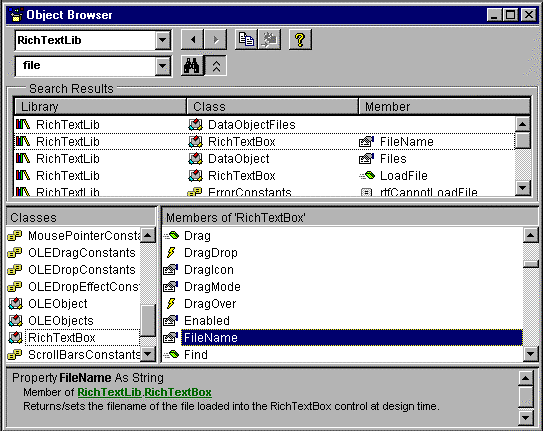
Figure 11: The Object Browser is displayed by either by selecting View | Object Browser or by pressing the F2 shortcut key
Before a component can be used in your application it will need to be registered in the Windows Registry. Registering a component refers to the process of making entries into the Registry that specify where a COM component is and indexing it by a unique identifier. When an ActiveX component is compiled, it is assigned a ClassId that is represented as a GUID (globally unique identifier), which is stored as a 128-bit number that is guaranteed to be unique across time and space. What this means is that no matter how many components humans can create, we can be assured that each one of them has a unique number identifying it. The ClassID is used by the client application to request a particular object from COM, which looks the number up in the system Registry and uses the path stored there to find and create the component. Effectively, all the client application knows about the component is its ClassID, the rest of the information on that component is obtained by talking directly to the component through the standard interfaces outlined by COM. The ClassID is made available to the project when a reference to its type library is added to the project using either the References or Components dialog boxes.
For calls that use late binding, as you may recall, a type library reference is not required. In this situation, VB uses another Registry entry called an AppID. An AppID is stored in the Registry using the same human readable name that is used with the CreateObject and GetObject calls, for example Excel.Application is the AppID for the Excel Application root object. This AppID entry in the Registry is just another layer of indirection that allows the client to look up the ClassID of the component by referencing a more friendly name .
There are two primary methods available in VB to register a component. You have already seen that this can be done automatically by the Visual Component Manager, but it can also be done manually. The type of component (In-Process/Out-of-Process) determines how this is accomplished.
In process components are registered using the Regsvr32.EXE file that is located in the \Windows\System directory. In truth, all ActiveX components must provide an interface by which they can register and unregister themselves. The only thing the Regsvr32.EXE utility does is call that interface of the component .
To register ActiveX components Component.DLL and Control.OCX the syntax is:
Regsvr32 Component.DLL
Regsvr32 Control.OCX
To unregister the same components, the syntax is:
Regsvr32 /u Component.DLL
Regsvr32 /u Control.OCX
Registering EXE-type ActiveX components is even simpler. All you need to do is run the EXE file and the component will register itself automatically. When registering these components you will normally only be notified if the component fails to register. That is, if you receive no message, it means that it registered normally . Exam Watch: Once you have registered a component in Windows, the location to which it is registered follows the file when you move it around your hard disk. I have seen questions about whether this feature exists on more than one of the MCSD exams. One "gotcha" regarding this feature is that when you delete components, they can remain registered in the Recycle Bin directory. This can lead to confusing bugs in VB, so be sure when deleting registered components to delete them completely from the system or unregister them.
In Exercise 6-1 I will demonstrate how you can use ActiveX controls to add powerful functionality with very little effort to a VB application. This exercise demonstrates how to use the Rich Text Box and Common Dialog controls to create a simple text editor similar to Notepad that comes with Windows.
Exercise 6-1: Using ActiveX Controls
Item |
Name |
| File | mnuFile |
| Open | mnuFileOpen |
Save |
mnuFileSave |
| Exit | mnuFileExit |
Private Sub mnuFileExit_Click()
'Unload the main form closing the application
Unload Me
End Sub
Private Sub mnuFileOpen_Click()
'*** Set properties of common Dialog Control
CommonDialog1.DialogTitle = "Open Text"
CommonDialog1.CancelError = False
'*** Display the open Dialog
CommonDialog1.ShowOpen
If CommonDialog1.FileName <> vbNullString Then
RichTextBox1.FileName = CommonDialog1.FileName
End If
End Sub
Private Sub mnuFileSave_Click()
'*** Set properties of common Dialog Control
CommonDialog1.DialogTitle = "Save Text"
CommonDialog1.CancelError = False
'*** Display the Save Dialog
CommonDialog1.ShowSave
'*** If a filename was selected, save the file
If CommonDialog1.FileName <> vbNullString Then
RichTextBox1.SaveFile CommonDialog1.FileName
End If
End Sub
10. Add the following code to the Resize event of the form to make the Rich Text box stretch and shrink to hug the edges of the form.
Private Sub Form_Resize()
On Error Resume Next
'Size the Rich Textbox to use the whole form
RichTextBox1.Left = 0
RichTextBox1.Top = 0
RichTextBox1.Width = ScaleWidth
RichTextBox1.Height = ScaleHeight
End Sub
That’s it! If you compile and run your application you will have a basic text editor as shown in Figure 6-12. It works a lot like Notepad, and even has some features that Notepad does not. For example, you will find that unlike Notepad, this application will open and save RTF documents and accept items dragged and dropped onto the text window. The best part is that you didn’t have to deal with the complexities of making a scrollable window, parsing RTF files, or designing a dialog box to select filenames for saving and loading files. You were left to deal with how the text editor and common dialog box elements work within the framework of your application.
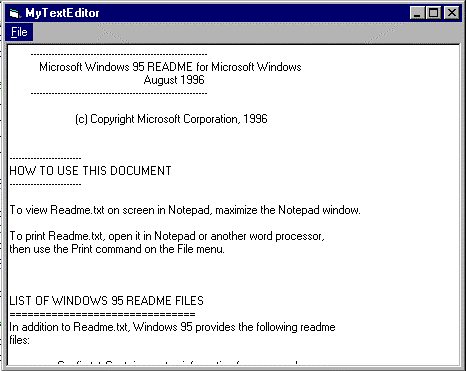
Figure 12: The MyTextEditor App
In Exercise 6-2, we will take the MyTextEditor application we created in Exercise 6-1 and extend it using the Outlook ActiveX code component. You will need to have completed the previous exercise and have Microsoft Outlook (any version) installed on your system to perform this exercise. As you may know, there are just around a zillion text editors available today. In order to add some zip to our application, let’s specialize this text editor so that it can be used to write letters to your mother.
Exercise 6-2: Using ActiveX Code Components
Item |
Name |
| Send To Mom | mnuFileSendToMom |
Private Sub mnuFileSendToMom_Click()
‘*** Declare variable to hold the reference to outlook and Mail Item
‘*** Note: These Declarations use early binding.
Dim olApp As Outlook.Application
Dim olMail As Outlook.MailItem
‘*** Create a new instance of the Application Object
‘*** Note: This is an externally creatable object.
Set olApp = New Outlook.Application
‘*** Create a new mail Item Object by calling the CreateItem Method
‘*** of the Outlook Application object.
‘*** Note: This is a dependant object.
Set olMessage = olApp.CreateItem(olMailItem)
‘*** Set the properties of the Mail Item Object
‘*** Insert Mom’s E-mail Address here.
olMail.To = "mother@florida.com"
olMail.Subject = "Another Letter"
olMail.Body = RichTextBox1.Text
‘*** Send the Message using the Send Method of the Mail Item Object.
olMail.Send
‘*** Release the Objects References (Decrementing reference counters)
Set olMail = Nothing
Set olApp = Nothing
End Sub
Microsoft’s solution to interoperatability of binary components written in multiple languages, including VB, is known as the component object model (COM). This document- or component-centric focus is taking over the development universe. COM was designed to address four basic problems with component-based systems. Interoperability deals with the basic ability of components written by separate vendors to work together efficiently. Versioning is a concern addressing the ability to update individual components without disturbing the functionality of independent components. Language independence references the concerns of calling functions across components written in different languages. Transport remoting involves communication between components independent of the process, or even the computer on which the component process is running.
VB 6 can be used to create COM-based DLLs that encapsulate business services, addressing the middle layer in Microsoft’s Solution Framework for n-tier application development. VB can create COM components as executable files (EXEs), or DLLs. Integration with Microsoft Transaction Server requires COM components be written as DLLs.
DLLs are In-Process, sharing the same memory space as the container application. EXEs are Out-of-Process components, using their own separate memory space from the container application. COM, or ActiveX, DLLs running In-Process are faster, but risk failing the entire host process on failure. COM, or ActiveX, EXEs are slower, but limit failures to the EXE process only. COM EXEs, written with the VB ActiveX application project, require a process known as marshaling, which entails processing the packaging and sending of COM interface parameters across process boundaries.
COM components entail the creation of VB class modules. A class module serves as a template for creating COM objects at runtime by creating instances of a class. COM components may involve more than one class.
Class modules involve only two built-in events, Initialize and Terminate. Methods are added to a class, and hence to any objects created at runtime via instantiation of the class, by adding public sub and function procedures.
Using COM objects require registration on a system. Registration may be accomplished by a setup program, compiling a DLL in VB, or using REGSVR32.ESE with the appropriate command-line parameters. Adding a COM component to MTS will result in automatic registration of the component on the server on which MTS is running.
For the exam, remember the differences between In-Process and Out-of-Process, how to export a method from a class module, registration methods, and testing procedures for debugging COM DLLs.
— By Michael Lane Thomas, MCSE+I, MCSD, MCT, A+
ActiveX components are COM-based components built on Microsoft’s OLE technology. When using ActiveX components the component that is providing functionality is called the server or OLE server and the application or component that is using the services of another component is called the client. An OLE server can run either In-Process (OCX, DLL) or Out-of-Process (EXE) applications. In-Process servers run faster than Out-of Process servers. This is because the client does not have to make calls across process boundaries to access the methods and properties of the component. Components must be registered on the system they are used on to allow the client application to look up the component by its globally unique identifier (GUID) in the Windows Registry.
To use an ActiveX control, use the following steps: add a reference to the project using the Components dialog box, add the control to your form from the Toolbox, add code to the event handlers for the control, and finally, add code to use the properties and methods exposed by the control. You can use the Object Browser as a quick reference to the functionality that the control supports.
To use an ActiveX code component, use the following steps. add a reference to the project using the References dialog box or the Visual Component Manager. Declare a variable to hold a pointer to the object. Use the WithEvents keyword if you want to trap the events raised by the object. Use early binding whenever possible for faster performance. If the component does not provide a type library, you will have to use the late binding method. Create an instance, or instantiate, the object. Call the properties and methods of the object. You can use the Object Browser as a quick reference to the functionality that the component supports. Release the object by setting it to the constant Nothing.
The following Self Test questions will help you measure your understanding of the material presented in this chapter. Read all the choices carefully, as there may be more than one correct answer. Choose all correct answers for each question.