Building COM Components
*Certification Objectives
*Introduction to Building COM Components
*Creating COM Components
*ActiveX Component Project Types
*Types of ActiveX Components
*In-process (DLL) vs. Out-of-Process (EXE) Components
*Selecting the Type of Component
*Instancing
*Private Instancing
*PublicNotCreatable Instancing
*MultiUse Instancing
*SingleUse Instancing
*GlobalMultiUse/GlobalSingleUse Instancing
*Versioning
*Setting Version Compatibility Options
*When to Use Version Compatibility Options
*From the Classroom
*Implementing COM with Visual Basic
*Making Your Component User-Friendly
*Custom Enumerated Types
*Setting Interface Properties and Descriptions (Procedure Attributes Dialog Box)
*Creating an Enumerator for Your Collection Objects
*Error Handling in Components
*Stupid COM Tricks
*Asynchronous Processing in Visual Basic
*Asynchronous Notifications Using Call-Back Methods
*Providing an Asynchronous Notification Event
*Bundling Data to Improve Performance in Out-of-Process Components
*Designing an Object Model
*Root Objects
*Getting References to Dependent Objects
*Dealing with Circular References
*Debugging COM Components
*Debugging an In-Process Component
*Debugging an Out-of-Process Component
*Debugging an ActiveX Document Component
*Implementing Business Logic in COM Components
*Creating Business Objects
*Certification Summary
*Two-Minute Drill
*Self Test
*
In Chapter 5 you learned to create classes as templates for objects to be reused within your application. It is important that you feel comfortable with these procedures before continuing with this chapter, because COM components are simply classes compiled into external objects that can be reused between applications. In this chapter I am going to expand on the topic of building classes and discuss how to compile them into ActiveX COM components. For this reason, if you feel a little shaky on classes, please review Chapter 5 before attempting to work through this chapter.
The key to building a COM component that is easy to use in a client application and is able to retain compatibility through multiple versions of the component is planning. Keep in mind that the idea behind COM is reusability. If you design a component with an interface that is confusing or limiting, you (or the developer using the component) may be stuck working with this interface over and over. Worse yet, because of COM versioning rules, you may not be able to fix or update the interface to the component in a very graceful way if you want the component to remain compatible with clients using previous versions.
Creating the actual component in most cases is not very different than creating classes as described in the previous chapter. I am assuming that you are already familiar with this process and I will focus on the issues that come up when building classes that are going to be compiled as external components. Let’s start by talking about the types of ActiveX components you can create in Visual Basic.
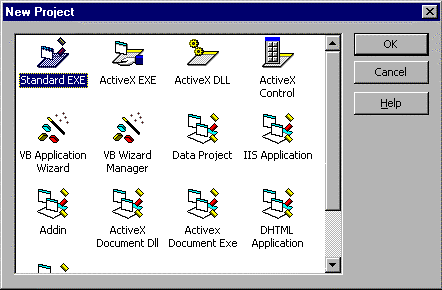
As soon as you start a new project in VB, you are prompted with the dialog box pictured in Figure 7-1 asking you to select a project type. In this chapter I will be talking about the ActiveX project types (with the exception of ActiveX controls, which are complicated enough to get their own chapter later in this guide).

Figure 1: New Project dialog box (note the ActiveX component project types)
When selecting a component type to build, you need to answer two main questions:
The answer to the first question will tell you what major category of control you will need to use, that is, ActiveX control, ActiveX code component, or ActiveX document. The second question will determine whether the DLL or EXE subtype is more in line with the functional requirements of the component you are designing.
There are five types of ActiveX components shown in the New Project dialog box. They can be categorized into the three major types:
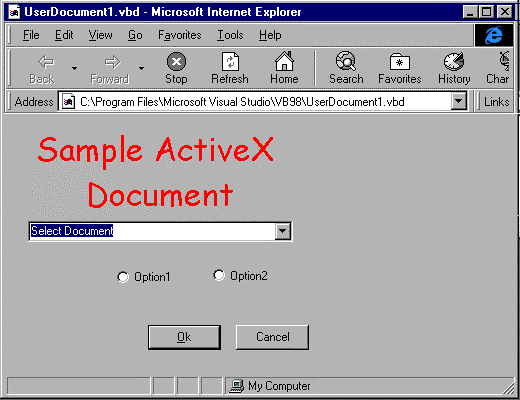
Figure 2: An example of an ActiveX document loaded in Internet Explorer
For ActiveX code components and ActiveX documents you can create the component as either a DLL or an EXE file. The primary distinction between these component subtypes is how they are loaded into memory when used by a client (see Table 7-1). DLL components are created in the client applications process space (in-process) and EXE-type components are created in their own process space (out-of-process). ActiveX controls don’t give you a choice in this matter, they can only be compiled as in-process OCX files.
| Component Type | In-Process |
Out-of-Process |
| ActiveX Control | ü |
|
| ActiveX DLL Code Component | ü |
|
| ActiveX EXE Code Component | ü |
|
| ActiveX Document DLL | ü |
|
| ActiveX Document EXE | ü |
Table 1: A sure Sign that a Component Runs Out-of-Process is the .EXE Extension
When I talk about a process, I am referring to an area in memory allocated by the operating system to a particular application. In the Windows implementation of multitasking, each application is compartmentalized into processes. Effectively, each process serves as a virtual computer created for a particular application. In this model, each application can act as if it has the entire machine to itself. Behind the scenes, Windows intercepts all of the requests for memory, hardware devices, and processor time from each process, prioritizes them, and passes them on to the actual hardware.
When I talk about a component running in-process I mean that it is loaded into the same virtual computer space as the client that is using it. By contrast, an out-of-process component gets its own virtual computer and might as well be operating on a separate machine (and sometimes is) as far as the client is concerned. Because of this, out-of-process servers must talk to the client application across process boundaries using a process called marshalling. For this reason, out-of-process components are sometimes referred to as cross-process components.
Now that you understand some of the underlying technical details of where a component runs and what it means to run in one process or another, why should you care? You should care because there are costs and benefits to both models that can make a real difference in the ways your component can be used and how it performs. Here are the key points:
While the EXE/DLL decision is commonly based on whether the in-process or out-of-process loading method is more appropriate, there is a situation in which you would want to select the EXE component type when using ActiveX code components. This is when you want the component to act as an application server. An application server is a component with a dual identity. It can be run like any standard EXE-type application, but can also be used by a client as an OLE server. DLL-type components cannot be used in this fashion.
Exam Watch: Be sure you know which types of components are created in-process and which are created out-of-process. The VB exams always have questions about this in one form or another. Remember: EXE = out-of-process; DLL and OCX = in-process.
Here are some sample scenarios with regard to selecting an ActiveX Project Type:
Begin Q&A
| I want a component that will run inside of Microsoft Word. | ActiveX documents are the logical choice when your component is going to run inside an OLE container application. | |
| I am developing a component to display a graphs of mathematical functions for use in VB clients. | An ActiveX control is the best choice when you want interface-centric functionality that can be used as a tool to drop onto a form. | |
| I need an application that can run standalone, but also exposes objects programmatically to VB and C++ clients. | ActiveX EXE code components are the only types of components that can be designed to run as application servers. | |
| I want to encapsulate advanced math functions into a component, there will be a lot of information passed between the component and the client, and speed is essential. | ActiveX DLL Code Components run in-process and therefore can pass data back and forth to the application much more quickly than out-of-process components. | |
| I am creating a component that will be used in an Active Server Page Script. The component is bound to be crash prone, and I don’t want it to bring down my Web server with it. | ActiveX EXE components run in another process that can be terminated by the operative system if necessary without affecting the client. | |
The Instancing property is used to designate classes as available to the client (public) or for internal use only (private). For public classes, the instancing property is also used to control how objects are created when requested by a client.
The instancing options for a class are set on the property sheet when the class is selected in the Project Explorer window, as shown in Figure 7-3. Not all instancing options are available to all of the ActiveX component project types, see Table 7-2 for the instancing options available for each project type.Figure 3: Instancing options for each class are set in the Properties dialog box.
| Instancing Setting | ActiveX Control | ActiveX DLL | ActiveX EXE |
| Private | ü |
ü |
ü |
| PublicNotCreatable | ü |
ü |
ü |
| MultiUse | ü |
ü |
ü |
| GlobalMultiUse | ü |
ü |
ü |
| SingleUse | ü |
||
| GlobalSingleUse | ü |
Table 2: Instancing options available vary depending on the type of project
The private instancing option is used to designate a class for internal use in the component only. These classes are not made available to the client.
Classes defined this way cannot be created from the client application, but can be used by the client if they are created from within the component and then passed to the client. Objects created from this type of class are called dependent objects. A common way to give references to these types of objects back to the client is to provide an externally creatable collection class that exposes an Add method that creates a new instance of the dependent object and returns a reference to the object to the client.
This setting is used for externally creatable classes. Externally creatable classes are classes that can be created from outside of the component using the CreateObject method or the New keyword. The "Multi" in MultiUse refers to the fact that a single instance of your component can create multiple instances of classes defined with this instancing option. This type of instancing is makes much more efficient use of memory than the SingleUse method because it only needs one instance of the component for all of the objects created from its classes.
This setting also allows for the creation of externally creatable classes. The only difference between this option and MultiUse is that each instance of the component can only create one instance of the class. Each additional instance of the class that is requested by the client will automatically create another instance of the component. A major benefit of this behavior is that each instance of the class runs on a separate thread of execution that can be independently preemptively multitasked. This behavior also allows objects containing high-risk code to run in an isolated state that will not affect other objects created from the class if it happens to bomb. The downside of using this method is that this type of instancing uses a lot more overhead due to the fact that it must start a separate instance of the component and all of the resources associated with that component for each object that the client requests. This setting is only available for out-of-process (EXE) components and is disabled in other project types.
These settings work just like the MultiUse and SingleUse settings except that you can call the properties and methods of the class as if they were simply global functions in the client. The client does not need to explicitly create an instance of these classes first, because one will automatically be created.
On the Job: The properties and methods of a GlobalMultiUse object are not part of the global name space of the component that provides the object. Within the component itself you must still explicitly create instances of these classes to use the object's properties and methods.
The ability of the functionality of a component to evolve without the need to modify the clients that use the component is a fundamental strength of COM. The versioning capabilities of COM fill this need. Versioning is the capability of a COM component to remain compatible with clients using older versions of the component while allowing the developer of the component to further enhance the component. This works because the only link between a client and the component itself is its ClassID. A ClassID is a unique, 128-bit number used to look up the component using the Windows Registry. As long as the new component still supports the same interfaces as the old version of the component and registers itself under the same ClassId, the client will always get the newest version of the component.
When you are ready to update a component that you have already compiled, it is important to first set the compatibility options so that your component will work successfully with clients using the versions you have previously released. To set the compatibility level for your component, use the Version Compatibility section of the located on the Component tab of the Project Properties dialog box, shown in Figure 7- 4. There are three compatibility options available.
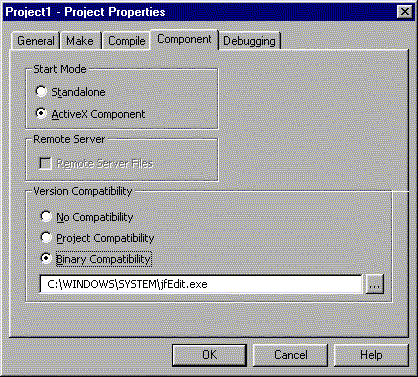
Figure 4: The Component tab of the Properties dialog box is used to set compatibility options for the project
In order to maintain binary compatibility with previous versions of the component, you must not remove or change any of the existing interfaces in the component’s classes. The single exception to this rule is that you are allowed to add optional parameters to an existing interface while still maintaining compatibility. If the compiler detects an incompatibility while compiling with this option set, it will alert you with the warning dialog box shown in Figure 7-5. This dialog box gives you the option to break or preserve compatibility for the class interfaces that have not changed. Selecting the Break Compatibility option will cause the project to be compiled as a brand-new component with a new ClassID. This new component version will no longer support clients using previous versions of that component. If you must break compatibility, it is recommended that you change the name of the project so that the new component will not overwrite previous versions of the component already on the user’s hard disk.
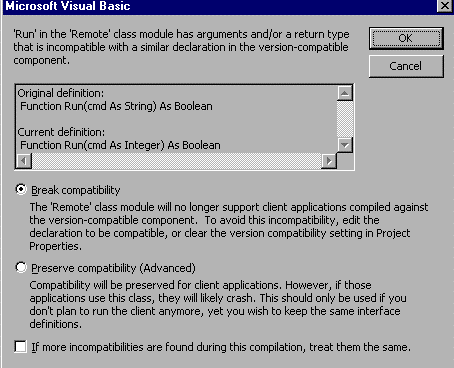
Figure 5: By changing the cmd parameter from a string to an integer, binary compatibility has been broken
Here are some sample scenarios for when to use each of the compatibility options.
Begin Q&A
| While working on a new version I need to make interface changes that will break backward compatibility. | Use the No Compatibility option. Remember to change the filename of your component so that the incompatible version won’t overwrite earlier versions on the users’ hard disks. |
| I am compiling the first version of my component. Consequently, I do not have previous versions of the component to maintain compatibility with. | Use Project Compatibility. However, as soon as you have compiled the component, go back and set the compatibility option so you don’t mistakenly compile an incompatible version of the component the next time you update it. |
| I am updating a component and I want the new version of the component to work seamlessly with the other clients using an older version of the same component already on the user’s machines. | Use Binary Compatibility. |
Many COM component advantages occur through functionality contracts between the component author and consumer or developer. Known as interfaces, these contracts are groups of functions that encapsulate functionality into objects programmatically accessed through the interfaces that are implemented according to the COM standard.
Now this is all well and good, but what does this mean in layman’s terms? Creating a COM component in VB begins by creating an abstract class. This class is used to define the interfaces of the COM components; it provides no actual implementation code of any kind. Additional classes are created actually implement the defined interfaces, using the Implements keyword in your code. COM components can provide polymorphism by exposing different objects with a function of the same name, hence hiding the fact that the function may generate different behaviors. COM components may also involve developing a hierarchy of object within your component. Why would this be desired? A COM component might contain a single object that consists of so many interfaces and functions that dividing the complexity into separate, interdependent objects can significantly reduce the burden of using the component. This entails creating an object model for your component, which may be saved as a TLB or OLB file. The object model may also be saved internally within your ActiveX EXE or DLL compiled binary file.
Regarding the exam, be sure to be familiar with early and late binding, and how it would be implemented in a COM component. Be familiar with the purpose of iUnknown, QueryInterface, and iDispatch. Finally, be aware of the proper syntax for creating and manipulating objects defined within a COM component.
— By Michael Lane Thomas, MCSE+I, MCSD, MCT, A+
In this section I will describe several ways to make components that make life simpler for developers using your component in their client application. Remember, in most cases that developer using your component is you! Remember that this code is supposed to be reusable. It is worth spending a little time now to save yourself a lot of time later.
Enumerated types allow you to use plain text identifiers in place of numbers or complicated parameters in your component. The code below illustrates how to set up the properties in your component to use the IntelliSense technology when using the objects created from your classes. Notice how the list of acceptable values is displayed in the VB IDE when setting the PetType property, as shown in Figure 7-6.
Public Enum PetTypes
Cat = 1
Dog = 2
Fish = 3
Bird = 4
Wumpus = 5
End Enum
Public Property Let PetType(NewPetType as PetTypes)
mPetType = NewPetType
End Property
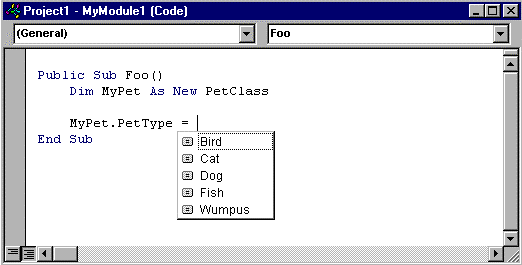
Figure 6: Using enumerated types is a good way to make using your component easier
This does more than just save the user a few keystrokes when writing the client application. It also makes the code much more readable. In this example, it is much more evident what is going on when the enumerated type is used:
‘*** This will work but, but it requires you to look up
‘*** animal number 5 to figure out what is happening in
‘*** this line of code
MyPet.PetType = 5
‘*** Using the enumerated type clears things up
MyPet.PetType = Wumpus
You have already seen how the Procedure Attributes dialog box can be used to set the data binding properties of a class. Now I will revisit this dialog box to show you how the top two-thirds it can be instrumental in making your components easier to use. As you learned in the previous chapter, VB adds type library information to the DLL or EXE file when you compile an ActiveX component. What you may not know is that the Procedure Attributes dialog box (shown in Figure 7-7) allows you to customize the way the class is documented in that type library. This feature of VB allows you to compile documentation right into the components EXE or DLL file. The following options can be set for each member in the classes your component exposes.
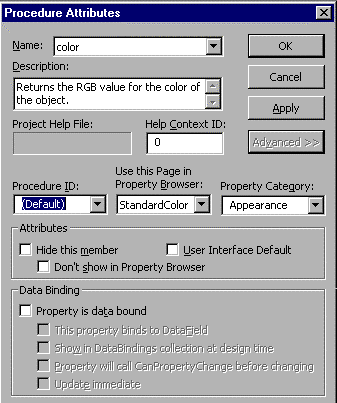
Figure 7: Entering a description in the Procedure Attributes dialog box adds a description to your property or method in the Object Browser dialog box. This can be a big help to developers using your components
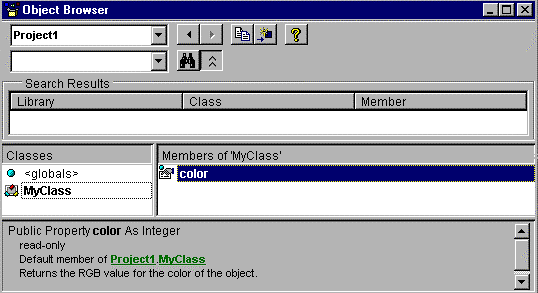
Figure 8: The description from the Procedure Attributes dialog box now appears in the Object Browser dialog box
'*** Both of the following statements retrieve the name property
MyName = ObjPerson.Name
MyName = ObjPerson
There is a hidden feature of the ProcedureID field in the Procedure Attributes dialog box described above. You can set this property to allow a specifically designed property to act as a custom enumerator for collection type objects. Adding an enumerator to a collection object allows you to use VB’s For Each…Next statements to iterate through the items in your collection. To enable this functionality, define a property of your class exactly as shown here:
Public Function NewEnum() As Iunknown

Set NewEnum = mcolPeople.[_NewEnum]

End Function
After creating this property of the collection, open the Procedure Attributes dialog box and type -4 into the ProcedureID field on the Advanced tab. The last step is to select the Hide This Member option on the Procedure Attributes dialog box.
Enabling the For Each…Next functionality for your classes makes them work more like the built-in collection objects that the developers using your components will be used to.
On the Job: The For Each…Next construct also has the additional benefit of being somewhat faster in iterating through a collection than looping through a collection using a For…Next loop using the index property of the collection to retrieve member objects.
The preferred method for dealing with an error in a component is to correct the error silently and continue on normally. Of course, this is not always possible. When an error cannot be dealt with internally, a component should pass the error up the chain to the client using the Raise Method of the Err object. You can use enumerated types to assign meaningful names to the error codes your component uses to make things a little easier on the developer using your component. Here is an example of error handling in a component:
Public Enum WeaponType
RIFLE= 1
SPITWAD = 2
MISSLE = 3
End Enum
Public Enum AnimalType
WOMBAT = 1
BABY_SEAL = 2
ELEPHANT = 3
TIGER = 4
End Enum
Public Enum SAFARI_ERROR_TYPE
SAFARI_ERR_SUCCESS = 0
SAFARI_ERR_INVALID_WEAPON = 1
SAFARI_ERR_OUT_OF_AMMO = 2
Enum
Public Sub Hunt(Animal as AnimalType, Weapon as WeaponType)
‘*** Error Handling
Dim ErrMsg as string
If (Ammunition = 0) then
Select Case Weapon
RIFLE: ErrMsg = ‘Out of Bullets.’
SPITWAD: ErrMsg = ‘Out of spit.’
MISSILE: ErrMsg = ‘Out of Missles.’
End Select
‘*** Send the error up to the client
Err.Raise NUMBER:=SAFARI_ERR_OUT_OF_AMMO,, ErrMsg
Exit sub
End if
End Sub
On the Job: In the previous code segment, I used the error values zero through three for my component. In practice it is probably not a good idea to use these values as you tend to trample on error handling inside the client. It is recommended to add the VB constant vbObjectError to whatever error codes your component uses. This gives a good buffer for the error numbers used by VB and/or the client application.
A client application should only receive errors from the components it calls directly. You should not allow an error to be passed up the chain two levels. It is your component’s responsibility to either deal with the error or translate the error message generated by the subcomponent into one that is meaningful in terms of your component. If the error in the subcomponent contains information that might be useful to the client in handling or debugging the error, it should be incorporated into the error generated by your component. Here is an example of this technique:
Public Function Calculate(ByRef V as Long)
On Error Goto Error_Handler
Dim VC as new Velocity.Calculator
Dim Result as long
Result = VC.GetVelocityCalculation(V)
Exit Function
Error_Handler:
Select Case Err.Number
Case vbObjectError + 1000
'*** Error 1000 means the velocity is negative
'*** Get the absolute value and try again
V = abs(V)
Resume
Case vbObjectError To (vbObjectError + 65536)
‘*** Unanticipated errors Velocity Component.
Err.Raise ERR_VEL_UNK + vbObjectError,, _
‘Error Calculating Velocity’
exit function
End Select
End Function
This section presents some techniques available to you as a VB ActiveX component author. These items are clever tricks (the title of this section notwithstanding) for improving performance and implementing difficult interactions between clients and servers. You might want to note that these techniques have been explicitly mentioned on the list of topics covered by the Visual Basic 6 Desktop Applications Exam.
Normally, only one line of code in a VB program can be executing at a time. This behavior extends to COM objects as well. For example, when you call a method of a COM object, VB waits patiently for the method to finish executing before resuming on the next line of code in the client application. When a component is called in such a way that the component code must run its course before returning control to the client the component code is said to be to blocking or running synchronously.In most cases, this is exactly how you want your program to act. You generally want whatever that method was doing to finish before giving control back to the client because it probably sets the stage for whatever comes after that call in the application. Blocking is caused by the fact that each process can only have one piece of code executing at one time.
When you run an in-process (DLL) component, it is loaded in the process space of the client, thus, the component and the client must share the virtual machine created for the process, and only one piece of code between them can execute at one time. By using out-of-process components you can get around this. As you’ll recall, out-of-process components get their own virtual machine (process) to execute code on, consequently, the component and the client can each receive their own time slices and can effectively run asynchronously. This property of out-of-process components allows the client to make a call to the functionality in a component and go about its business while the component continues to process the request. The component will then notify the client whenever it is done with the task or when a certain state is reached. This asynchronous processing method can be accomplished by one of two methods. These two methods are the call-back method and the event notification method. Both require some coding on both the client and server side of the relationship. In this section I will discuss how to take advantage of this benefit of out-of-process components.
A call-back is just what its name implies. The application makes a call to a function, method, and so on, and goes about its business. When the external function has completed the task, it calls the application back by calling a function in the client designated to answer it. Although Windows programmers have done this for years, this technique is fairly new to VB.
On the component side of the component you must:
Public Sub OpenFileAsynch(Byval iCallBackObject as IFileIONotify)
ICallBackObject.IFileIONotify_FileOpenComplete
On the Job: You can also use the MKTYPLIB utility included in the Tools directory of Visual Studio to create a type library if you are feeling adventurous.
On the client side of the component you must:
Implements IFileIONotify
In this new class re-create all of the properties and methods exactly as defined when creating the type library. This time, however, you actually want to add the code to do whatever these methods are intended to do. These methods and properties will be the ones called when the component calls back, so put code into these routines to do whatever you plan to do when the call-back occurs. Note: You must exactly reproduce all of the members that you put into the interface as defined above. If you don’t need one of the members in this particular application you can always just add the sub or function header with comments inside for the code. Here is an example method that would be called by the callback defined in Step 6 above:
Private Sub IFileIONotify_FileOpenComplete()
MsgBox "File Opened Successfully."
End Sub
At this point the call-back is all set up and ready to use. I realize that these steps are a little complicated so I have included Figure 7-9 to make these steps a little easier to comprehend.
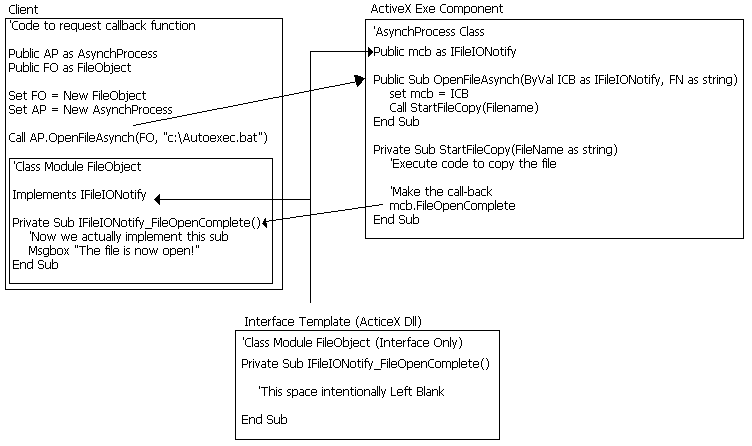
Figure 9: The component uses the type library from the template DLL to determine the calling interface for the callback to the client application
You can also use events in VB to provide notification to the client after the component has completed its task. The benefit of this approach is that events call back the client anonymously. The object just throws the event notification to whichever clients are listening for them. This approach is also much easier to implement. The steps are as follows.
First we set up the component to notify the client of when the requested task is complete or a specific condition arises.
Here is a sample component class module that will start a file copy and return control to the caller, then notify the client via an event when the copy is done.
Public Event FileCopyComplete()
Public Sub CopyFile(FileName as string, NewFileName as string)
'Start File Copy process running asynchronously
StartCopy(FileName, NewFileName)
End Sub
Private Sub CopyFile(FileName as String, NewFileName as string)
'Put code here to actually copy the file
'Notify the client when copy is complete
RaiseEvent FileCopyComplete()
End Sub
Next we will set up the client to tell the component to respond to the events generated by the component.
Here is some sample code to call the component described in the previous example.
Public WithEvents FileCopierObject as clsFileCopy
Public Sub DoFileCopy
'Start File Copy process running asynchronously
Set FileCopierObject = new clsFileCopy
FileCopierObject.CopyFile(FileName,NewFileName)
End Sub
Public Sub FileCopierObject_FileCopyComplete()
MsgBox "Notification: File Copy has been completed."
End Sub
On the Job: Events cannot have named arguments, optional arguments, or ParamArray arguments. If you must use one of these constructs you will have to use the call-back method.
As mentioned earlier in this chapter, making calls to properties and methods can be a fairly slow task when the client and component are not running in the same process. This was one of the factors that would push you away from the out-of-process or EXE-type components when opting for speed in your application. When designing an out-of-process component you can minimize this performance sacrifice with the following technique.
A lot of the overhead required to make calls across process boundaries is not associated with passing the data but with just opening a channel of communications between the two processes. With this in mind, we can minimize the damage by sending the same amount of data in fewer calls to the component’s properties and methods. Take, for instance, the following example:
‘*** Prepare for call to Purchase Ticket
objTicket.Smoking = True
objTicket.Class = TICKET_CLASS_COACH
objTicket.CreditCardNumber = PassengerCardNo$
objTicket.FrequentFlierNo = PassengerFreqFlierNo$
‘*** Purchase the ticket
objTicket.PurchaseTicket
Although this method will certainly work and is perfectly acceptable in terms of good programming practices, notice that the code initiates five calls to the properties/methods of the component. If the Airline component is in a separate process from the client executing the code, each of those calls is very costly. The following code executes the same functionality in a single call to the Ticket object:
‘*** Purchase the ticket
objTicket.PurchaseTicket(Smoking:=True, Class:=TICKETCLASS_COACH,
CreditCardNumber:=PassengerCardNo$, FrequentFlierNo:= PassengerFreqFlierNo$)
A side benefit of using this method is that the programmer using a component designed to use the second method can immediately see what information is necessary to execute PurchaseTicketMethod by looking at the method definition. This is one more example where forward-thinking design can make a big impact on the performance of a component.
The object model of a component is the blueprint for how clients will access the objects exposed by your component. The best implementation of an object model is also usually the simplest one. Navigating complex object models can be not only confusing but it also can take a lot of unnecessary time to dereference all of the objects in the path the object you are working with. Following are some pointers on designing a good object model.
The name of the root object varies depending on the type of component. For example, application servers usually use the name Application for the root object, while in-process components usually use a name that is more indicative of the functionality of the component and that has a name very similar to the name of the type library.
The root object’s function is twofold. Its first job is to pass out dependent objects (instanced as PublicNotCreatable) to the client application as they are requested through properties that are normally defined as collections. Because the root object is usually the gatekeeper for all of the objects lower down in the object model, you almost always want to instance it so that it is externally creatable, that is, use any of the options except Private or PublicNotCreatable. The second job a root object performs is to expose the properties and methods that affect the entire component. For example, if you wanted to allow the client to run the component in Silent mode and suppress all messages normally sent to the user by the component, you might implement a SilentMode property in the root object.
The most common method that root objects expose dependent objects to the client is an Add method. An Add method is exposed by root objects that expose collections of dependent objects. In the add method, the client specifies the parameters for how the new instance of the object should be created. The root object will create the object, add it to a collection that is normally exposed through another property, and return a reference to that object. Here is an example of how this could be coded in a Book object that contains a Pages collection of Page objects:
‘*** This code is contained in the Book Class
‘****Local storage of property value
Private mPages as Pages
Public Property Get Pages as Pages
Pages = mPages
End Property
‘*** This code is exposed in the Pages class
‘****Local storage of property value
Private mPagesCol as Collection
Public Function Add(PageNumber as integer, PageText as string ) as Page
Dim NewPage as Page
NewPage.PageNumber = PageNumber
NewPage.PageText = PageText
mPagesCol.Add NewPage
Set Add = NewPage
End Function
‘This is code in the client used to get a page object
Public Sub DoBookThing
Dim MobyDick as New Book
Dim NewPage as Page
Set NewPage = MobyDick.Pages.Add(1,"Call me Ishmael…")
End Sub
Containment relationships, like the one shown in the example above, allow you to navigate through a hierarchy from a high-level object to any of the objects it contains. Normally these containment relationships flow down the chain with each level containing the level below it. However, this model also allows for objects to be linked to objects higher in the chain as well. The most common form of circular references is the parent property. A parent property is a property used to reference the parent object that contains it. In most cases it is a good idea to avoid structures like this in VB because they violate the rules of encapsulation and can cause problems tearing down the object hierarchy when you are done with it. I will use the Book component to illustrate this point. Say we have created a Book object that contains a Pages property that references a Custom Pages Collection object, which in turn references Individual Page object. At some point in our program after we have been using this object model in our library program we destroy the object by setting the Book object to Nothing. Here is the sequence of events:
Now let’s see what happens when we add a parent property to the Pages collection that points back to the Book object that contains it.
If you must set up parent properties, the best way to avoid the above problem is by explicitly setting the parent property to Nothing before destroying the parent object. Here is an example:
‘**** Clear the parental reference
Set MyBook.Pages.Parent = Nothing
‘****Now it is safe to destroy the parent reference.
Set MyBook = Nothing
A component’s external nature requires special techniques to debug the object. Here is some guidance on how to successfully test and debug an ActiveX component.
To debug an in-process component you will need to create a client to test the component because a component cannot run on its own. To set up a client to test your application:
On the Job: In-process components will not unload while running in the development environment, even if all references to objects are released by the test project, and all other component shutdown conditions are met. The only way to test DLL unloading behavior is with the compiled component.
Out-of-process means the component is running in a separate process from the client application. Therefore you need to run your test program in a separate process. This means starting a separate instance of the VB.
To test an out-of-process component:
An ActiveX document component is yet another special case for debugging components. Because these projects run only in OLE container applications that support ActiveX documents like Word or Internet Explorer, they can not normally be embedded in a VB client application. This means that you will not be able to use either the in-process or out-of-process debugging methods described above on these components.
Don’t be discouraged here—you can still use all the tools available in VB such as setting breakpoints, watching variables, using debug statements, and so on when debugging ActiveX documents, but you will need to use the Internet as the test client. Set the project so that it starts in Internet Explorer for debugging by selecting the Start Component radio button on the Debugging tab of the Project Properties dialog box, shown in Figure 7-10.
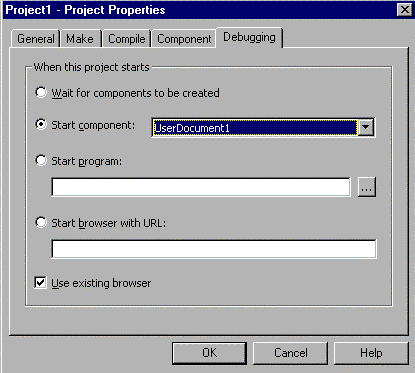
Figure 10: If you have more than one UserDocument in your component you can specify which one you want to debug on the Debugging tab of the Project Properties dialog box
At this point you should be able to debug the ActiveX document using Internet Explorer as the test client. If you need to put an ActiveX document in Break mode while it is running in Internet Explorer, press Ctrl-Break. Also, because the container that hosts the ActiveX document is using the objects that the ActiveX document provides, Internet Explorer may throw a bunch of errors if you stop the project while the document is being displayed. To avoid this, close Internet Explorer before pressing the Stop button in VB.
The modular nature of COM components and the ability to use DCOM to seamlessly run components on separate machines makes them a good choice for implementing multitiered applications. A multitiered application is simply an application that has its functionality broken out into components that are each tasked with a particular aspect of using the application. For example, in the most common two-tier model is a server-side database. The database application is broken down into two pieces: the client piece, which presents the information to the user and collects information from the user, and the server piece, which receives requests from the client, executes them against its data, and returns the result to the client.
The main benefit in this type of client/server model is that the code executing against the data is run on a machine much closer to the data. Consequently it can search the database more quickly, without the bottleneck of going over the wire to the network disk. Also, less network traffic is introduced because only the answer is returned, not the entire database for parsing by the application running on the local machine. Yet another benefit of this approach is that when you need to increase database performance you only need to upgrade the server machine rather than every workstation running the client.
This model worked so well that programmers kept finding ways to add levels (or tiers) to this structure. It is now very common to hear about a third tier in the mix called a business logic or business services layer. The purpose of this layer is primarily to ensure that the data moving into the database has been checked and or massaged to fit into the database so that the business rules are enforced and data integrity is maintained. In this model the business logic component acts as a translator of sorts for the data. By distributing the load over three components, we can split the processing onto yet a third machine, further improving performance in some cases. Although it is common for multitier architectures to split each tier onto a separate machine, this is not necessary. Many times this is done to make a logical service more componentized and easier to swap out should the need arise.
Creating a middle layer is all about defining a good object model that resembles the data your application uses. The first step is to define the objects that your system will expose. These objects could represent employees, invoices, or orders, for example. At this stage it is a good idea to put down the computer manuals, forget programming for a while, and think about your task in real-world terms. Answer the following questions about your data:
After answering these questions, an object model will begin to emerge. Fine-tune this model as you go working through different scenarios of working with the objects you are defining. I would highly recommend modeling these structures on paper before attempting to code them. It is very easy to get started on the wrong track with object models to the point where you have invested too much time to go back and correct the model. I have said it before and I will say it again—planning may seem time-consuming up front, but not planning is twice as time-consuming later in the application’s life cycle.
Let’s put these new skills to use and build an ActiveX document that functions as a mortgage calculator that could be used on a Web page for a mortgage brokering company.
Exercise 7-1 Creating an ActiveX Document
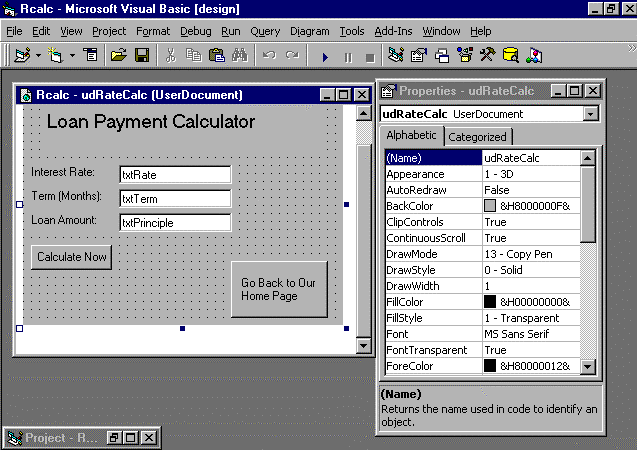
Figure 11: Your UserDocument should look like this when you have completed Step 4
Private Sub cmdCalculate_Click()
Dim Payment As Currency
Dim Term as double
Dim MonthlyRate as double
Dim Principle as Currency
‘Divide the Rate by 12 to get the monthly rate
Let MonthlyRate = cDbl(txtRate/100)/ 12
‘Convert the Term and Principle values to Doubles for call to PMT
Let Term = cDbl(txtTerm)
Let Principle = cDbl(txtTerm)
‘Don’t forget those seldom used VBA functions
Let Payment = Pmt(MonthlyRate, Term, Principle)
‘Tell the user the damage
MsgBox "Your monthly payment would be " & CCur(Abs(Payment))
End Sub
Private Sub cmdGoHome_Click()
‘Send the user off to whatever website you designate
UserDocument.Hyperlink.NavigateTo "http://www.microsoft.com"
End Sub
This chapter has covered a lot of material. I have discussed how to design your components to make the most efficient use of the resources on the client machine by selecting the proper component type, subtype, and instancing properties. You should have also picked up several new techniques that will make the component more accessible to the developer using it by using a sound object model and taking advantage of some of the built in features associated with class modules in VB. Hopefully the special attention I paid to the gotchas of component and class will help you avoid making costly mistakes in your components like breaking compatibility or creating circular references that can be very difficult to debug. Remember, above all, planning is the key to developing good components.
The following Self-Test questions will help you measure your understanding of the material presented in this chapter. Read all the choices carefully, as there may be more than one correct answer. Choose all correct answers for each question.
Dim V as variant
V = MyObject